

Fusion U-tip extensions are a long-lasting way to add volume and length to your hair. These keratin-based extensions are applied strand-by-strand using heat, creating a natural look that blends seamlessly with your hair. While professional application is recommended, you can achieve great results at home with the right tools, products, and careful technique. Here's a quick summary of the process:
- Tools Needed: Fusion heat wand, tail comb, sectioning clips, scalp shield, heat-resistant finger protectors, and a detangling brush.
- Hair Extensions: Use double-drawn Russian or Mongolian U-tip extensions for durability and thickness.
- Hair Prep: Wash your hair with clarifying shampoo and avoid oils or conditioners to help the keratin bond adhere properly.
-
Steps:
- Section hair into clean, horizontal rows.
- Position the U-tip extension under a matchstick-thin strand of natural hair, leaving 1 cm from the scalp.
- Use a fusion heat wand to melt the keratin and roll it into a secure bond.
- Test each bond for movement and comfort.
- Blend and style your extensions for a polished finish.
Proper care, like brushing twice daily and avoiding products with sulphates or alcohol, will help your extensions last 3–6 months. For best results, invest in high-quality extensions and tools.
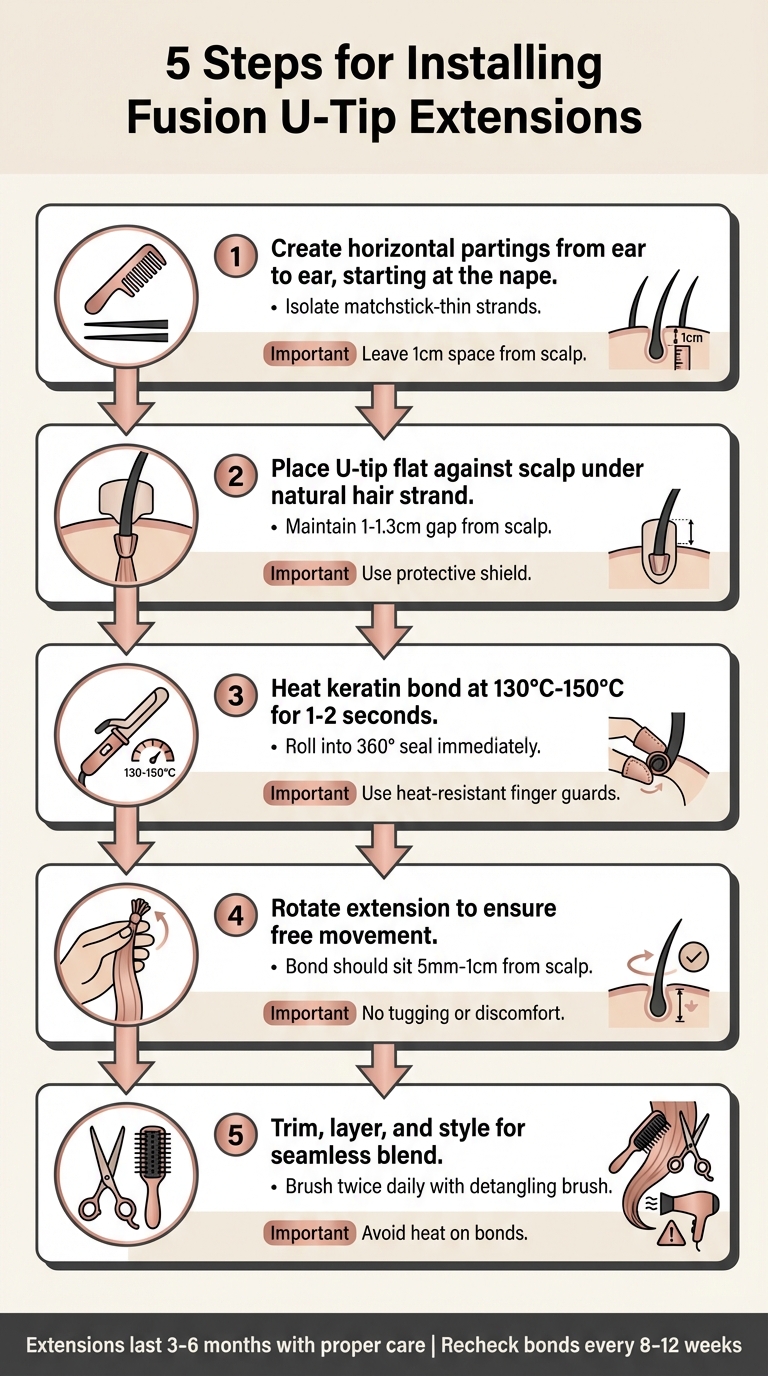
5-Step Process for Installing Fusion U-Tip Hair Extensions
how to install U-TIP hair extensions on yourself
Once installed, you'll need to blend extensions with natural hair to ensure a seamless, professional finish.
sbb-itb-dcde78e
Tools and Materials Needed
To achieve a polished and professional look, having the right tools and materials is essential. Here's what you'll need for fusion bonding, along with premium-quality extensions.
Hair Extensions
Start with double-drawn Russian or Mongolian U-tip extensions. Double-drawn extensions ensure that the hair remains thick from root to tip, unlike lower-quality options that tend to thin out at the ends. These high-grade extensions can last 1 to 2 years with proper care. For full coverage, you'll need 150–200 strands, while adding 100–150 strands is enough to boost volume. Investing in premium extensions not only enhances the final look but also ensures durability.
Required Tools
To secure the extensions, you'll need a fusion heat wand (heat connector iron) to melt the keratin tips. A tail comb is indispensable for creating precise, horizontal partings, while sectioning clips help keep the hair organised as you work, starting from the nape and moving upwards. For safety, use a scalp shield, a heat-resistant disc that protects your skin and isolates each strand during application. Additionally, heat-resistant finger protectors are useful during the "roll and press" phase, allowing you to shape the melted keratin without risking burns. Once the extensions are installed, a detangling brush – like Hair Wonderland's Tangle Tamer Brush ($21.95) – is essential for blending and maintaining the extensions daily.
Hair Care Products
Before you begin, wash your hair thoroughly with a clarifying shampoo to remove oils and residues, which helps the keratin bonds adhere securely to your natural hair. During the installation process, apply a heat protectant to shield both your natural hair and the extensions from thermal damage. Knowing how to safely heat style hair extensions is crucial when using high-temperature tools. Hair Wonderland's Moisture Magic ($39.95) is specially formulated for extensions and even includes a 6-week warranty when used as directed. For ongoing care, avoid products containing protein, keratin, sulphates, or high alcohol content, as these can weaken the bonds and make the extensions difficult to manage after just one use.
With these tools, extensions, and products ready, you're all set to begin the installation process, starting with sectioning your hair.
Step 1: Section the Hair
Start at the nape of the neck by creating a clean horizontal parting from ear to ear using a tail comb. This initial row acts as your base - clip the rest of the hair above it to keep it out of the way as you work upward.
Within this bottom row, isolate individual strands of natural hair for accurate bonding. Each strand should be about the thickness of a matchstick - this ensures it aligns with the size of your U-tip extension strand. Strands that are too thick or too thin can lead to poor adhesion or place unnecessary stress on your natural hair. Use the pointed end of your tail comb to separate each strand neatly, making sure not to tangle or overlap with neighbouring strands, as these "cross-hairs" can cause discomfort and even breakage down the line.
As you move upward, continue creating horizontal rows and stagger each strand placement. This method avoids creating visible lines and ensures the extensions fall naturally. Always leave about 1cm of space between each bond and your scalp, allowing for natural movement and minimising irritation and scalp itch.
Step 2: Position the Extension
After isolating your natural hair strand, place the U-tip extension directly under the isolated section. The extension should lie flat against your scalp, with the U-shaped keratin bond gently cradling your natural hair from below. Imagine tucking your natural hair into the groove of the keratin bond - this ensures a secure fusion when heat is applied.
One key detail to focus on is the distance from your scalp. Make sure to maintain a gap of 1 cm to 1.3 cm between the keratin bond and your scalp. This small space allows your hair to move naturally, reduces tension on the roots, and keeps the bonds discreet, even when styling your hair. As Hibiscus Hair advises:
Installing too close can cause common hair extension problems like tension, scalp irritation, and difficulty brushing. Always leave a 1 cm space between the bond and your scalp to allow natural hair movement and airflow.
Next, use a protective shield to prepare for heat application. Before applying heat, thread the natural hair through the shield. This tool has two important functions: it isolates the strand to prevent stray hairs from sticking to the keratin and shields your scalp from the heat of the fusion tool. Position the shield close to your scalp, pulling the natural hair through so it sits snugly in the U-shaped bond.
Both the natural hair and the extension should be matchstick-thin. Any deviation from this width could result in improper bonding or place undue strain on delicate hair. Additionally, ensure the hair is completely dry and free of oils or conditioners, as residue can prevent the keratin bond from adhering properly.
Keep a firm grip on both the natural hair and the extension to hold them in alignment. The natural hair should rest securely within the U-groove, ready for the next step: heat fusion. This steady hold is crucial to prevent any shifting and ensures a seamless bond.
Step 3: Apply Heat to Fuse
Once your extension is positioned correctly, it's time to secure the keratin bond with heat. Make sure your extension is in place, and the shield is protecting the natural hair. Set your fusion tool to a temperature between 130°C and 150°C. As Hibiscus Hair advises:
Set your fusion tool to the appropriate temperature (usually around 130°C to 150°C). Too hot, and you risk damaging both the extensions and your client's natural hair; too cold, and the bond won't hold.
Carefully apply the heat tool to the U-tip, ensuring it doesn't touch the natural hair directly. Within 1–2 seconds, the keratin will soften and become translucent. At this point, remove the tool and immediately roll the softened bond using heat-resistant finger guards. Roll it firmly but gently into a 360° seal. This step is essential to eliminate any air pockets and create a smooth, flat bond before the keratin hardens. Always keep the natural hair shielded to avoid accidental burns.
Once the bond is formed, hold it steady for a few seconds to let it cool completely. This cooling phase is crucial for ensuring the bond lasts anywhere from 3 to 6 months. And don’t forget - protect your fingers throughout the process since melted keratin can be extremely hot and cause burns.
Step 4: Test the Bond
Once the keratin has cooled, it’s time to test the bond. Gently rotate the extension to ensure it moves freely without tugging on the roots of your natural hair.
For the extension to move naturally, the bond should sit about 5 mm to 1 cm away from the scalp. This spacing allows for comfort and natural movement.
If the bond feels too tight or doesn’t rotate easily, it may be positioned too close to the scalp. Avoid pulling on the extension - use a keratin bond remover and flat-tip pliers to safely adjust it to the correct distance. On the other hand, if the bond feels loose or slides, reheat the keratin, reposition it, and carefully re-roll it to secure it in place.
A correctly applied bond should feel snug but not cause any discomfort. If your client notices pinching or pain during the rotation test, it could mean the section of natural hair used is too small, or the bond might be catching nearby hairs. Be sure to check and adjust as needed. Additionally, it’s a good idea to recheck bonds using a hair extension maintenance planner every 8–12 weeks to account for natural hair growth.
Step 5: Blend and Finish
Once all the bonds are in place and secure, it's time to blend and finish your extensions for a natural, polished look.
Start by trimming and layering the extensions to ensure they blend seamlessly with your natural hair. This step removes any harsh lines and creates a unified appearance. Use heat styling tools like a flat iron or curling wand to fuse the extensions with your natural hair. Make sure to apply a heat protectant and avoid direct heat on the keratin bonds to prevent damage.
To keep your extensions looking flawless, establish a consistent care routine. Use a detangling brush, such as Hair Wonderland's Tangle Tamer Brush, to gently smooth your hair and detangle your hair extensions without damage. Always brush starting at the ends and work your way up to avoid stressing the bonds. Brush your hair twice daily - morning and night - to reduce matting. Before washing, detangle your hair thoroughly, as wet hair is more prone to knots.
When it’s time to wash, limit it to 1–3 times per week and use sulfate- and alcohol-free products. Focus shampoo on the scalp, and avoid applying conditioners, oils, or silicones near the keratin bonds. To protect your extensions while you sleep, loosely braid your hair or wear a silk bonnet to minimise friction.
Conclusion
Fusion U-tip extensions demand careful preparation, precise application, and thorough finishing to achieve professional, long-lasting results. By sectioning the hair properly, testing each bond, and blending the extensions seamlessly with natural hair, you can ensure they last anywhere from 3 to 6 months.
As Priyanka Swamy, Founder of Perfect Locks, explains:
Fusion extensions are the gold standard for natural‐looking results, but they're not the right choice for everyone. They require a significant investment in both time and money, plus ongoing salon visits.
To maximise the lifespan and appearance of your extensions, always use premium 100% Remy human hair. This ensures the extensions endure heat styling and daily wear while maintaining a natural look.
For high-quality options, Hair Wonderland offers double-drawn Russian and Mongolian human hair extensions that are built for durability and blend effortlessly with natural hair. Pairing these extensions with proper tools, like the Tangle Tamer Brush ($21.95), and a daily care routine helps protect your investment. Additionally, scheduling professional maintenance every 5 to 6 weeks is essential to prevent damage as your natural hair grows.
FAQs
Can I install U-tip extensions at home safely?
Yes, you can safely install U-tip extensions at home if you use the right tools and follow proper techniques. The process involves a few key steps: start with clean, dry hair and section it carefully; position the U-tip extension close to your scalp (but not touching it); use a fusion heat tool to melt the keratin bond; and roll the bond between your fingers to secure it in place. To avoid uneven application or potential damage, it's important to use professional-grade tools and follow detailed tutorials for guidance.
How do I choose the right number of strands?
Choosing how many strands to use for fusion U-tip hair extensions comes down to your hair's natural thickness, the volume you’re after, and your styling preferences. A professional stylist can evaluate your hair density and suggest the right amount for you. If you’re aiming for a more natural appearance, fewer strands are typically applied. On the other hand, adding more strands gives a fuller, more dramatic look. Working with a professional ensures the extensions blend seamlessly and are customised to suit your hair type perfectly.
How do I stop keratin bonds slipping?
To keep keratin bonds secure and prevent them from slipping, it's all about proper application and care. Start by ensuring precise sectioning of the hair and using the correct amount of heat - neither too much nor too little - during the bonding process. Choosing high-quality keratin bonds is equally important, as is maintaining appropriate spacing between them.
After installation, protect the bonds from excessive heat (like hot styling tools) and moisture (such as prolonged exposure to water). Regular maintenance appointments are essential to tighten or re-bond as needed, keeping everything in place and looking flawless.