

When blending clip-in extensions, the goal is to make them invisible. Here's how to achieve a natural look:
- Match your hair colour: Focus on the mid-lengths and ends, not the roots. Use natural light to identify undertones (warm, cool, or neutral). If unsure, opt for a lighter shade that can be toned darker.
- Prep your natural hair: Section hair horizontally, starting at the nape. Backcomb roots and use dry shampoo or texturising spray for grip. Conceal shorter layers by braiding, twisting, or pinning them.
- Position extensions correctly: Start with smaller wefts at the nape, moving to wider ones in the middle. Leave enough natural hair at the crown to cover the clips.
- Blend with styling: Curl or wave your hair and extensions together to hide transition lines. Use a wide-tooth comb or extension brush to mix layers smoothly.
- Final touches: Check for visible clips in natural light, adjust as needed, and store extensions properly to maintain their quality.
Using high-quality extensions, like Hair Wonderland's Seamless Set, and following these steps ensures a flawless finish every time.
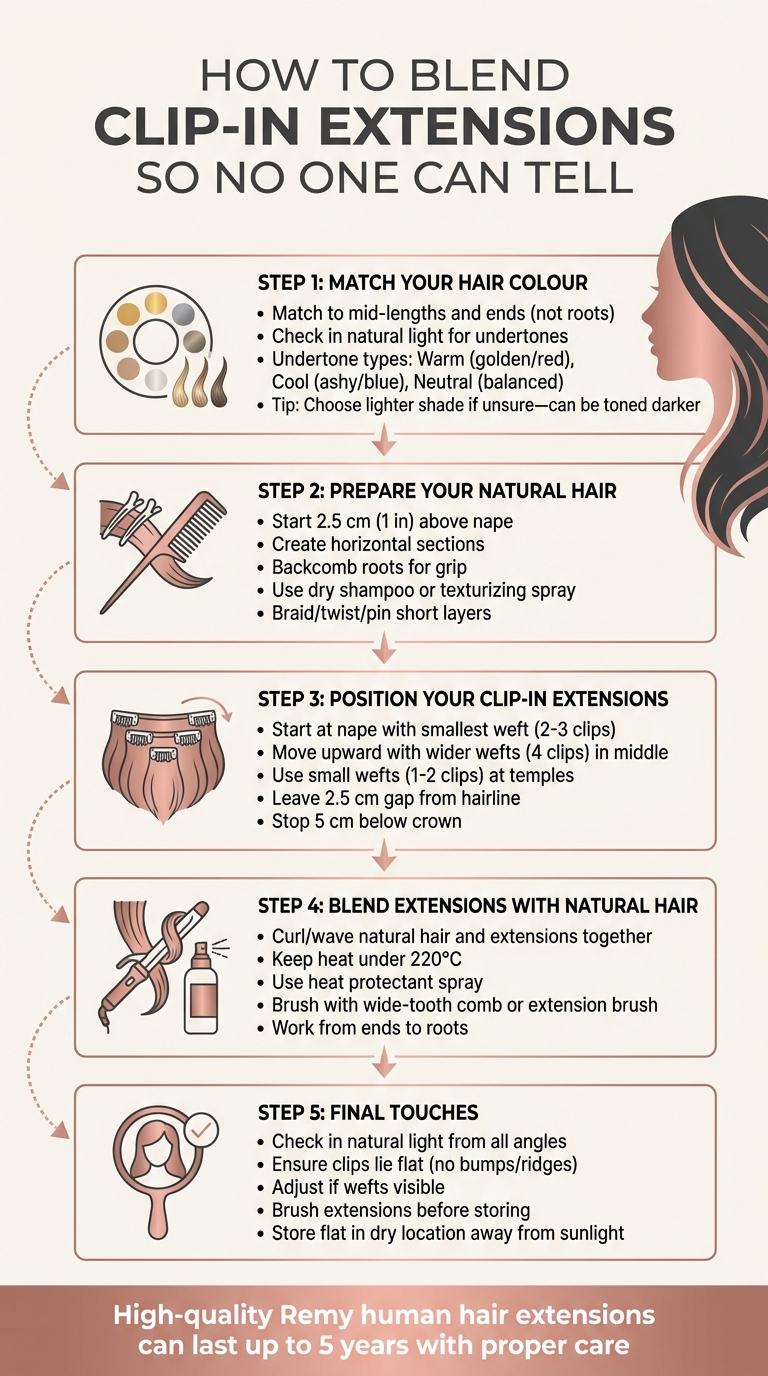
5-Step Guide to Blending Clip-In Hair Extensions Naturally
How To: Blend Straight Hair with Clip-In Luxy Hair Extensions

Step 1: Match Your Hair Colour
One of the most obvious signs that you're wearing extensions? A mismatched colour. To avoid this, focus on matching your extensions to the mid-lengths and ends of your hair - not the roots. This will create a seamless look without any noticeable contrast.
Identify Your Hair's Undertones
Your natural hair likely isn’t just one flat shade. Step into natural light - near a window or outside - because artificial lighting can distort your hair’s true colour. Look closely, and you’ll probably spot highlights, lowlights, and subtle tonal shifts. These undertones typically fall into three categories:
- Warm: Golden or reddish hues
- Cool: Ashy or blue tones
- Neutral: A balanced mix of warm and cool
"Much like makeup, it's as if you're wearing the wrong foundation shade – it sticks out like a sore thumb." - Heather Collier, Cliphair
If you’re stuck deciding between two shades, go for the slightly lighter one. Extensions made from 100% Remy human hair can be toned darker by a professional for a better match, but lightening them is much trickier.
Understanding your undertones is key to choosing the right shade, and Hair Wonderland’s expert service can make this process even easier.
Use Hair Wonderland's Colour Matching Service

Hair Wonderland provides a free colour matching service to ensure your extensions blend perfectly with your hair. All you need to do is submit clear photos of your hair taken in natural light. Include shots from the front, back, and sides so their team can assess the full range of your hair's tones.
Once you’ve sent your photos through Hair Wonderland’s website or social media, their experts will review them and recommend the best shade for you. This personalised advice ensures your extensions not only match your hair colour but also blend naturally with its texture and tone.
Step 2: Prepare Your Natural Hair
Before you attach any clip-in extensions, it’s crucial to create a solid base. Proper sectioning is the key to achieving a polished, seamless look. Without it, extensions might slip or become visible through your natural hair.
Create Horizontal Sections
Begin about 2.5 cm (1 in) above the nape of your neck. Use a pintail comb to make a clean horizontal parting, and secure the rest of your hair with sectioning clips.
"By parting and sectioning your hair and then applying piece by piece, you'll be able to blend them perfectly into your natural hair." - Emilly Hadrill Hair & Extensions
Work your way upwards, releasing one section at a time. Start with the smallest wefts at the nape, use wider pieces in the middle of your head, and finish with the smallest wefts near the temples. To ensure the clips hold securely, lightly backcomb the roots of each section. For extra grip, you can also mist the roots with dry shampoo or a texturising spray.
Repeat this process for each section to create a stable base that keeps the extensions in place and blends seamlessly with your natural hair.
Tame Short or Blunt Layers
If you have a bob or blunt haircut, it’s important to deal with any shorter layers at the bottom. Braid, twist, or pin these sections to create a smooth foundation.
"For short thick hair which is bluntly cut, an absolute must to avoid hair blend issues is concealing shorter pieces of hair at the nape of your neck." - Emma Howe, hairextensions.co.uk
If the layers are too short to braid, twist them into a small ponytail or bun, secure with hairspray, and pin them flat against your head. This step ensures those shorter ends stay hidden, giving you a flawless and natural finish.
With your hair prepped and secured, you're now ready to start placing your clip-in extensions.
Step 3: Position Your Clip-In Extensions
Now that your hair is prepped and sectioned, it’s time to place your clip-in extensions for a natural and seamless look.
Begin at the Nape
Start with the smallest weft, typically a 2- or 3-clip piece, and position it at the nape of your neck. Release the first section of hair, about 2.5 cm above your hairline. Open the clips, press them firmly into the teased roots, and snap them shut to secure them in place.
"Start at the nape – attach your smallest weft (usually with 2 or 3 clips). Snap the clips open, secure them into the teased section, and snap them shut." - Heather Collier, Cliphair
Continue moving upward, releasing a new section of hair each time. As you approach the middle of your head, switch to wider 4-clip wefts for added coverage. Near the temples, use smaller 1- or 2-clip pieces to keep the extensions discreet. Maintain a gap of about 2.5 cm from your hairline and parting to ensure a natural blend.
Once you’ve secured the wefts at the nape, assess the quantity of extensions needed based on your hair’s thickness.
Adjust for Your Hair Thickness
For fine or thin hair, using fewer wefts can prevent unnecessary bulk. If your hair is particularly slippery, consider tying tiny sections into elastics below the clips to keep them firmly in place.
For thick hair, you might need all the wefts in your set to match your natural volume. If the ends of your hair appear thin, layering multiple wefts at the same horizontal level can help create a fuller look.
Cover Wefts with Top Layers
Stop placing wefts about 5 cm below your crown to leave enough natural hair to cover the tracks. Once you’ve clipped in the final weft, release the top section of your hair and check for any visible clips or wefts.
Run your fingers through your hair to ensure the top layers fall naturally over the extensions. If you notice any clips showing, adjust the placement slightly lower or backcomb the hair above the wefts for extra coverage.
These finishing touches will ensure your extensions blend perfectly with your natural hair, leaving no trace of the clips behind.
sbb-itb-dcde78e
Step 4: Blend Extensions with Natural Hair
Now that your extensions are clipped in, it’s time to make them look like part of your natural hair by styling everything together.
Add Curls or Waves for Texture
Creating curls or waves is a great way to hide the extension line. The texture helps blur the transition between your natural hair and the extensions.
"Curling creates the easiest blend - the textured pattern makes it difficult to distinguish where your natural hair ends and extensions begin." - Link Hair Extensions
To achieve this, take sections that include both your natural hair and the extensions, then wrap them around your curling wand. This method ensures the textures merge effortlessly. Keep the heat setting under 220°C and always apply a heat protectant spray to protect both your natural hair and the extensions.
If your natural hair has a blunt cut or is on the shorter side, waves can soften the edges, making the extensions mimic the natural flow and bounce of your hair.
Brush and Comb to Mix Hair
After adding texture, the final touch is blending the layers. Use a gentle comb or brush to mix your natural hair with the extensions, ensuring everything looks seamless.
Opt for a wide-toothed comb or a brush designed for extensions to avoid pulling on the clips. Start at the ends and work your way up to the roots, taking care not to snag the wefts while brushing. This step ties the entire look together, leaving no visible separation between your natural hair and the extensions.
Step 5: Complete the Final Touches
Wrap up your look by perfecting the styling and ensuring your extensions are stored correctly.
Style and Check for Visibility
Once you've blended your natural hair with the extensions, take a moment to check your work in natural light. Use a hand mirror to inspect from all angles, tilting your head to ensure no clips or wefts are visible.
Run your fingers gently over the clipped areas to confirm they lie flat against your scalp. If you feel bumps or ridges, it might mean the clips need to be adjusted. Should you notice any visible lines, try backcombing lightly over the weft to provide extra coverage. For sleek, straight styles, a flat iron can help smooth your natural hair with the extensions. Just be sure to keep the heat below 180°C to protect the hair's integrity.
"Trim layers for a tapered, textured finish." - Showpony Hair Extensions
Once you're happy with the final look, it's time to focus on proper storage to keep your extensions in the best condition.
Store Extensions Properly
Before storing, brush through the extensions carefully to remove any tangles or knots. Make sure the hair is completely dry, as damp extensions can develop mould or unpleasant smells.
For optimal storage, consider using a product like Hair Wonderland's Clip In Bag ($54.00), designed to keep your extensions safe and secure between uses. Store them flat in a clean, dry location away from direct sunlight to help maintain their shape and softness. With the right care, high-quality Remy human hair extensions can last up to five years, making them a worthwhile addition to your hair routine.
These final touches ensure your hair transformation looks seamless and natural while keeping your extensions in top-notch condition.
Conclusion
Achieving a flawless blend with hair extensions comes down to careful planning and technique. Matching the colour and texture of your extensions to your natural hair, along with precise placement and cohesive styling, creates a polished, natural finish. Using high-quality Remy hair and sectioning properly - placing smaller wefts at the nape and temples, and wider ones in the middle and back - helps maintain a balanced and undetectable look.
Once your extensions are secured, the final step is blending textures. Styling both your natural hair and the extensions together - whether through curling or waving - smoothly conceals transition points and ties the entire look together.
"With the right preparation, techniques, and... high-quality extensions, achieving a seamless and natural-looking finish is easy." - Beauty Works
Hair Wonderland's premium double-drawn Russian and Mongolian human hair extensions, paired with quality accessories, make it easy to achieve a soft, tangle-free blend every time. When cared for with sulphate-free products and gentle detangling techniques, these extensions can last over a year. By combining proper methods with top-tier products, you can ensure your extensions blend beautifully with your natural hair for a stunning, long-lasting result.
FAQs
How do I pick the perfect shade of clip-in extensions for my hair?
To choose the right shade of clip-in extensions, start by determining your natural hair colour and undertones. Focus on finding extensions that match the mid-lengths to the ends of your hair for a smooth, natural blend. If you're unsure, consider consulting a stylist or using a colour matching service to ensure the best match.
For a realistic appearance, go for extensions made from 100% Remy human hair, as they closely replicate the texture and shine of natural hair. If you're stuck between two shades, pick the lighter option and use styling tricks like curling or layering to create a seamless look.
How can I make sure my clip-in extensions stay securely in place?
To keep your clip-in extensions secure throughout the day, start by prepping your hair with a texturising spray or dry shampoo. This creates grip, making it easier for the clips to latch onto your natural hair. For added security, try creating small hidden braids or using criss-crossed bobby pins at the base of each section. These tricks give the clips a solid foundation to hold onto.
Before applying the extensions, make sure your hair is clean, dry, and free of tangles. Use a rat-tail comb to section your hair neatly, and attach the extensions close to the roots for a snug, natural fit. These steps will not only keep your extensions in place but also ensure they blend seamlessly with your own hair.
How can I care for and store my clip-in extensions to make them last longer?
To keep your clip-in extensions in top shape and extend their lifespan, proper care is key. Start by carefully removing any styling products and washing them with a gentle shampoo. After washing, let them air dry fully - this helps avoid potential damage from heat or trapped moisture.
For storage, choose a cool, dry place away from sunlight and humidity. Keeping them in a silk or satin bag, or even their original packaging, can help prevent tangling and preserve their quality. Taking these steps will ensure your extensions stay looking great for longer.