

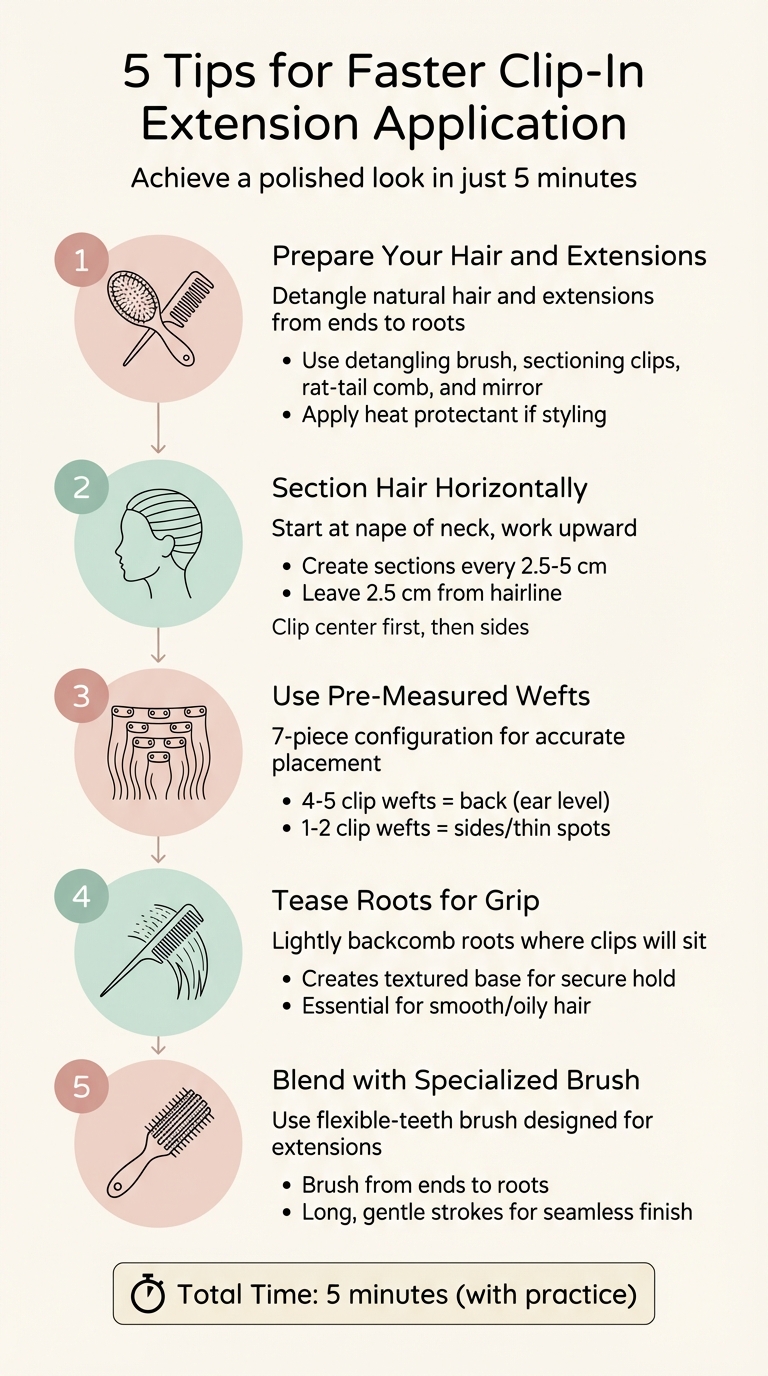
Applying clip-in extensions doesn’t have to be a time-consuming or frustrating process. With the right tools, techniques, and preparation, you can achieve a polished, natural look in just five minutes. Here's how:
- Prepare Your Hair and Extensions: Start with clean, detangled, and dry hair. Use tools like a detangling brush, sectioning clips, and a rat-tail comb to simplify the process.
- Section Hair Horizontally: Begin at the nape of your neck and work upwards. Clean, horizontal parts ensure even placement and conceal clips effectively.
- Use Pre-Measured Wefts: Opt for clip-in sets designed with pre-cut pieces for specific areas of your head. This eliminates guesswork and ensures balanced volume.
- Tease Roots for Grip: Lightly backcomb the roots where clips will sit to provide a secure hold, especially for smooth or oily hair.
- Blend Extensions with a Specialised Brush: Use a brush designed for extensions to combine your natural hair with the wefts, creating a smooth and natural finish.
Investing in high-quality extensions like Hair Wonderland’s Seamless Set 22" ($499.00) can also make the process easier, thanks to their thinner design and natural blend. Tools like The Detangle Brush ($29.95) and a Clip In Bag ($54.00) can help maintain your extensions and streamline your routine.
5-Step Guide to Applying Clip-In Hair Extensions in 5 Minutes
how to put in clip-in hair extensions with placement guide
1. Prepare Your Hair and Extensions with the Right Tools
To make applying clip-in extensions easier, gather these essentials: a detangling brush, a rat-tail comb, sectioning clips, and a mirror. These tools will help streamline the process and give you a polished result.
Start by brushing your natural hair and each extension weft, working from the ends up to the roots. This removes any tangles that could interfere with the clips staying in place. As Prue from Lady and the Hair explains:
"Oily or knotted hair makes it harder for the clips to grip, which affects the hold".
For a reliable detangling tool, consider Hair Wonderland's The Detangle Brush ($29.95). Its flexible teeth glide through knots effortlessly and have earned rave reviews, particularly from those with thick hair - customers rate it a perfect 5/5 for its effectiveness.
Next, use sectioning clips to keep the upper layers of your hair out of the way. With a rat-tail comb, create clean, horizontal parts. This ensures the extensions are evenly distributed, blend naturally, and stay hidden. A mirror is essential for checking alignment and making sure the wefts lie flat along your hairline.
If you plan to heat style your extensions, don’t forget to apply a heat protectant to shield the hair from damage. For those with fine hair, teasing the roots slightly before clipping in the extensions can help them stay secure. When not in use, store your extensions in a Clip In Bag ($54.00) to keep them tangle-free and ready for the next wear.
2. Section Hair Horizontally from Bottom to Top
When applying hair extensions, it's best to start at the nape of your neck and work your way up. This method helps prevent tangles and avoids the need for mid-application adjustments. Begin by creating your first horizontal part just below the ears using a rat-tail comb to achieve a clean, straight line. Starting this low ensures that natural hair from the crown will fall over and hide the clips, giving a seamless finish. This step lays the groundwork for precise weft placement.
For natural volume and balance, place the widest wefts around mid-ear level. As EH Hair Extensions advises:
"Start and end small. The smallest wefts start at the nape of your head, then as you move up through the hair, they are wider".
Continue sectioning your hair every 2.5–5 cm as you move upwards. When securing the wefts, always fasten the centre clip first, then attach the side clips to keep the weft flat against your scalp. Use a hand mirror to double-check that each section is level and the clips remain hidden.
With consistent practice, this bottom-up technique can allow you to complete a full-head application in as little as 5 minutes. This method also avoids one of the most common mistakes - placing wefts too high near the crown, which can make them harder to conceal and create a bulky look. To keep your extensions invisible, always leave at least 2.5 cm of natural hair between your hairline and the first clip.
3. Use Pre-Measured Wefts for Accurate Placement
Pre-measured clip-in sets take the guesswork out of applying hair extensions by providing wefts that are already cut and sized for specific areas of your head. Most high-quality sets are designed with a 7-piece configuration, featuring wefts with 1 to 5 clips. The wider wefts (4 or 5 clips) are ideal for the back of your head, while the smaller 1- or 2-clip wefts are perfect for the sides or areas that need a little extra fullness.
This setup makes placement straightforward. As Prue from Lady And The Hair puts it:
"The wider pieces (like 4 or 5 clips) go along the back for volume, while the smaller ones (1 or 2 clips) fill in the sides or thinner spots. Knowing how to put in 7-piece clip-in extensions allows for better placement."
To achieve a balanced and natural look, start with the longest weft at ear level on the back of your head and work your way upward, using smaller wefts as you go. This sequential arrangement ensures the density is distributed evenly, mimicking the way hair naturally grows and avoiding clip overcrowding. Save the 1-clip and 2-clip wefts for the sides or thinner areas to add subtle volume without making these sections appear bulky.
For example, Hair Wonderland's Seamless Set 22" (A$499.00) offers pre-measured wefts that blend effortlessly with your natural hair while speeding up the application process. These seamless wefts are up to 30% thinner than traditional extensions, allowing them to lie flat against your scalp for a discreet and polished finish.
With these pre-measured wefts, there’s no need for cutting or measuring. Simply tease your roots for grip, then clip in the correct piece, and you're good to go.
sbb-itb-dcde78e
4. Lightly Tease Roots for Quick, Secure Hold
Adding a touch of backcombing at the roots can make all the difference when it comes to keeping your clip-ins in place throughout the day. This simple trick creates a textured base, giving the clips the grip they need - especially helpful if your hair tends to be smooth or oily, which can sometimes make it harder for the clips to stay secure.
To get started, focus your teasing only on the root area where the clip will sit. This prevents unnecessary tangling while still giving you that extra hold. Grab a rat-tail comb, create a clean horizontal part, and gently tease the roots to form a soft, textured cushion. Once you've prepped the base, attach the weft by securing the middle clip first. Press it firmly against the teased roots to ensure the extension lies flat and stays balanced on your scalp.
For those with oily or product-heavy hair, slipping clips can be a challenge. This method helps combat that issue, and with a little practice, you can have your extensions securely in place in as little as five minutes.
If you're short on time or prefer to skip the teasing, there's an alternative: tie fine sections of hair into small elastics just below the clip line. This creates a similar grip without the need for backcombing and can be a quicker option for busy mornings.
5. Blend Extensions Quickly with a Multi-Purpose Brush
Once your extensions are securely clipped in and prepped, the last step is achieving a flawless blend. This is where a multi-purpose brush becomes your best friend. Unlike regular brushes that can snag on clips, brushes designed specifically for extensions feature flexible teeth or soft bristles. These glide effortlessly through both your natural hair and extensions, minimising snagging and reducing potential damage.
To get that smooth, natural finish, start by removing any holding clips. Then, use long, gentle strokes to brush your hair, beginning at the ends and working your way up to the roots. This technique not only blends the extensions seamlessly but also hides any visible attachment points. For added care, hold the hair firmly near the clips as you brush to prevent pulling on the attachment areas.
"The true game-changer when it comes to blending hair extensions is using a high quality hair brush to detangle your hair and keep your extensions looking brand new." - Cashmere Hair
If you're looking for a great tool, the Hair Wonderland Detangle Brush ($29.95) is a standout choice. It's highly rated for its ability to blend extensions into both thick and fine hair effortlessly. Plus, it works well on both wet and dry hair, helping to reduce breakage while delivering a polished look. For a more budget-friendly option, the Tangle Tamer Brush ($21.95) offers similar benefits without compromising on performance.
Conclusion
Turning clip-in extensions into a quick and easy part of your morning routine is entirely possible with these five tips. By prepping your tools, sectioning your hair horizontally, using pre-measured wefts, teasing your roots for extra grip, and blending with the right brush, you can achieve a polished, natural look in just about five minutes - once you’ve had some practice. This step-by-step approach takes the guesswork out of the process and helps you avoid common problems like slipping wefts or visible clips.
To make your routine even smoother, investing in high-quality products makes all the difference. Reliable extensions and tools are key to effortless application. Consider options like Hair Wonderland's Seamless Set 22" ($499.00), which uses Invisi® weft technology for a flat, discreet finish.
Don’t forget the essentials: the Tangle Tamer Brush ($21.95) ensures seamless blending, while the Clip In Bag ($54.00) keeps your extensions in top condition. With the right tools and techniques, achieving a flawless look has never been easier.
FAQs
How can I stop my clip-in extensions from slipping during the day?
To make sure your clip-in extensions stay secure throughout the day, start with clean, completely dry hair. Carefully section your hair and attach the clips to a sturdy, stable area of your natural hair. Press the clips firmly to ensure they’re locked in place. Using tools like a detangling brush or a silicone-grip pad can help the extensions stay in place and blend smoothly with your hair. For a natural look and long-lasting comfort, opt for high-quality extensions.
What are the advantages of using pre-measured wefts for clip-in hair extensions?
Using pre-measured wefts for clip-in hair extensions is a game-changer for anyone looking to save time and make the application process easier. These wefts are crafted to match specific sections of your head, helping them blend more naturally with your own hair.
Since they're already sized, there's no need for trimming or extra adjustments, which is great for anyone wanting a quick and straightforward styling experience. Plus, their consistent sizing ensures a uniform, polished look - perfect for creating salon-quality results right at home.
What tools do I need to create a natural look with clip-in extensions?
To get your clip-in extensions looking as natural as possible, having the right tools on hand is key:
- A detangling brush or regular hairbrush to smooth out both your hair and the extensions.
- A rat-tail comb for creating neat, precise sections.
- Hair clips to hold sections of your hair aside while you work.
- A mirror to check the placement and alignment as you go.
With these tools, the process becomes easier, and your extensions will blend beautifully with your natural hair.