

Cutting hair extensions to the right length ensures they blend naturally with your hair for a polished look. Whether you’re trimming clip-ins at home or working with tape-ins or wefts, the process involves precise techniques to maintain the extensions' quality and appearance. Here's what you need to know:
- Why Trim Extensions? Avoid bulky, unnatural edges and create a natural flow by trimming to match your hair's length, texture, and style.
- Tools Required: Sharp hairdressing scissors, sectioning clips, and extension-safe combs or brushes.
- Preparation: Work in a well-lit space, always cut dry extensions, and detangle thoroughly before trimming.
-
Techniques:
- Use blunt cutting for a clean edge.
- Apply point cutting to soften ends and blend layers.
- Opt for slicing to reduce bulk and add movement.
- Maintenance: Regular trims (every 4–8 weeks) and proper aftercare, like using sulphate-free products and gentle brushing, keep extensions looking their best.
For best results, always trim extensions while installed to see how they fall naturally. Start small - cutting a little at a time ensures precision and avoids overcutting. Premium extensions, such as double-drawn Russian or Mongolian hair, are designed to handle multiple trims while maintaining their luxurious look.
How to CUT & BLEND Your CLIP-IN Hair Extensions Like A Pro At Home | Thin Short Hair | SKLPT'D Hair
Preparation and Tools
Getting ready properly is the first step to achieving a flawless blend when working with hair extensions.
Assess Your Hair and Set Goals
Start by measuring your hair in centimetres at key spots like the back, sides, and around your face. This will give you a clear idea of how much to trim from your extensions. Also, think about your hair’s thickness. If your hair is on the finer side, trimming extensions to match your exact length might create a noticeable line. Instead, consider leaving the extensions slightly longer with soft, feathered ends for a more natural blend.
Next, decide on the look you’re aiming for. Are you after face-framing layers, a blunt cut, or perhaps soft curtain bangs? Write down your target lengths to keep yourself on track and avoid cutting too much.
Once you’ve set your goals, it’s time to gather the right tools for the job.
Tools You'll Need
For a clean and precise cut, sharp hairdressing scissors are a must - they’ll help you avoid split ends and rough edges. Keep sectioning clips handy to keep hair organised as you work, along with a fine-toothed comb for precision and a wide-toothed comb for gently detangling.
For a smoother experience, consider tools like the Detangle Brush, Styling Comb, and Tangle Tamer Brush from Hair Wonderland. These are specially designed to work with premium hair extensions, ensuring they’re tangle-free and easy to manage before you start trimming.
Set Up Your Workspace
Choose a well-lit space - natural light is ideal, as it lets you see the true colour and texture of the hair. Arrange your tools so they’re within easy reach, and use a mirror to check the back and sides as you work.
Always cut clean, dry extensions. Wet hair can stretch and look longer, which might lead to uneven results once it dries. Before cutting, use your detangling brush to smooth out any knots, starting from the ends and working your way up to the roots. Lay clip-in wefts flat on a clean towel or hang them up if you’re working with tape-ins or sewn wefts. This setup ensures you have full control and visibility while cutting.
Step-by-Step Cutting Process
Hair Extension Cutting Techniques Comparison Guide
Your workspace is ready, your extensions are detangled - now it’s time to start cutting. Following these steps carefully will help you achieve a polished, natural finish.
Install and Section Extensions
Begin by installing your extensions as you typically wear them. For clip-ins, tease your natural roots slightly before clipping to ensure they stay secure. Style your hair the way you usually do - whether straight, wavy, or parted in your preferred way. This lets you see how the extensions blend and their true length.
Next, section your hair horizontally, starting at the nape and working upward. Use clips to separate each layer of extensions from your natural hair. This keeps everything neat and prevents accidentally cutting into the attachment points.
Trim Overall Length
Decide where you want your hair to fall - collarbone, bust, or mid-back - and check this in the mirror. Hold the hair straight and trim just below your chosen length, cutting small amounts (around 0.5–1 cm) at a time for precision and adjustments. For a blunt cut, hold the hair with light tension and cut straight across at a 0° angle to create a clean, even edge.
Cross-check the lengths to ensure consistency. Once you’ve achieved a straight line, soften the edges using point-cutting. Hold the scissors almost vertically, with the tips pointing into the ends, and make small, precise snips (2–5 mm for fine hair or up to 1 cm for thicker extensions). This technique prevents a harsh, overly uniform look and helps the extensions blend seamlessly with your natural hair, especially in bright Australian sunlight. With the length set, you’re ready to add layers for more dimension.
Blend Layers and Add Dimension
Blending layers is key to reducing bulk and adding movement. Work with small sections, holding the hair at a slight elevation. Use a slicing technique - angle your scissors diagonally downward and keep the blades partially open. This removes bulk from the mid-lengths without taking off too much length, creating soft, graduated layers that flow naturally.
For double-drawn extensions, such as the premium Russian or Mongolian sets from Hair Wonderland, go easy with slicing. These extensions are thick from root to tip, so a light touch ensures a natural blend without creating heaviness. If your natural hair is fine, focus on feathering the ends rather than adding deep layers, which could create an obvious line.
Face-Framing and Front Details
Face-framing layers give a polished, flattering finish. Start by deciding where the shortest layer should fall - usually between the cheekbone and just below the chin, depending on your face shape. Comb the front sections of your hair and extensions forward, then hold the scissors at a slight downward angle. Slide the blades along the hair’s length, keeping them partially open.
Repeat on both sides, adjusting as needed to create a balanced, soft frame. This technique results in a curtain-like effect that complements both centre and off-centre parts. Be conservative when cutting around the face - it’s always easier to take off more later than to fix a cut that’s too short.
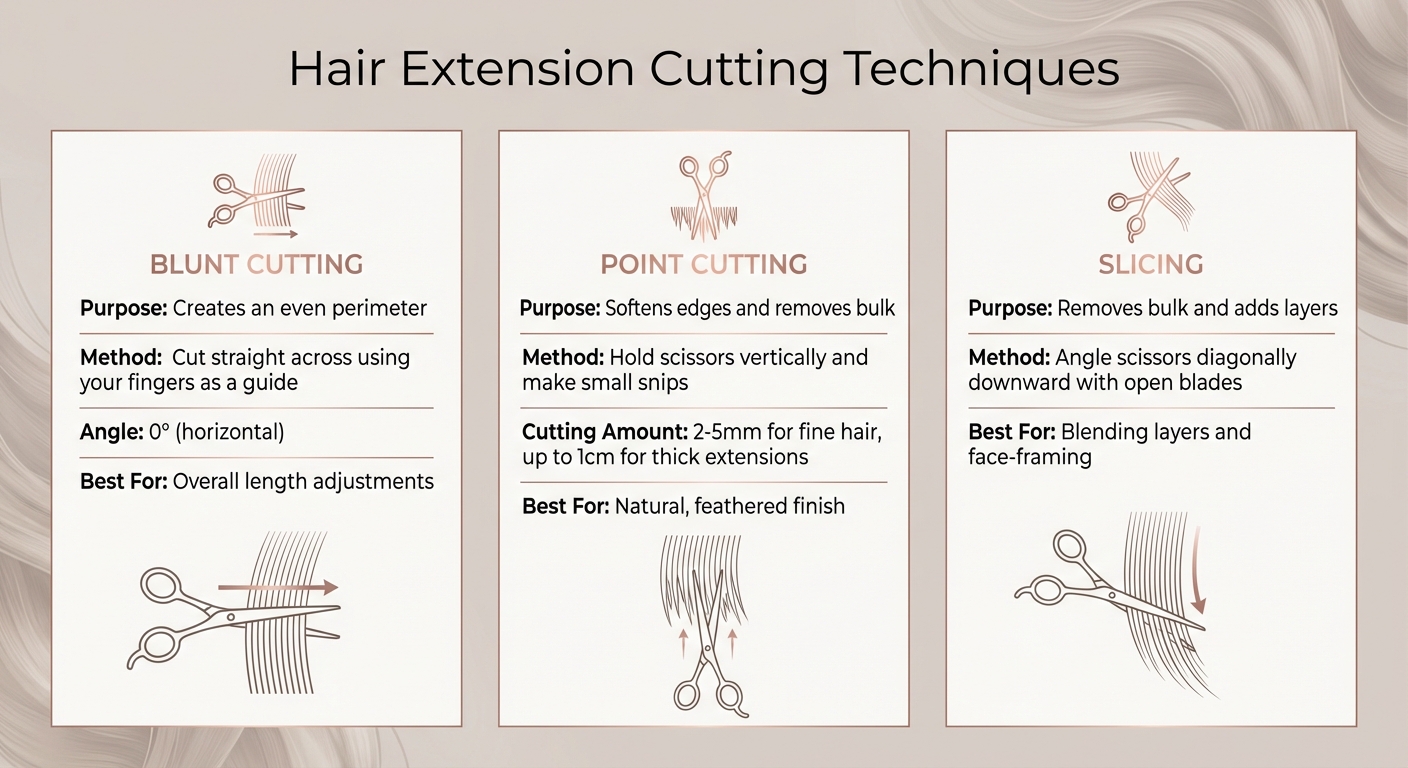
| Technique | Purpose | Method | Best For |
|---|---|---|---|
| Blunt Cutting | Creates an even perimeter | Cut straight across using your fingers as a guide | Overall length |
| Point-Cutting | Softens edges and removes bulk | Hold scissors vertically and make small snips | A natural, feathered finish |
| Slicing | Removes bulk and adds layers | Angle scissors diagonally downward with open blades | Blending layers and face-framing |
sbb-itb-dcde78e
Finishing Touches and Maintenance
Once you've achieved the perfect cut, keeping it in shape and ensuring its longevity is just as important.
Final Adjustments After Styling
After styling your extensions - whether you've straightened, curled, or waved them - take a moment to assess the overall look. Heat styling can sometimes make extensions contract, which might highlight uneven lengths or create blunt lines that interrupt a natural blend. A good trick is to tilt your head forward and inspect both sides in the mirror, looking for any strands that stick out or create a harsh line.
If you spot uneven areas, use point cutting for small adjustments. Hold your scissors almost vertically and snip gently into the tips, removing only a little at a time. This technique softens edges and avoids a harsh finish. Always trim with caution - unlike natural hair, extensions won’t grow back, so it’s better to take off less and reassess as needed.
Regular Maintenance Trims
Keeping extensions fresh and polished requires regular trims. For clip-ins, check their length after every 3–5 uses. For tape-ins or wefts, a trim every 6–8 weeks is ideal. If the ends start feeling wispy, tangled, or thin despite brushing, trim about 0.5–1 centimetre using point cutting to maintain their shape.
High-quality, double-drawn extensions from Hair Wonderland are made to stay thick from root to tip. To avoid a bulky or blocky appearance, occasional texturising can help blend them seamlessly. With proper care at home, you can extend the life of your premium extensions, reducing tangles and split ends, and even doubling their usability.
Extension Aftercare
Daily care is crucial for keeping your extensions looking salon-fresh while preserving your custom cut. Detangle them daily, starting from the ends and working upward with a wide-tooth or extension-safe brush. If brushing wet hair, do so gently to avoid breakage. The Hair Wonderland Tangle Tamer Brush (AUD $21.95) is specifically designed to remove knots without damaging the ends. Always support the wefts or roots with one hand while brushing to prevent pulling.
When washing your extensions, use sulphate-free and alcohol-free products. Apply conditioner only to the mid-lengths and ends, steering clear of the attachment points. Before styling, always use a heat protectant and keep hot tools set between 160–180 °C to minimise dryness and splitting. For clip-ins, store them brushed, dry, and laid flat in a Clip In Bag (AUD $54.00). This helps maintain the cut’s shape and prevents tangling, ensuring your extensions stay in top condition for their full lifespan of 9–12 months.
Techniques for Different Extension Types
Each type of hair extension requires a specific cutting technique, depending on how it's attached and its level of permanence. Adjusting your trimming method for each type ensures a natural blend while protecting both the extensions and their attachment points.
Clip-In Extensions
Clip-ins offer the most flexibility since they are removable panels that can be customised. Always position the wefts where you intend to wear them - whether that's a centre part, side part, or a half-up style - before cutting. This allows you to see how the extensions will fall and ensures you can shape them properly.
For example:
- Use slicing or slide cutting to shorten side pieces around the face for a soft, face-framing effect.
- Adjust for a deep side part by trimming pieces to blend with your natural parting.
- Remove bulk behind the ears with point cutting for a more seamless look.
If you're trimming off-head, replicate your head's shape as closely as possible, then re-check the cut once the wefts are clipped in. Premium extensions, like those from Hair Wonderland, often maintain their thickness from root to tip, so you may only need a light perimeter trim and some face-framing rather than a full re-cut, preserving the purchased length.
Next, let's move on to techniques for tape-in extensions.
Tape-In Extensions
Since tape-ins are semi-permanent, they should always be cut after installation. One key rule: never cut into the adhesive tab or too close to it. Keep your scissors at least 2–3 mm below the tab to avoid damaging the adhesive "sandwich." Cutting too close can lead to shedding, slipping, or exposing sticky adhesive, which can make the tapes visible or uncomfortable.
For length adjustments, use blunt or soft point cutting on the combed-down perimeter and refine with point or slide cutting. If you need to narrow a tape for fine hairlines, always pre-cut the tape before installation. Seal the cut edges with a small amount of glue or use mini tapes provided by the manufacturer to avoid compromising the adhesive.
Now, let’s explore the techniques for wefted extensions.
Wefted Extensions
Wefted extensions, whether sewn or machine-made, are semi-permanent and require careful handling. Never cut through the stitched track, as this can cause the weft to unravel and shed. If you need to shorten a weft off-head, cut between the stitches and immediately seal the cut edge with a sealant or clear-drying nail glue to prevent fraying.
When blending, avoid over-texturising the ends, which can make the extensions look thin or stringy. Keep the perimeter full and soften only the outer centimetre with point cutting. For curly or wavy wefts, always cut with the curl pattern in mind. Work on dry hair in its natural curl, using curl-by-curl or twist-cutting methods to avoid uneven springing layers.
These tailored techniques for each extension type ensure a polished, natural finish while maintaining the integrity of the extensions.
Conclusion
Trimming extensions to custom lengths requires preparation, precision, and a steady hand. Start by evaluating your natural hair and deciding on your desired outcome - whether it’s soft layers, a blunt edge, or face-framing accents. Equip yourself with the right tools, including sharp shears, a fine-tooth comb, and sectioning clips. Ensure you have proper lighting and always work on installed extensions so you can see how they naturally fall and blend with your hair.
To recap the cutting techniques mentioned earlier: the method you choose can be the difference between a seamless blend and a choppy finish. Point cutting helps soften the ends and eliminate harsh lines while maintaining length, whereas slithering reduces bulk, creating feathered layers that blend effortlessly. Take it slow - trim a little at a time and check your progress often to avoid thinning the extensions too much, which can leave them looking sparse.
Regular trims every 4–8 weeks help maintain a polished shape and healthy ends. Thoughtful cutting and consistent upkeep safeguard your investment. Premium brands like Hair Wonderland, known for their double-drawn Russian and Mongolian extensions, are crafted to blend naturally and endure multiple trims and restyling when properly cared for.
FAQs
How can I make my hair extensions look natural and blend with my own hair?
To achieve a natural look with hair extensions, start by selecting a shade that matches your hair colour as closely as possible. Once you’ve got the right colour, trim the extensions to your preferred length, blending them carefully with your natural hair to avoid any noticeable lines. Styling your hair and the extensions together - whether you’re curling, straightening, or adding waves - can make the two blend seamlessly.
Keep your extensions tangle-free and well-maintained to ensure they remain smooth and realistic. For a polished, professional finish, opt for high-quality extensions, like those from Hair Wonderland, which are praised for their durability and their ability to blend effortlessly with natural hair.
What tools do I need to trim hair extensions?
For optimal results when trimming hair extensions, make sure to use sharp hairdressing scissors. This ensures clean and accurate cuts without damaging the extensions. Pair these with a fine-tooth comb to easily section and manage the hair during the trimming process. Together, these tools will help you create a polished and natural look.
How often should I trim my hair extensions to keep them looking their best?
To keep your hair extensions looking their best and blending naturally with your hair, consider trimming them every 8 to 12 weeks. This routine helps maintain their shape, prevents split ends, and ensures they continue to look seamless.
If you spot frayed ends or uneven lengths sooner, a light trim can instantly refresh their look. Use sharp scissors and take off only a small amount to preserve both their quality and length.