
Sectioning hair correctly is the key to achieving natural-looking extensions that blend well and stay secure. Here's what you need to know:
- Tools You Need: A rat tail comb for clean partings, sectioning clips to hold hair in place, a detangling brush to remove knots, and a styling comb for finishing touches.
- Preparation: Start with clean, dry hair - wash with clarifying shampoo (no conditioner) and detangle thoroughly. Assess hair thickness to plan section sizes.
- Sectioning Steps: Begin at the nape, creating even horizontal sections about 2.5 cm apart. Use clips to keep upper layers out of the way. Maintain consistent section widths to avoid gaps or uneven weight distribution.
-
Techniques for Each Extension Type:
- Clip-Ins: Use horizontal partings, starting from the nape. Place wefts strategically to add volume and keep them hidden.
- Tape-Ins: Apply in staggered rows, sandwiching thin hair slices between adhesive wefts. Keep tapes 2–3 mm from the scalp.
- Permanent Methods: Micro-sectioning for sew-ins, microbeads, or fusion extensions ensures secure placement and protects natural hair.
Proper sectioning not only enhances the look of extensions but also reduces strain on natural hair, ensuring long-lasting results. Regular maintenance is essential to adjust sections as your hair grows. For tools and premium extensions, check out Hair Wonderland.
Sectioning Secrets: Why Section Sizes Matter Webinar| Aqua Hair Extensions

Tools You Need for Sectioning Hair
Having the right tools on hand can make sectioning your hair quicker and more precise. You don’t need a full salon setup - just a few basics can help you create neat partings that keep your extensions secure and well-hidden.
Rat Tail Comb
This comb is an absolute must-have. The pointed "tail" end is perfect for creating clean, straight horizontal lines, which are essential when working section by section. Whether it’s a thin metal or plastic tip, it glides smoothly along the scalp without snagging, making it easier to map out your sections before securing your extensions.
Sectioning Clips
Sectioning clips are a lifesaver when it comes to keeping the upper layers of hair out of your way while you work on the lower sections. For those with thick hair or extensions, clips with strong tension are key. One user even highlighted how these clips make drying thick or extended hair much simpler. Their firm grip ensures that each section stays in place, so you can focus on styling without interruptions.
Tangle Tamer Brush
Detangling your hair before sectioning is crucial. The Tangle Tamer Brush from Hair Wonderland (AUD $21.95) features flexible teeth that glide through knots effortlessly without pulling or breaking strands. As Hair Wonderland puts it:
Hair Wonderland's detangling brushes are specially designed so that the teeth flex when needed to ease the knots and detangle painlessly.
This brush works on both wet and dry hair and is compatible with all types of extensions, making it an all-purpose tool for prepping your hair.
Styling Comb
After your extensions are in place, a styling comb is handy for refining sections and blending your natural hair with the extensions. It’s also great for teasing the roots slightly before clipping in extensions, giving them extra hold and volume. Keep one nearby to smooth out any uneven lines or touch up your style.
With these tools, you’ll be well-prepared to section and style your hair like a pro.
How to Prepare Hair Before Sectioning
Getting your hair ready the right way ensures a secure attachment and a natural look.
Wash and Dry Your Hair Thoroughly
Start by washing your hair with a clarifying shampoo - twice is best. Focus on the roots to get rid of oils, dirt, and any buildup. Skip conditioners and styling products entirely, as even a small amount can mess with the adhesive's grip.
Extensions should always be applied to 100% dry hair to prevent moisture from interfering with the tape adhesive.
Once washed, dry your hair completely using a low-to-medium heat setting on your dryer and a microfibre towel. Avoid any additional heat styling to keep the adhesive intact. With your hair clean and dry, you're ready to tackle tangles.
Detangle Your Hair Completely
Before you start sectioning, make sure your hair is completely free of knots. Detangling is essential for creating the perfect base for extensions. Use a Tangle Tamer Brush to gently detangle both before washing and after drying. This not only removes knots but also helps prevent breakage. Once your hair is smooth, you can evaluate its density and scalp condition to plan your sectioning.
Assess Hair Thickness and Scalp Health
Take a close look at your hair's thickness and the condition of your scalp. This will help you decide on the right section sizes. For thicker hair, you can work with larger sections, while finer hair calls for smaller, more precise parting. According to Hair Wonderland, it’s important to re-section during maintenance to evenly spread the weight of the extensions. If you have fine hair, you might need adjustments more often - every four weeks is a good guideline.
How to Create Horizontal Sections Step-by-Step
Step-by-Step Guide to Sectioning Hair for Extensions
Creating clean and even horizontal sections is a must for a professional extension application. Getting these sections right ensures the extensions sit perfectly and blend seamlessly.
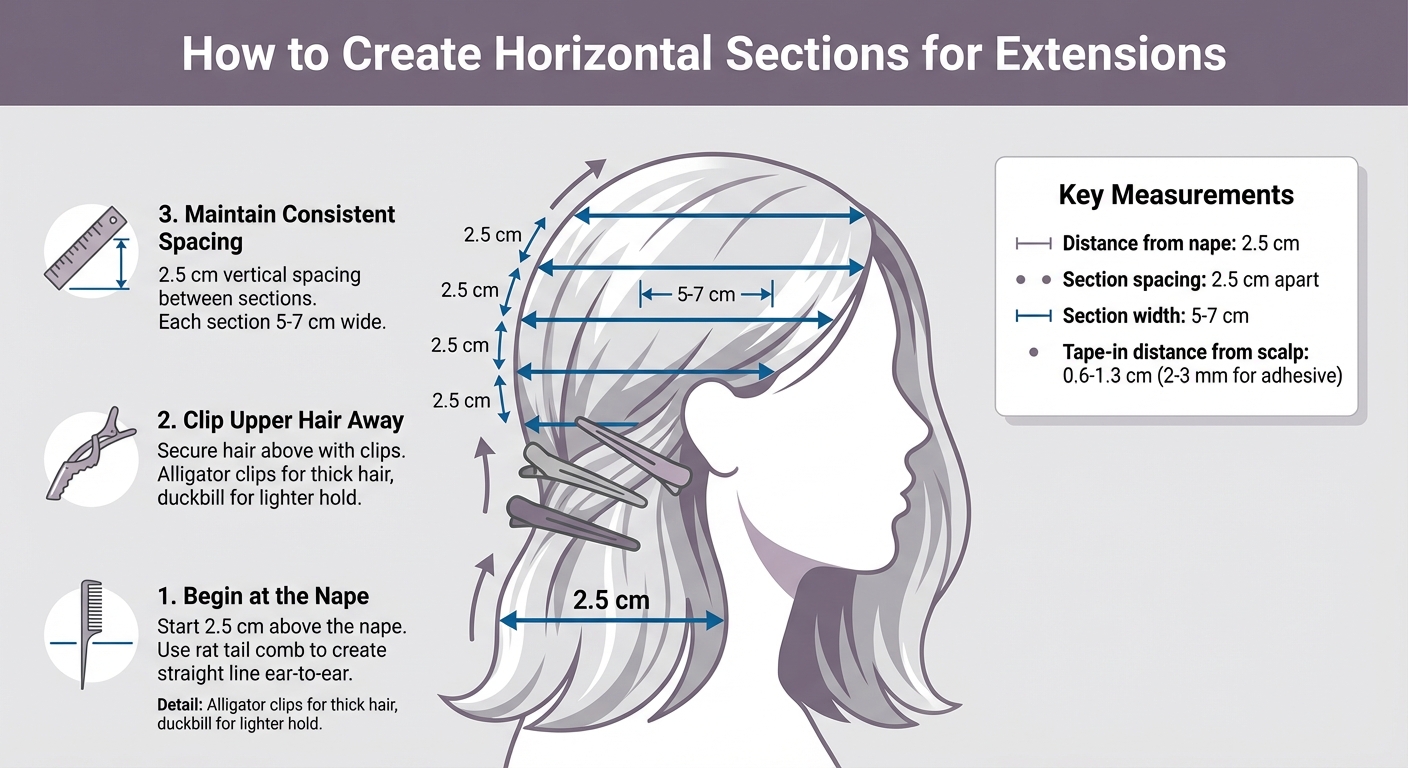
Begin at the Nape
Start by making your first horizontal parting about 2.5 cm above the nape of your neck. Use a rat tail comb to draw a straight, even line from ear to ear across the back of your head. This parting serves as the foundation for your extensions, so make sure it’s level to avoid any misalignment.
Clip the Upper Hair Away
Once you’ve created the first section, secure the hair above it with sectioning clips. This keeps the area you’re working on neat and free from stray strands. For thicker hair, alligator clips work best, while plastic duckbill clips are ideal for a lighter hold. Keeping the upper layers clipped away ensures you can focus on the exposed section without distractions.
Keep Section Widths Consistent
As you move upward from the nape, maintain a vertical spacing of about 2.5 cm between each horizontal section. Each section should be roughly 5–7 cm wide to ensure the extensions are evenly distributed. Consistent sectioning helps avoid gaps and ensures the weight of the extensions is balanced. For tape-in extensions, the thickness of each section is crucial - too much hair can prevent the tape from sealing properly, while too little may lead to slippage. Place tape-in extensions between 0.6 and 1.3 cm away from your scalp to allow natural movement and flexibility.
sbb-itb-dcde78e
Sectioning Methods for Different Extension Types
Each type of hair extension calls for specific sectioning techniques to ensure a natural look and secure placement. Clip-ins require straightforward horizontal partings, tape-ins depend on thin, staggered rows, and permanent extensions demand meticulous micro-sectioning. Let's break down the techniques for clip-in, tape-in, and other extension types, building on the foundational sectioning principles.
Clip-In Extensions
Clip-in extensions use a simple horizontal sectioning approach, starting from the nape and working upward. The widest section of your head - around the middle of each ear - is perfect for placing the largest 4-clip wefts. This placement helps achieve both volume and width. For a seamless look, ensure the wefts sit below eyebrow level to keep the clips well-hidden. Lightly teasing the roots before attaching each weft can also help them stay secure all day. Hair Wonderland's Invisi® weft technology offers a thinner, flatter design - up to 30% slimmer than traditional wefts - making them virtually undetectable when sectioned properly.
For the sides, create partings about 5 cm above the ears to fit smaller 2-clip wefts, while single-clip pieces can fill in thinner areas near the temples. Always keep wefts at least 2.5 cm away from the hairline to prevent visibility when your hair moves. When attaching multi-clip wefts, start by securing the centre clip to ensure the piece is evenly placed before fastening the side clips.
Tape-In Extensions
Tape-in extensions rely on the "sandwich" method, where a thin slice of natural hair - about 3 mm thick - is placed between two adhesive tape wefts. This technique ensures proper bonding and a natural appearance. Rows should be applied in a staggered, brick-laying pattern to avoid gaps and evenly distribute weight. To allow for natural movement, position tapes about 2–3 mm away from the scalp. For the adhesive to bond effectively, follow hair cleansing recommendations and wait 48–72 hours before washing your hair. Depending on hair density, a full head typically requires 40–80 pieces (or 20–40 sandwiches).
Other Extension Methods
Other methods, like sew-ins, microbeads, and fusion extensions, also demand precise sectioning. Sew-in extensions involve horizontal braids or cornrows for weft attachment, while the LA Weave method uses micro rings for a flatter, more comfortable base. Microbead (I-tip) and fusion (K-tip) extensions require micro-sectioning to isolate small strands of natural hair. For fusion extensions, keratin-tipped strands are bonded to hair using heat.
These permanent options require professional upkeep every 5–6 weeks. During maintenance, your stylist will re-section your hair to ensure the extensions are attached to a suitable, weighted section of natural hair. This step is crucial for protecting the health of your natural hair.
"During maintenance, we'll re-section your hair to ensure the extensions are placed on a suitable, weighted section, protecting your natural hair." - Hair Wonderland
Common Sectioning Mistakes to Avoid
When it comes to applying extensions, even seasoned stylists can slip up. Precision is key - rushing through the process or cutting corners can lead to issues that are hard to fix later. Let’s break down some common mistakes and how to avoid them.
Uneven Partings
Crooked or wavy partings can throw off the entire application. If you’re using your fingers instead of proper tools, you’re more likely to create uneven sections that not only look messy but can also strain your hair unnecessarily.
"Straight sections of hair significantly help when applying for extensions as this prevents uneven application and unnecessary pulling on your hair follicles".
Without a systematic approach, it’s easy to lose track of which sections you’ve completed. This can result in inconsistent widths, leading to a patchy or unbalanced look.
Placing Extensions Too Close Together
Spacing matters - a lot. Extensions placed too close together can lead to bulging bonds, making the application look unnatural. This is especially problematic near the crown, where improper placement is more noticeable. To avoid this, aim to space your horizontal sections about 2.5 cm apart for even coverage and a smooth blend.
For tape-in extensions, use a staggered, brick-laying pattern instead of stacking rows directly on top of each other. Before wrapping up, gently backcomb the underside of your top cover section near the crown to ensure the bonds are discreetly hidden.
Skipping Hair Preparation
Neglecting proper hair preparation is a recipe for disaster. Unwashed or tangled hair prevents adhesives from bonding well and increases the risk of extensions slipping out. After washing, always detangle your hair with a brush designed for extensions, and ensure it’s completely dry before starting the application.
Hair Wonderland highlights the importance of maintenance:
"As your extensions grow, the section of natural hair they're attached to becomes smaller due to daily shedding. During maintenance, we'll re-section your hair to ensure the extensions are placed on a suitable, weighted section, protecting your natural hair".
Taking the time to prepare your hair properly not only ensures a secure application but also protects your natural hair from unnecessary stress and damage.
Conclusion
As outlined earlier, proper sectioning is the cornerstone of achieving a flawless and professional look with hair extensions. By combining the right tools, careful preparation, and deliberate techniques, you can protect your natural hair while ensuring extensions blend seamlessly. These steps form the backbone of every extension method discussed.
Start at the nape of your neck, working upward in even, horizontal sections to create balanced volume and keep bonds discreet. Whether you’re using clip-ins, tape-ins, or any other type of extensions, precision is key. Preparing your hair by washing, drying completely, and detangling ensures a solid base for application and helps your extensions last their full lifespan of 9–12 months.
Regular maintenance is just as important. Adjusting and re-sectioning during follow-up appointments ensures the extensions stay securely attached to the right sections of hair, accommodating natural growth and shedding.
Ready to achieve salon-quality results at home? Hair Wonderland provides everything you need to get started. From premium double-drawn Russian/Mongolian human hair extensions (priced at $499.00 for the Seamless Set 22") to must-have tools like the Tangle Tamer Brush ($21.95), they’ve got you covered. Trusted by salons across Australia, their extensions are celebrated for their thickness, durability, and ability to blend naturally.
With the right techniques and high-quality products, you can elevate your extension game and enjoy the confidence that comes with perfectly applied, natural-looking results.
FAQs
How do I make my hair extensions look natural?
To make sure your extensions blend naturally with your own hair, start by selecting top-notch extensions that closely match your hair's colour, texture, and length. Hair Wonderland offers double-drawn Russian and Mongolian extensions, which are popular for their consistent thickness and shine, giving a seamless, natural appearance.
Before you apply the extensions, prepare your hair thoroughly. Wash it with a gentle, sulphate-free shampoo, follow up with a conditioner, and make sure it’s completely detangled. When it’s time to section your hair, aim for small and even sections, about 1–2 cm wide. Position the extensions close to the scalp and align them with your hair’s natural growth pattern for the best blend.
After the extensions are in place, style your hair and extensions together for a polished look. Always use a heat protectant when curling or straightening, and steer clear of products containing sulphates or high levels of alcohol, as these can cause slipping. To keep your extensions looking fresh and natural, schedule regular maintenance - re-sectioning and trimming every 4–6 weeks is ideal. This will help maintain their flawless appearance over time.
What’s the best way to care for hair extensions over time?
To keep your Hair Wonderland extensions in great condition, balance regular salon visits with gentle at-home care. Schedule a trip to your stylist every 5–6 weeks (or every 4 weeks if your hair is on the finer side) to re-section and refresh the extensions. Leaving them in for too long can compromise both your natural hair and the lifespan of the extensions.
At home, stick to products specifically designed for extensions. Avoid anything containing protein, keratin, sulphates, or high alcohol content - these ingredients can dry out the extensions. Start your day by gently brushing with an extension-safe tool, like the Hair Wonderland Detangle Brush, to keep tangles at bay. When styling, use low-heat tools and always apply a heat protectant. If you're not wearing your extensions, store them properly in a breathable bag or on a mannequin head to help them retain their shape and quality.
When it’s time to wash, choose a sulphate-free, moisture-rich shampoo and conditioner. Rinse with cool water to lock in moisture and minimise the use of heat tools afterward. With the right care routine, you can enjoy the natural look, comfort, and longevity of your extensions for months.
What are common mistakes to avoid when sectioning hair for extensions?
Properly sectioning hair is essential for achieving a natural and comfortable look when applying extensions. One common mistake to steer clear of is overloading a section by attaching too many wefts or clips in one spot. This can put unnecessary tension on the scalp, increase the risk of breakage, and make attachment lines more visible. Similarly, placing extensions too close to the hairline or a fresh part can make the bonds stand out and irritate sensitive areas.
Another frequent misstep is skipping regular re-sectioning during maintenance. As natural hair sheds over time, the original sections can thin out, leading to slipping extensions or strain on the roots. To prevent this, re-sectioning every 4–6 weeks helps distribute the extensions across healthy, well-supported sections of hair.
Finally, avoid creating sections that are uneven or too tight. Tight braids or clips can be uncomfortable and strain the bonds, while uneven sections may result in an unbalanced appearance. For a smooth, seamless finish, use tools like a fine tail comb or sectioning clips to create even, well-spaced partitions.