

Clip-in extensions can instantly transform your look, but the real secret lies in how you section your hair. Proper sectioning ensures a natural appearance, prevents discomfort, and keeps the extensions secure throughout the day. Here's what you need to know:
- Start at the nape: Create clean, horizontal partings with a rat-tail comb, working upwards in layers.
- Use the right tools: A pintail comb, detangling brush, and strong sectioning clips are essential.
- Secure the clips: Tease roots lightly for better grip, especially if your hair is fine or silky.
- Placement matters: Keep extensions below the crown and leave enough natural hair on top to hide the wefts.
- Prepare your hair: Work with clean, dry hair for better hold and avoid oily or damp strands.
This step-by-step method ensures your extensions blend naturally, stay hidden, and feel comfortable all day. With practice, you'll achieve a polished look in just minutes.
how to put in clip-in hair extensions with placement guide
Why Proper Sectioning Matters for Clip-In Extensions
Getting the sectioning right is key to achieving a natural and secure look with clip-in extensions. Horizontal sections create a solid base, helping the extensions sit flat against your scalp. This avoids bumps and ensures the clips hold firmly in place. Professional stylists often layer extensions carefully, working section by section, to blend them seamlessly with your natural hair.
When sectioning is off, problems can arise. Crooked or uneven parts can cause the extensions to sit awkwardly, creating an uneven or bulky appearance. If the clips aren’t properly secured, they might slip or tug uncomfortably, which nobody wants. Another common issue is stray hairs crossing the section line - these can get caught in the clips, leading to painful snagging. All of this highlights just how important it is to take a strategic approach to sectioning.
Good sectioning also ensures there’s enough of your natural hair to cover the wefts completely. Placing the extensions below the crown or eyebrow level helps keep the attachment points hidden, even as you move. For those with finer hair, lightly teasing the roots can improve grip, reducing the chance of slippage and keeping everything in place.
In short, precise sectioning is what takes clip-in extensions from obvious to invisible. Starting at the nape and working upwards in a methodical way helps distribute volume evenly. On the flip side, haphazard clipping can leave you with an unnatural look and exposed wefts. A little extra effort with sectioning can make all the difference for a flawless finish.
Tools You Need for Sectioning
Getting precise sections starts with having the right tools. A pintail comb (also known as a tail or rat-tail comb) is a must-have for creating clean, straight horizontal partings. Its long, pointed end makes it easy to trace neat lines across your scalp, ensuring your extensions lie flat and stay secure. Hope Saxton Howes, a hair extensions expert at hairextensions.co.uk, highlights the importance of this: "Straight sections of hair significantly help when applying for extensions as this prevents uneven application and unnecessary pulling on your hair follicles".
A detangling brush is equally important. Start by detangling your hair to ensure smooth, clean lines before sectioning. Options like Hair Wonderland's Tangle Tamer Brush ($21.95) or The Detangle Brush ($29.95) work well for this step. Once detangled, tools such as the Hair Wonderland Styling Comb ($12.95) are perfect for crafting precise partings, thanks to their lightweight design and fine-toothed structure.
These tools are the foundation for achieving a polished look with your extensions.
Hair Wonderland Styling Comb and Tangle Tamer Brush

Begin with the Tangle Tamer Brush to gently remove knots, then switch to the fine-toothed Styling Comb for creating even, horizontal partings. The comb’s pointed tail end allows you to trace straight lines effortlessly from ear to ear.
If you have fine or silky hair, the Styling Comb can also be used to lightly backcomb or tease the roots within each section. This adds texture, creating a secure "anchor" for the extension clips to grip onto, reducing the risk of slippage throughout the day.
Once your sections are ready, secure them with strong, reliable clips.
Sectioning Clips
High-quality sectioning clips are essential for keeping your hair in place while you work. They need to hold large sections of hair firmly, keeping non-working areas out of the way as you attach each weft. Clips that slip or fail to hold securely can lead to stray strands falling into your partings, causing discomfort and uneven results. For thick or heavy hair, double-hinged croc clips or rubberised butterfly clips are excellent choices. These clips provide a strong grip and are affordable, making them a practical addition to your toolkit. Having four to six clips on hand ensures you can work through each layer systematically without feeling rushed.
Preparing Your Hair and Workspace
Start with clean, dry hair. Natural oils or leftover product can make it difficult for extension clips to stay in place, while damp hair can stretch and lead to slippage as it dries. Maiden Hair Extensions highlights this, saying:
"Start with clean, dry hair. Oily hair can make clips slip, and wet hair can tangle more easily when attached to the clip in wefts".
Use a gentle shampoo to remove any buildup, but avoid products that leave heavy residues. If you're blow-drying, stick to a low heat setting to minimise damage, or let your hair air dry naturally. When towel-drying, pat your hair gently to avoid frizz or tangles.
Once your hair is completely dry, detangle it by brushing from the ends upward using a detangling brush. If you have fine or very silky hair, a small amount of dry shampoo or texturising spray at the roots can add the grip needed for the clips to hold securely.
Now, set up your workspace. Make sure you have all the essentials within reach: a mirror, a pintail comb, sectioning clips, and your extension wefts sorted by width. Being organised ahead of time makes the application process smoother and more efficient. With your hair and tools ready, you're all set to move on to sectioning for a seamless extension application.
sbb-itb-dcde78e
How to Section Hair for Clip-In Extensions
Step-by-Step Guide to Sectioning Hair for Clip-In Extensions
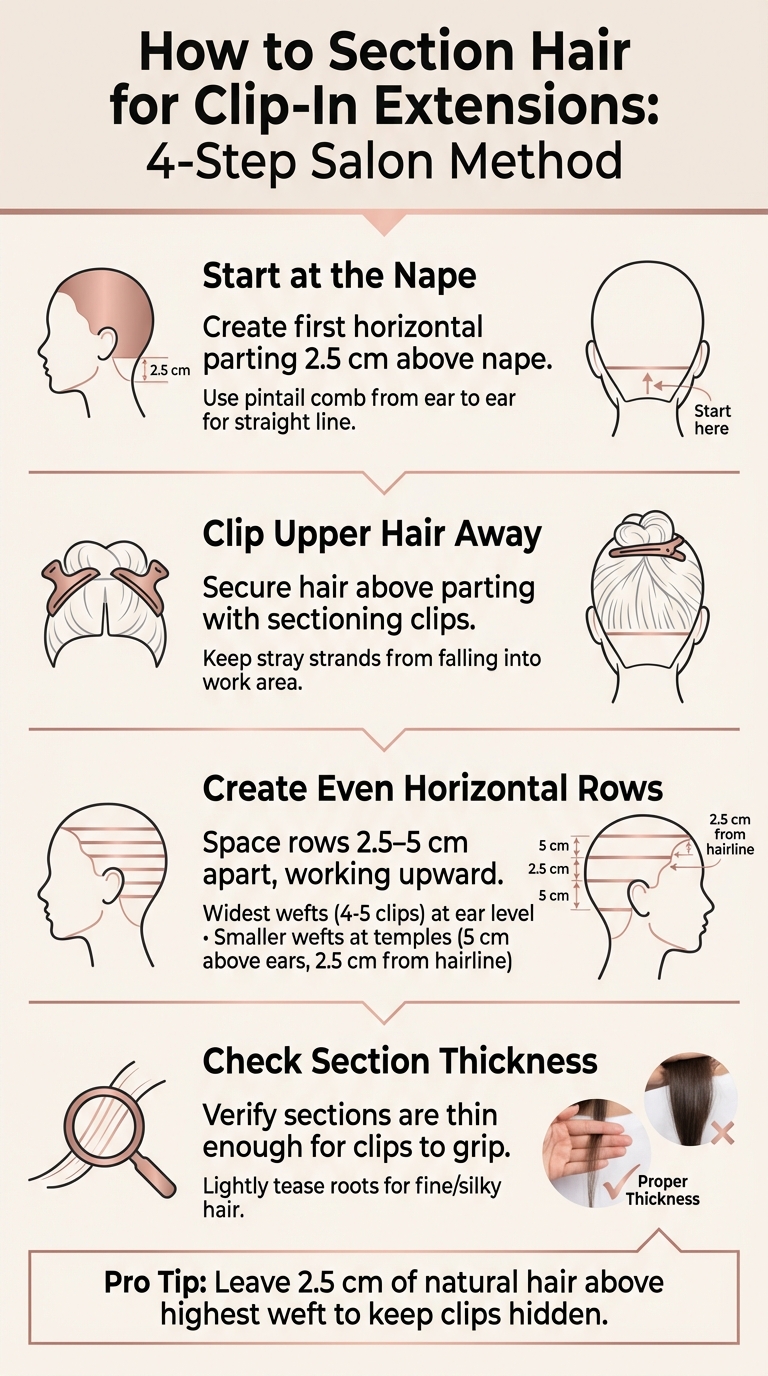
Start with a Horizontal Parting at the Nape
Stand in front of a mirror and place a second mirror behind you so you can see the back of your head clearly. Use a pintail comb to create your first horizontal parting about 2.5 centimetres above the nape of your neck. This initial section is the foundation for your clip-in extensions and ensures they’ll sit naturally. Run the comb from ear to ear, making sure the line is straight and level. If you have shorter layers at the nape that might stick out, braid or pin this bottom layer flat against your scalp to create a smooth, seamless base.
Clip Upper Hair Out of the Way
Once your first parting is in place, use sectioning clips to secure the hair above it. Position the clips high enough to keep stray strands from falling into your work area. This keeps your section neat and makes the process much easier.
With the upper hair clipped away, you can focus on creating consistent rows for your extensions.
Create Even Horizontal Rows
As you work your way up, make additional horizontal partings spaced roughly 2.5 to 5 centimetres apart. Keep each new row parallel to the one below it - check in the mirror to make sure your lines are straight. Use your widest wefts (the ones with 4 or 5 clips) for the broadest part of your head, usually around the middle of your ears. Smaller wefts should go near the temples and sides, about 5 centimetres above the ears and at least 2.5 centimetres away from the hairline. Leaving a small amount of natural hair near your part helps keep the clips hidden.
Check Section Thickness for Natural Blending
After defining your rows, inspect the thickness of each section. It should be thin enough for the clips to hold securely but thick enough to support the weft.
"Ensure the section is thin enough for the clips to grasp securely... sections should be parallel to each other and the floor".
If your hair is fine or slippery, lightly backcomb or tease the roots of each section before attaching the weft. This creates a textured base that gives the clips a better grip, reducing the chance of slippage throughout the day.
Attaching Hair Wonderland Clip-In Extensions
Now that your hair is sectioned, it’s time to attach your extensions. These clean sections create the perfect foundation for precise placement. The Hair Wonderland 22" Seamless Set is designed with Invisi® weft technology - a thin, flexible silicone base that sits completely flat against your scalp. This eliminates the bulky look often associated with traditional stitched wefts, giving you a smooth, natural finish.
Start at the nape of your neck with a 3-clip weft, positioning it about 2.5 centimetres above your hairline. Begin by snapping the middle clip into place to centre the weft, then secure the side clips while keeping the weft taut.
"Clipping the middle clip to your head first will help you have a secure grip when attaching the other clips in a straight line." – Hope Saxton Howes
From here, work your way upwards for full coverage. At the widest part of your head - typically near ear level - apply the largest wefts (usually with 4 or 5 clips) to maximise coverage. Next, place a large weft approximately 5 centimetres below the crown, leaving enough natural hair on top to completely cover the seam. For the finishing touches, add smaller 2-clip and 1-clip wefts at the temples and sides, angling them upward for a natural blend. Once all the wefts are in place, gently comb through your hair to seamlessly integrate the extensions with your own strands.
How to Position the 22" Seamless Set
Once your extensions are clipped in securely, proper placement is key for even weight distribution and lasting comfort. Made from 100% Remy European Human Hair, the 22" Seamless Set weighs 200 grams and is designed to balance evenly, preventing any strain on your scalp.
To achieve the best results, follow this placement sequence: start at the nape, move through the middle and upper back sections, and finish with the side pieces. Always leave at least 2.5 centimetres of natural hair between your highest weft and your parting - this "one-inch rule" ensures the clips remain invisible. After attaching each weft, give it a gentle tug to check its security. If it feels too tight or pinches, reposition it immediately. Properly applied extensions should feel comfortable enough for all-day wear without causing any discomfort.
Tips for a Natural-Looking Finish
Once your extensions are clipped in, the key to a flawless look is blending them seamlessly with your natural hair. Since the Hair Wonderland 22" Seamless Set is made from 100% Remy European Human Hair, you can heat-style it to match your hair’s texture perfectly. Use a curling wand or straightener on both your natural hair and the extensions at the same time. This creates consistent movement, and curls or waves work especially well to disguise the transition between lengths.
To keep your extensions secure and natural-looking all day, focus on the roots. Lightly backcomb or tease the roots where the clips are attached. This technique not only creates a stronger grip - especially important for fine or silky hair - but also ensures the extensions sit naturally without slipping.
If your extensions are much longer than your natural hair, consider layering them for a smoother blend. You can have them professionally trimmed or layered after clipping them in to avoid a harsh "shelf" effect. This allows the extensions to integrate more naturally with your haircut. For shorter hair, try braiding or pinning the bottom layer at the nape of your neck before attaching the first weft. This keeps shorter strands from peeking out beneath the extensions.
Finally, focus on the crown area. Before laying your natural hair over the top-most weft, gently tease the underside of the crown section. This extra volume helps keep the extension tracks hidden for a flawless finish.
Conclusion
Perfecting the salon method is the key to achieving flawless clip-in extensions. Start by creating clean, horizontal partings with a rat-tail comb and secure each section with clips. This provides a stable, natural base that avoids uneven placement and protects your hair follicles from unnecessary strain.
Work from the nape of your neck upward, spacing horizontal rows 2.5–5 centimetres apart. Always leave at least 2.5 centimetres of natural hair above each weft to ensure the extensions remain hidden. For fine or freshly washed hair, a little backcombing at the roots can improve grip. These foundational steps are essential for achieving a polished, professional look.
With practice, you can reduce the entire process to just five minutes. The Hair Wonderland 22" Seamless Set, crafted from 100% Remy European Human Hair and featuring Invisi® weft technology, pairs perfectly with this technique, offering a seamless blend that lies flat against your scalp.
Using quality tools, such as the Hair Wonderland Styling Comb, and dedicating time to proper preparation will pay off. When done right, your extensions will look natural, stay secure, and move effortlessly with your own hair.
FAQs
Why is it important to section your hair when applying clip-in extensions?
Sectioning your hair is a crucial step when applying clip-in extensions. It helps the extensions blend smoothly with your natural hair, giving you a realistic finish. Plus, it ensures the extensions stay securely in place throughout the day.
Clean and precise sections allow you to distribute the extensions evenly, avoiding any awkward gaps or bulky spots. Whether you're styling at home or getting it done professionally, this step makes all the difference in achieving a polished look.
What tools do I need to section my hair for clip-in extensions?
For neat and accurate sectioning when applying clip-in extensions, you'll want a few must-have tools. A rat-tail comb is perfect for creating clean, even sections, while sectioning clips help keep the rest of your hair out of the way as you work. A mirror is essential for checking alignment and ensuring the extensions blend naturally.
Don't forget a hairbrush to detangle both your natural hair and the extensions before and after application. With these tools, you can achieve a flawless, professional-looking result every time.
What’s the best way to make clip-in extensions look natural?
To help your clip-in extensions look as natural as possible, start by parting your hair into clean, precise sections using a rat-tail comb. This ensures the extensions sit close to your scalp and lay flat, blending effortlessly with your natural hair.
Select extensions that closely match your hair colour and length for the best results. After clipping them in, style your natural hair and extensions together - whether you’re curling, straightening, or lightly teasing - to create a seamless, polished look. The secret lies in careful sectioning, proper placement, and blending everything smoothly.