

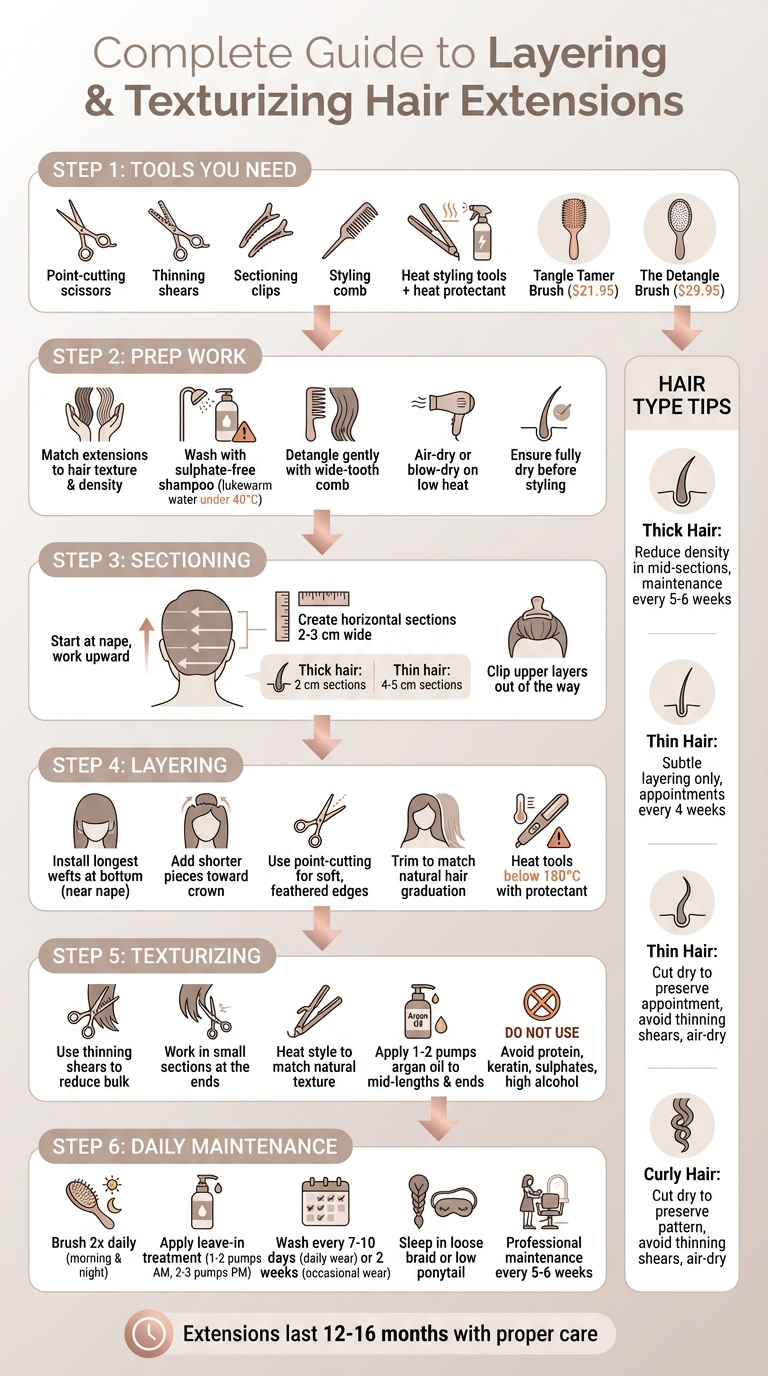
Extensions often look heavy or unnatural without proper layering and texturising. Here's how you can make them blend seamlessly with your natural hair:
- Tools You Need: Point-cutting scissors, thinning shears, sectioning clips, a styling comb, and heat styling tools (always paired with a heat protectant).
- Prep Work: Match your extensions to your hair's texture and density. Wash and detangle them gently, ensuring they're dry before styling.
- Layering Steps: Start with the base layer, trimming to match your hair's natural graduation. Use point-cutting for soft, feathered edges.
- Texturising Techniques: Thin out bulk with thinning shears or razors. Heat styling helps blend textures but always use a protectant.
- Hair Type Tips: Thick hair needs bulk reduction, thin hair requires subtle layering, and curly hair demands dry cutting to preserve its pattern.
- Daily Care: Brush twice daily with a detangling brush, apply leave-in treatments, and avoid products with sulphates, protein, or high alcohol content.
With these steps, you'll achieve a natural look while maintaining the health and longevity of your extensions. Regular maintenance every 5–6 weeks is key to keeping them secure and polished.
Step-by-Step Guide to Layering and Texturizing Hair Extensions
The Secret to Seamless Blending - Hair Extension Tutorial
sbb-itb-dcde78e
Tools and Products You'll Need
Before diving into layering and texturising, it’s essential to have the right tools and products on hand to ensure natural-looking, long-lasting results.
Required Tools
Start with professional-quality point-cutting scissors and thinning shears. These are perfect for creating soft, feathered edges that blend seamlessly between natural hair and extensions. To keep sections neat and even, use sectioning clips - either alligator or duckbill clips work well. A styling comb is also a must-have for teasing the roots of your natural hair, providing a secure base to keep clip-in extensions in place.
For heat styling, invest in high-quality tools and always pair them with a heat protectant spray to avoid damaging the extensions. Interestingly, heat styling can enhance the look and feel of 100% Remy human hair extensions when done correctly. For daily upkeep, tools like the Tangle Tamer Brush ($21.95) and The Detangle Brush ($29.95) are essential. Use them morning and night, as well as before washing or swimming, to prevent matting.
With these tools ready, you’re all set to move on to choosing the right products for the best results.
Hair Wonderland Products

The Seamless Set 22" ($499.00) offers premium double-drawn Russian human hair with Invisi-Weft technology. These extensions are up to 30% thinner than traditional options, making them almost invisible when worn. This 200-gram, 6-piece clip-in set has earned a perfect 5.00-star rating from 8 reviews.
Because extensions don’t benefit from your scalp’s natural oils, hydration is key. The Moisture Magic Leave-in Treatment ($39.95) delivers lightweight moisture - use 1-2 pumps on mid-lengths and ends in the morning, and 2-3 pumps at night. For secure application, the Styling Comb ($12.95) is ideal for teasing roots before attaching the extensions. With proper care and these products, extensions can last between 12-16 months when used for special occasions.
These tools and products not only help maintain the extensions but also ensure precision when layering and texturising.
Preparation Steps Before Layering and Texturising
Getting your hair ready is key to achieving precise, balanced layering and texturising. Here’s how to set yourself up for success.
Matching Extension Texture to Your Natural Hair
Start by identifying your hair's natural texture - whether it’s straight, wavy, curly, or coily - and select extensions that closely match. For fine hair, lightweight single-drawn wefts are ideal, as they maintain volume without feeling too heavy. If your hair is thicker, double-drawn extensions, like the premium Russian/Mongolian options from Hair Wonderland, provide fuller, more uniform ends. Before committing, test a small sample of the extensions with your usual styling routine. This quick check ensures the extensions will blend seamlessly and look natural once installed.
Preparing Extensions for Styling
Before styling, give your extensions some TLC. Wash them with lukewarm water and a sulphate-free shampoo, then condition from the mid-lengths to the ends. Rinse thoroughly to avoid product build-up. Detangle gently using a wide-tooth comb or the Tangle Tamer Brush from Hair Wonderland ($21.95), which helps minimise shedding. Allow the extensions to air-dry, or use a blow-dryer on a low heat setting and safely heat style hair extensions with a heat protectant. For curly extensions, attach a diffuser to maintain their natural pattern. Always ensure the extensions are fully dry before sectioning - damp hair can slip during layering, leading to uneven results.
Sectioning Hair for Even Distribution
Proper sectioning is essential for a natural, well-balanced look. Begin at the nape, creating horizontal sections 2–3 cm wide using a tail comb. Clip the upper layers out of the way and work upward in increments of 2–5 cm. For thicker hair, stick to 2 cm sections, while thinner hair can handle 4–5 cm sections. Lay out your extensions in matching horizontal wefts, starting with the longest at the bottom. Secure each weft close to the roots with clips to mimic the natural fall of your hair. This method ensures even distribution and sets the stage for precise layering.
How to Layer Extensions: Step-by-Step Checklist
Layering extensions is all about creating a natural, dimensional look. By blending varied lengths - shorter pieces near the crown and longer ones at the ends - you mimic the way hair grows naturally. This approach helps avoid the "wig-like" effect and eliminates any harsh lines where your natural hair meets the extensions.
Once your extensions are prepped and sectioned, follow these steps to achieve a seamless, natural blend.
Creating the Base Layer
Start by measuring from the crown of your head to your desired hair length, then add an extra 5 cm to allow for precise trimming. Choose extensions slightly longer than your target length - Hair Wonderland's 22-inch Seamless Sets work perfectly for this purpose. Ensure the tones and textures of the extensions match your mid-length hair for a smooth transition. Once you've installed the extensions based on your sectioning plan, trim them to follow the natural graduation of your hair.
To protect the Remy cuticles during styling, use heat tools set below 180°C and always apply a heat protectant. Position the base layer on weighted sections of your natural hair to provide proper support. Once the base layer is in place, you can build additional layers for more dimension.
Cutting Additional Layers
After cutting the base layer, refine and soften the extensions using point-cutting techniques. This method creates graduated layers that move naturally. To do this, hold the scissors vertically and point-cut upwards from the base layer to achieve a soft fade.
Once the layers are cut, apply 1–2 pumps of a lightweight treatment oil, such as argan oil, to the mid-lengths and ends to keep the extensions smooth and manageable. Style the new layers using professional heat tools like GHD, but avoid products containing protein, keratin, sulphates, or high alcohol content, as these can leave the extensions feeling stiff. To maintain a natural look, plan to re-section the extensions every 4–6 weeks.
Texturising Extensions for Natural Blending
Layering adds dimension, but it’s texturising that brings the softness and movement needed for a seamless, natural look. Without proper texturising, even well-layered extensions can appear too uniform or heavy compared to your natural hair. The right techniques help remove bulk, add depth, and ensure your extensions move naturally alongside your hair.
Refining textures requires the right tools and techniques.
Using Thinning Shears or Razors
Thinning shears are a must-have for reducing bulk and achieving a natural finish. Pay attention to the ends of your extensions, where blunt lines tend to stand out. Work in small sections, using thinning scissors to gently reduce density and avoid harsh transitions or choppy edges. If you’re investing in tools, thinning scissors designed for extensions typically start at around AU$15.00.
Heat Styling for Texture Matching
Heat styling is an effective way to match your extensions to the texture and movement of your natural hair. But here’s the golden rule: always use a heat protectant spray to keep the hair fibres intact. High-quality tools, such as those from GHD or Cloud 9, are great for achieving a polished, professional finish without causing unnecessary damage.
"Heat styling is beneficial for extensions; always use high-quality tools like GHD or Cloud 9 with heat protectant spray." - Hair Wonderland
For wavy or curly extensions, air-drying can help maintain their natural bounce and texture. If you’re blending different curl patterns, try mixing Russian vs Mongolian hair extensions or different textures before styling. To refresh movement in the morning, apply 1–2 pumps of treatment oil to the mid-lengths and ends. Avoid products with protein, keratin, sulphates, or high alcohol content, as these can create stiffness and disrupt a natural blend. Instead, opt for lightweight styling products that maintain the extensions' movement without weighing them down.
Layering and Texturising by Hair Type
When it comes to layering and texturising, your natural hair type plays a big role in determining the right techniques. The goal? To make sure your extensions blend effortlessly and move naturally with your own hair.
Thick Hair
Thick hair can easily look bulky if not handled carefully. To avoid a heavy or uneven look, focus on reducing density in the mid-sections without compromising length. Extensions should be applied to areas with enough weight, as natural shedding can reduce attachment points over time. It's a good idea to schedule maintenance appointments every 5–6 weeks to have your extensions re-sectioned and adjusted. To keep your hair soft and manageable, apply 1–2 pumps of treatment oil daily to the mid-lengths and ends. This will also make styling easier.
Thin Hair
For thin hair, the aim is to enhance volume and create dimension while preserving your natural hair’s density. Subtle layering is key - avoid aggressive texturising, as it can leave extensions looking sparse. Regular appointments every 4 weeks are essential to prevent damage from the added weight of extensions and to ensure they’re placed on properly weighted sections. When washing, focus shampoo on the scalp and conditioner on the mid-lengths and ends to avoid weighing down the roots or causing bonds to slip. Finish with a cool rinse to seal the cuticles and lock in moisture.
Curly Hair
Curly hair needs a completely different approach. Always cut curly extensions dry, as this reveals their true curl pattern and spring. Wet curls can be deceptive - they shrink by up to 80% when drying.
"Curls need some weight at the ends to form correctly and hold their shape." - Louise O'Mullane, Stylist
Avoid thinning shears on curly extensions, as they disrupt the curl pattern and lead to frizz. Instead, cut individual curls to maintain their natural coil and clumping. This ensures smooth, blended layers without harsh lines. Wash extensions sparingly, let them air-dry, and then cut to see the true curl pattern. At night, use the "pineappling" method - gather your hair into a loose ponytail - and sleep on a silk or satin pillowcase to protect the texture and layering.
Blending and Final Touches
When it comes to extensions, the final blending stage is what separates a flawless, natural look from an obvious one. This is where you shape, refine, and add those finishing touches that bring everything together with movement and shine.
Removing Harsh Lines
One of the best ways to achieve a seamless blend is by using point-cutting. This involves holding your scissors vertically and trimming into the ends rather than cutting straight across. This technique creates soft, feathered edges that blend naturally. Additionally, slicing or slithering from the mid-shaft to the tips using thinning shears or a razor helps soften transitions and adds movement to the hair. Work in small sections, checking your progress often to ensure the result stays soft and free of blunt lines.
Pay extra attention to the areas around your face. Gentle, precise trimming here is essential to create a natural, face-framing effect. Once the shape is perfected, finish by applying a light product to lock in the seamless blend.
Applying Leave-In Conditioners and Styling Products
After blending, it’s time to nourish and protect your extensions. Use 1–2 pumps of argan oil daily on the mid-lengths and ends to add shine. For extra hydration, apply a little more in the evening to restore moisture.
Post-wash care is equally important. Start with 2 pumps of argan oil, then follow up with a heat protectant spray or blow-dry cream on damp hair before styling. A lightweight leave-in conditioner can also help shield your extensions from external factors while keeping them soft and manageable. Always focus on the mid-lengths and ends, steering clear of the bonds or attachment points to avoid loosening the extensions. If you want extra texture, a light mist of texturising spray can do the trick - just don’t overdo it, as too much product can weigh the hair down.
These finishing touches not only elevate your look but also help maintain the health and longevity of your extensions, ensuring they stay beautiful and natural-looking for longer.
Maintenance Checklist for Extension Longevity
After achieving your perfectly layered look, sticking to a consistent daily routine is key to keeping your extensions looking flawless and blending naturally for months.
Daily Care Routine
Brush your hair twice a day - once in the morning and again before bed - using the Tangle Tamer Brush from Hair Wonderland. Designed specifically for premium Russian and Mongolian extensions, its flexible, ball-tipped pins glide through knots without tugging at your newly layered hair. Always start brushing at the ends, working your way up to ensure your natural hair and extensions blend seamlessly.
Before bed, secure your hair in a loose braid or a low ponytail to prevent stress on the ends. Sleeping with wet hair is a no-go, as it can lead to matting. For curly extensions, use a microfibre towel to scrunch your hair gently and detangle extensions without damage by finger-detangling instead of brushing. To maintain shine, apply 1–2 pumps of argan oil in the morning and 2–3 pumps at night to keep your hair hydrated.
Washing and Product Use
If you wear your extensions daily, wash them every 7–10 days. For lighter use, you can stretch this to two weeks. Over-washing can strip the protective oils, especially in the texturised areas, which can lead to matting and faster wear. If you notice issues like shedding or slippage, consult our guide on common hair extension problems and solutions. When washing, stick to lukewarm water under 40°C to protect the ends. Use a sulphate-free shampoo, applying it to the mid-lengths and ends. Gently massage, rinse thoroughly, then apply conditioner to the ends only, leaving it on for 3–5 minutes before rinsing with cool water.
After washing, blot your hair gently with a towel (don’t rub), apply 2 pumps of argan oil to damp hair, and use a heat protectant spray or blow-dry cream before styling on medium heat. For daily touch-ups between washes, Hair Wonderland's leave-in conditioner and detangling spray are great for keeping your extensions hydrated without losing the volume created by layering. Avoid products with sulphates, protein, keratin, or high alcohol content, as these can make extensions difficult to manage and undo your careful texturising work.
Conclusion
Layering and texturising can make hair extensions blend so naturally that they look like your own. The secret to achieving this lies in three key factors: preparation, precision, and ongoing care.
Start by matching the texture and density of your extensions to your natural hair. When installing, layer the longest pieces at the nape and gradually work upwards with shorter pieces at the crown. Techniques like cutting hair extensions for custom lengths, razoring, and heat styling are essential for blending textures seamlessly.
Extensions, unlike natural hair, don’t receive nutrients from your scalp, so they require extra care to stay in top condition. Without proper upkeep, even the best-applied extensions can lose their shine and become difficult to manage. A consistent routine, including brushing twice a day, using treatment oils, and sticking to sulphate-free products, helps maintain their appearance.
Maintenance every 5–6 weeks isn’t just a good idea - it’s necessary. As your natural hair sheds daily, the sections supporting your extensions weaken over time. Regular re-sectioning redistributes the weight, preventing damage to your natural hair and ensuring your extensions stay secure and polished. Every step, from installation to upkeep, plays a role in keeping your extensions looking their best.
FAQs
Can I layer and texturise extensions at home without ruining them?
Yes, you can layer and add texture to your extensions at home, but it’s essential to handle them with care to avoid damage. Use tools like a wide-tooth comb or a soft brush, starting from the ends and working your way up to prevent tangles. If you’re styling with heat, always apply a heat protectant spray beforehand. Be gentle with heat settings, and if you’re trimming or layering, proceed cautiously. Avoid cutting too much unless you’re confident in your technique to preserve the extensions’ quality and appearance.
What’s the safest way to remove bulk without making extensions look thin?
To remove bulk from extensions without compromising their thickness, start by detangling them carefully. Use tools like wide-tooth combs, loop brushes, or detangling brushes, and always begin at the ends, working your way up to minimise damage. Applying a lightweight, alcohol-free detangling spray or leave-in conditioner can make this process smoother and gentler.
When it comes to layering, opt for precision shears or thinning scissors to achieve a natural and seamless blend. Take your time and work delicately to preserve the extensions' quality, avoiding unnecessary pulling or breakage.
How do I match extension texture to my natural hair for seamless blending?
To make extensions look natural, it's key to match them to your curl pattern, hair diameter, and overall density. If you have curly hair, prioritise finding extensions that align with your curl type and how your hair reflects light. For straight or wavy hair, focus on selecting textures that closely mimic your own. Use blending techniques like styling tools and detangling brushes to ensure a seamless appearance.
Before applying extensions, make sure your natural hair is well-hydrated and detangled. During styling, work in sections to achieve a polished, natural finish.