

Want your hair extensions to look natural and move like your own hair? The secret lies in layering. Properly layered extensions blend seamlessly with your natural hair, eliminating harsh lines and adding depth. Whether you're using clip-ins at home or working with professional methods like tape-ins, layering ensures your extensions look polished and undetectable.
Here’s the process in a nutshell:
- Why Layering Works: Mimics natural hair growth patterns, avoiding the "shelf effect."
- Tools You’ll Need: Thinning shears, texturising razor, sectioning clips, and heat styling tools.
-
Steps to Layer Extensions:
- Prep your hair and extensions (clean, detangled, and heat-protected).
- Place extensions strategically, starting at the nape and working upward.
- Use techniques like point cutting and slicing to create soft layers.
- Style with curls or waves for a smooth blend.
For long-lasting results, proper care is crucial. Use hydrating products, avoid harsh chemicals, and store extensions in a protective bag. With these tips, you can achieve natural-looking, flowing hair every time.
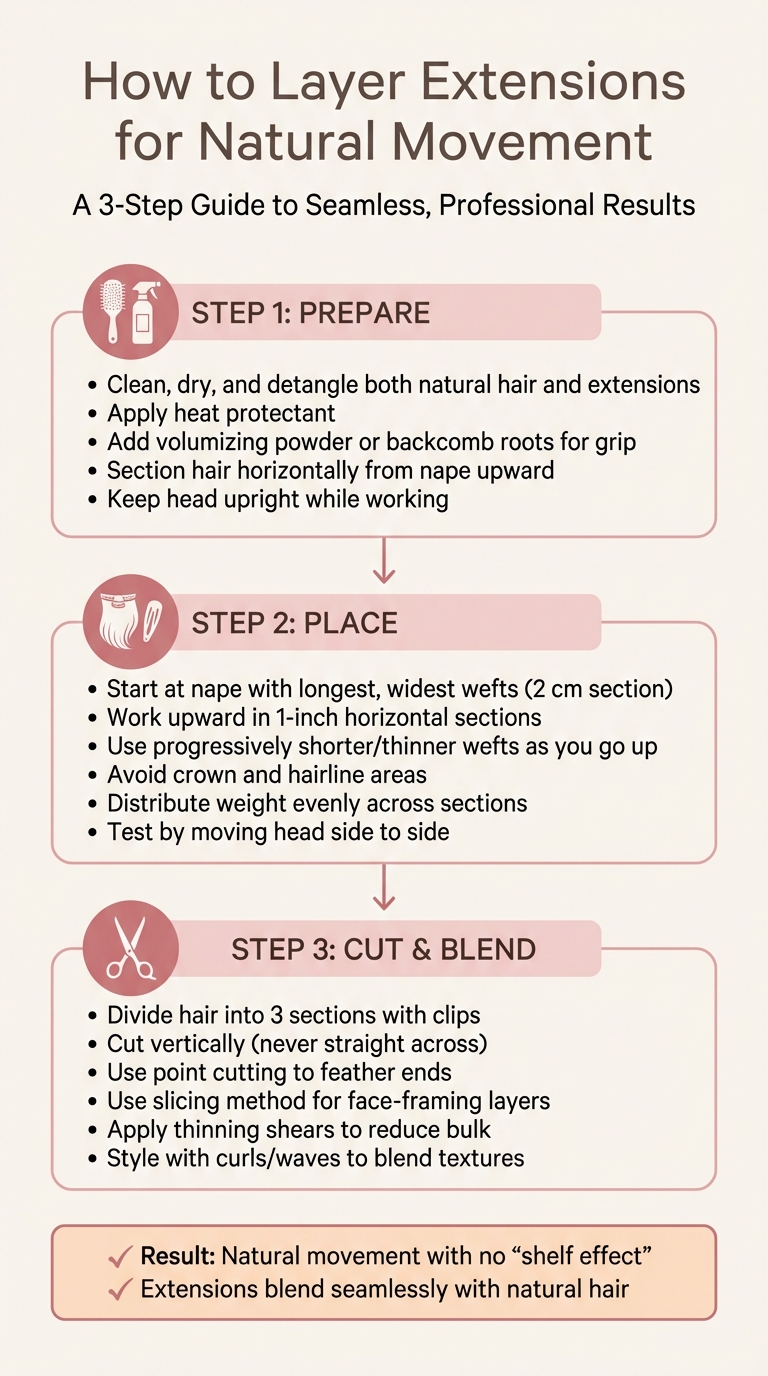
3-Step Process for Layering Hair Extensions Naturally
How to layer/cut your clip-in hair extensions | DIY project
sbb-itb-dcde78e
Tools and Products You'll Need
Having the right tools on hand makes all the difference when it comes to achieving smooth, professional layering at home.
Required Tools
Start with professional thinning and blending shears. These are essential for removing extra bulk and creating a seamless, feathered look. Avoid using regular household scissors - they can leave uneven, choppy cuts that make your extensions noticeable.
A texturising razor is another must-have. It adds movement to your hair, creating that effortless, natural finish. As Nicole Destefanao from Hair & Compounds, Inc. shares: "I love to use a razor to blend because it gives an automatic texture into the shape while you're cutting for a more lived-in blend."
To keep your sections neat and manageable, use sectioning clips. Pair these with a styling comb ($12.95) to guide your cutting and check your layers as you go. Before you start, detangle your hair with a Tangle Tamer Brush ($21.95) to ensure a smooth process.
Finally, have your heat styling tools - like a blow-dryer, curling iron, or straightener - ready. These are key for blending layers and hiding any transition lines between your natural hair and extensions.
Hair Wonderland Products
For a polished finish, Hair Wonderland offers specialised products tailored to your layering needs. Their Seamless Set 22" Clip-ins (priced at $499.00) are crafted from 100% Remy European Human Hair and feature Invisi® weft technology. These clip-ins lie flat against your scalp, adding volume without the bulky look that often gives extensions away.
Once your layering is complete, store your extensions in a Clip In Bag (priced at $54.00). This bag keeps them protected between uses, helping maintain their shape and extend their lifespan. Proper storage ensures your extensions stay in top condition, making it easy to achieve a natural, flawless look every time.
How to Layer Extensions: Step-by-Step
Step 1: Prepare Your Hair and Extensions
Start by making sure both your natural hair and extensions are clean, dry, and free of tangles. Blow-dry your hair until it’s smooth, and if your ends are blunt, soften them slightly to help the extensions blend naturally. Before using any heat tools, apply a heat protectant to safeguard your hair. Adding a small amount of hair oil can also help maintain a healthy appearance.
To keep clip-ins secure, apply a light dusting of volumising powder or gently backcomb the roots for extra grip. Section your hair horizontally, starting from the nape of your neck, and use clips to hold the top and side sections out of the way. Keep your head upright while looking into a mirror so your hair falls naturally as you work.
Once your hair is prepped, you’re ready to position the extensions.
Step 2: Place Your Extensions
Start at the nape of your neck by creating a horizontal section about 2 cm deep. Install the longest and widest wefts here to create a natural, cascading effect. For example, the Seamless Set 22" Clip-ins from Hair Wonderland are a great choice, as their Invisi® weft technology ensures a flat, bulk-free finish.
Work your way up in 1-inch horizontal sections, transitioning to thinner or shorter wefts as you go. This gradual layering helps distribute volume evenly. Avoid placing extensions too close to the crown or hairline to keep clips hidden and maintain a natural head shape. Distribute the weight across multiple sections to ensure the extensions feel secure and comfortable.
Check the placement by gently moving your head side to side. The extensions should stay in place without pulling or discomfort.
With the extensions securely in place, the next step is cutting and blending for a flawless finish.
Step 3: Cut and Blend
Divide your hair into three sections using alligator clips. To avoid harsh, blunt edges, always cut vertically into the hair rather than straight across.
Use point cutting - a technique where you snip at an angle - to feather the ends and remove bulk. For the front sections, try the slicing method: hold a section of hair and slide the scissors diagonally in a slow, controlled motion to create soft, face-framing layers.
If your hair is thick or you notice a "mushroom top" effect, thinning shears can help reduce excess bulk. Work on vertical sections to maintain a balanced look. Once the cutting is complete, style your natural hair and extensions together by curling or waving them. This step blends textures and hides any visible transition points.
| Technique | Purpose | Tool Recommended |
|---|---|---|
| Point Cutting | Feathers the ends, removes blunt lines | Scissors or Thinning Shears |
| Slicing | Tapers layers for a soft, face-framing look | Professional Scissors |
| Slithering | Reduces bulk with diagonal cuts | Professional Scissors |
| Texturing | Matches extensions with natural layers | Thinning Scissors or Razor |
These cutting and blending techniques mimic the natural taper of hair, ensuring a seamless, flowing result.
Styling and Care Tips
How to Style for Natural Results
To keep your layered extensions looking natural and full of life, the right styling techniques are key. Curling or waving your hair is a great way to blend extensions with natural hair seamlessly. Use a curling wand to create soft waves or loose curls, which help unify the layers and add volume. For a sleek, straight look, adding a slight bend at the ends can smooth transitions between your natural hair and the extensions.
Texturising sprays are your best friend when it comes to enhancing dimension and hiding attachment points. Pair this with a light root tease for added lift . Always safeguard your extensions by using a heat protectant before styling with heat tools. This not only protects the hair from damage but also ensures a flawless, blended finish .
How to Maintain Your Extensions
Once your extensions are styled, proper care will keep them looking their best for longer. When not in use, store your clip-in extensions in the Clip In Bag ($54.00) to avoid tangling and matting. Regular brushing is also crucial - use the Tangle Tamer Brush ($21.95) before showering, in the morning, and at night to keep the layers smooth and intact.
Because extensions don’t benefit from your scalp’s natural oils, they need extra hydration to maintain their softness and texture. Apply 2–3 pumps of treatment oil to the mid-lengths and ends each night. To reduce friction and tangling while you sleep, tie your hair in a loose, low plait or ponytail. Limit washing to 2–3 times per week to extend the life of your extensions, and always finish with a cool water rinse to seal the hair cuticles and lock in moisture.
Be mindful of the products you use - avoid anything with protein, keratin, sulphates, or high alcohol content, as these can leave your extensions brittle and difficult to manage after just one application. For tape-in extensions, the Tape Sheets ($78.00) are ideal for professional reapplication every 5–6 weeks, keeping your extensions secure and looking fresh.
Styling brings out the beauty of your extensions, but consistent care ensures they stay that way.
Conclusion
Layering your extensions can turn obvious add-ons into hair that looks and moves naturally. By choosing varied extension lengths and soft transitions, you avoid that dreaded "shelf effect" and achieve seamless movement that blends perfectly with your own hair. As Foxy Locks explains, "When extensions are layered correctly, no one will be able to tell where your hair ends and your extensions begin".
Some key techniques to master include vertical trimming with point-cutting, placing wefts strategically from the nape upwards, and using heat tools to blend textures. These methods not only reduce bulk but also add depth and dimension to your look.
Of course, the right products make all the difference. Hair Wonderland's premium Remy European extensions, when layered properly, move naturally and enhance your overall style. Since extensions don't benefit from your scalp's natural oils, proper care is essential. Products like Moisture Magic ($39.95) keep layered sections soft and cohesive, while the Tangle Tamer Brush ($21.95) gently detangles without disturbing your carefully placed wefts.
When it comes to maintenance, steer clear of products containing sulphates, protein, or high alcohol content, as these can harm your extensions. With proper layering techniques and consistent care, your extensions will look polished, luxurious, and undetectable.
Whether you prefer premium clip-ins or tape-in styles, Hair Wonderland has everything you need to achieve natural, effortless movement.
FAQs
Can I layer clip-in extensions at home safely?
Yes, you can layer clip-in extensions at home with the right approach and tools. You'll need essentials like sectioning clips, a fine-tooth comb, and hairdressing scissors. To create a natural look, carefully blend shorter and longer pieces by layering gradually. Take your time, work gently, and follow step-by-step instructions to ensure a smooth, damage-free result. Blending is key to achieving a seamless and natural finish.
How do I avoid the “shelf effect” when layering?
To prevent the dreaded "shelf effect" when layering hair extensions, it's important to blend them smoothly with your natural hair. Achieving this involves cutting and shaping the extensions to match the layers of your own hair.
Here’s how to get it right: Start with clean, tangle-free hair for easy handling. Work in sections to ensure precision, and use gradual, tapered cuts to create a natural flow between your hair and the extensions. This method helps avoid a bulky or uneven appearance, giving you a seamless and polished finish.
What’s the best way to blend layers without over-cutting?
To create seamless layers without over-cutting, prioritise precision and subtle techniques for a natural flow. Begin with clean, dry, and tangle-free hair, dividing it into well-organised sections. Use high-quality professional scissors and rely on slicing methods to shape and taper the layers. This approach prevents a blunt or heavy appearance, ensuring the extensions blend effortlessly with natural hair. Trim only as much as needed to preserve the extensions' quality while achieving smooth, natural movement.