

Hair extensions are a great way to add volume without damaging your natural hair. To achieve the best results, focus on choosing the right extensions, prepping your hair, and using proper styling techniques. Here's a quick rundown of the top tips:
- Pick lightweight clip-ins for fine hair or thicker wefts for dense hair.
- Tease your roots to add grip and keep extensions secure.
- Layer strategically to create a natural blend.
- Stack wefts for extra thickness.
- Focus on the crown and sides for balanced volume.
- Curl extensions and natural hair together for seamless blending.
- Use texturising spray to improve hold and texture.
- Trim extensions to match your natural layers.
- Apply root-lifting products for added lift.
- Backcomb and smooth to hide clips while maintaining volume.
Using quality products, such as Hair Wonderland’s Seamless Set 22" ($499.00), and tools like the Tangle Tamer Brush ($21.95), can make styling easier and help maintain your extensions. Proper care ensures they stay in great condition and blend naturally with your hair.
Hair Extension Styling Techniques Guide: 10 Methods for Voluminous Hair
Clip-In Extension “fill ins” for Instant Volume on FINE THIN Hair
sbb-itb-dcde78e
1. Choose Lightweight Seamless Clip-In Extensions
Start with lightweight seamless clip-in extensions. These are perfect for creating natural-looking volume, especially for fine or thin hair. Heavier extensions can put stress on delicate strands, potentially leading to breakage or damage.
Seamless clip-ins are designed to sit flat against your scalp, blending effortlessly with your hair and moving naturally without causing discomfort. Look for extensions made from 100% Remy human hair. This type of hair matches your natural texture and can be styled with heat tools for a polished look. The seamless design ensures a smooth, natural finish, making it easier to achieve your desired hairstyle.
A great example is the Hair Wonderland's Seamless Set 22". This set features double-drawn vs single-drawn Russian and Mongolian human hair with Invisi® weft technology, offering 200 grams of volume and length. Plus, the seamless construction ensures all-day comfort, with no clips digging into your scalp, even after hours of wear.
Clip-ins are a versatile, non-permanent solution. You can easily apply and remove them daily without the need for adhesives or heat, giving you the freedom to change your look as often as you'd like. Unlike heavier options like sew-ins or fusion bonds, clip-ins are gentle on your hair and won't contribute to thinning over time.
The 22-inch length is perfect for achieving a full-bodied, voluminous style. Thanks to their lightweight design, these extensions enhance your natural hair without weighing it down, giving you the lift and volume you’re after.
2. Tease Roots for Added Grip
To keep your lightweight, seamless clip-ins secure, try backcombing your roots. This simple trick creates a textured base, preventing the extensions from slipping while adding a bit of lift at the scalp. It’s especially helpful for those with fine or thin hair.
"If you have fine hair and your hair extensions constantly slip, teasing your roots will give the hair extra hold and a firm grip for the hair extensions to clip onto." - Azra Kassam, Luxy Hair
Here’s how to do it:
- Use a pintail comb to section your hair where you’ll place the extension.
- Take a small section of hair and backcomb the first 2.5 cm from the roots with 3–4 firm strokes.
- For extra grip on slippery hair, sprinkle a bit of volume powder before backcombing.
Once the section is teased, lightly smooth the top layer with the comb’s edge to hide the backcombing. Then, position the extension weft in the centre of the teased area and snap the clips shut. This textured base will keep your extensions in place all day.
Before starting, gently detangle your hair with a detangling brush to avoid breakage while teasing. For more detailed advice, see our guide to brushing hair extensions.
3. Layer Extensions Strategically
To achieve a natural look, layer your extensions step by step. Start at the nape of your neck with the longest extensions (about 50 cm) and gradually work upwards, using shorter lengths. Space each layer roughly 2.5 cm apart to ensure a smooth, seamless transition without any harsh lines.
If you have thick hair, it’s a good idea to have your stylist thin out the outer extension layers. This helps prevent an overly bulky appearance. As Cliphair explains:
Adding hair extensions to hair that is already quite thick can produce an undesired 'bulky' effect... you can easily avoid this by getting your hair extensions cut to slightly thin out the outer layers of your tresses, so that you avoid the mushroom top finish.
For those with fine hair, focus on placing extensions along the sides. This adds natural movement while avoiding excessive weight that could flatten your look.
Once the layering is done, blend the extensions with your natural hair by curling them together. This simple step ties all the lengths into a cohesive, polished style.
With layering complete, you’re ready to boost volume further using specific texturising and styling techniques.
4. Stack Wefts for Thickness
If you're aiming for serious volume, stacking wefts is a technique you can't overlook. This involves layering two or more wefts in the same section of your hair to pack in density and fullness. As Blakk Hair Extensions puts it:
By stacking two or more wefts, a larger thickness can be achieved.
This method is perfect for bold styles like high ponytails or thick, dramatic braids. The process is simple: clip in the first weft, then layer a second one directly on top. This creates intense volume without taking up extra space on your scalp. It's particularly handy for those with smaller heads who might find it tricky to fit multiple wefts across their hair.
To make sure your stacked wefts stay secure, prep your roots beforehand. Use a volumising powder or dry shampoo and gently backcomb the area to add some grip for the extra weight. If you're going for a high ponytail, clip the wefts upside down at the crown. This trick helps them lay flat when you pull your hair up, giving you that perfect lift.
For an even easier option, pre-stacked extensions are a game-changer. These come with multiple wefts already sewn together, offering instant thickness without the need for extra clips. Hair Wonderland’s seamless clip-in extensions, for example, use lightweight Invisi® weft technology. They’re designed to stack effortlessly without adding pressure to your scalp.
When stacking, focus on placing the wefts at the crown and back of your head. This avoids the dreaded "mushroom top" look and ensures a natural, blended finish.
5. Focus Placement on Crown and Sides
Once you've nailed the basics, where you place your extensions can make all the difference. The crown and sides are the key areas to focus on if you want a hairstyle with natural volume and balance. Adding extensions at the crown gives your roots a lift and adds density, perfect for creating that polished blowout or an elegant updo. On the other hand, placing extensions around the sides and temples helps avoid a flat, lifeless look, giving your face a well-defined frame.
If you only focus on the back of your head, you might end up with uneven volume that looks unnatural from certain angles. By balancing the placement at the crown and sides, you can achieve a consistent, natural fullness throughout your hairstyle.
For clip-in extensions, smaller wefts work best at the crown to avoid unnecessary bulk. Create a horizontal parting at the temple or just above the ear, prepare a solid base for the clips, and secure them firmly. At the crown, clip the wefts close to the scalp, ensuring your natural hair covers the tracks for a seamless look.
Here’s a quick reference guide to help you with placement:
| Placement Area | Primary Benefit | Recommended Extension Type |
|---|---|---|
| Crown | Adds lift and density at the roots | Tape-ins, Clip-ins, Butterfly wefts |
| Sides/Temples | Frames the face and prevents a flat appearance | Tape-ins, Butterfly wefts |
| Back/Nape | Builds overall density for length and curls | Wefts, Tape-ins, Halo extensions |
6. Curl Natural Hair and Extensions Together
If you want a flawless, full-bodied look, curling your natural hair and extensions together is the way to go. By styling them as one, the blend becomes almost undetectable, while adding both texture and volume. Before getting started, make sure your natural hair and extensions are completely dry - heat on damp hair can lead to damage.
Start by applying a heat protectant spray to both your natural hair and the extensions. Set your curling tool to about 180°C, and use sectioning clips to divide your hair into layers for easier styling. Working from the bottom layers upwards, take small sections (around 2.5–5 cm wide) that combine your natural hair with the extensions. Wrap each section around the curling wand, directing the curl away from your face, and hold for roughly 10 seconds. Once you release the curl, hold it in your hand briefly to cool, then secure it with a clip to help it set properly.
After all the curls have cooled, gently brush through them with a boar bristle brush. This step helps blend the extensions with your natural hair, creating a soft, voluminous finish. To complete the look, apply 1–2 pumps of argan serum or treatment oil to the mid-lengths and ends. This will define the curls, add shine, and tame any frizz. Since extensions don’t benefit from the natural oils your scalp produces, this added moisture is crucial for keeping them looking healthy and natural.
7. Apply Texturising Spray for Grip
Using a texturising spray can make a big difference when it comes to keeping your extensions in place, especially if your hair is fine or naturally smooth. It adds texture and creates just the right amount of friction, helping your clip-ins stay securely anchored throughout the day. Without this added grip, your extensions might shift or need constant adjusting. As Heather Collier from Cliphair puts it, texturising products "deliver immediate grip and body without weighing hair down". Here’s how to use it effectively to ensure your extensions hold firm.
Before you clip in your extensions, give the spray bottle a good shake to mix the ingredients. Section your hair into layers, then spray from the roots to the mid-lengths. Keep the bottle about 15–20 cm away from your head so the product is evenly distributed. If you have an oily scalp, focus the spray slightly away from the roots or pair it with a dry shampoo for the best results. Use your fingers to lightly tousle your hair, ensuring the spray is evenly spread.
Once your extensions are clipped in, finish with a light mist of hairspray to lock your style in place. Be careful not to spray directly onto the clips or bonds, as this can weaken the attachment over time. Opt for lightweight formulas and avoid products with high alcohol content, as these can dry out your extensions and reduce their lifespan.
8. Trim Extensions to Match Layers
Getting your extensions trimmed to match your natural layers can make all the difference in achieving a polished, natural look. When extensions hang as a blunt block beneath your natural hair, they create a noticeable line, making the extensions stand out. A proper trim smooths this transition, creating a flow that blends seamlessly, so no one can tell where your hair ends and the extensions begin.
The trimming process should take your hair's texture into account. For thicker hair, thinning the outer sections can prevent unnecessary bulk, while using a hair extension thickness calculator helps determine the right amount of hair for your needs, while careful tapering for finer hair can create the illusion of more volume. If you have curly or wavy hair, it's best to work with a stylist experienced in textured hair. They can ensure the layers complement your curl pattern, creating a cohesive and natural look.
Brenda L. from Cliphair highlights the importance of layering:
Without the proper layering, the added pieces may look unnatural.
A professional stylist can evaluate your haircut, hair type, and even the shape of your head to customise the trim. For instance, if your hair falls around shoulder length, choosing the right hair extension length is essential for a natural blend.
When booking a trim, make sure to bring your extensions along. Your stylist will clip them in one weft at a time, trimming each piece to align with your natural layers. If you have thick hair, ask for textured layers to add movement without causing frizz or creating a "halo" effect. A professional trim not only enhances the blend but also ensures your extensions move naturally with your styled hair.
9. Use Root-Lifting Products Before Clipping
Before clipping in your extensions, it’s important to prepare your roots for extra volume. By lifting your roots beforehand, you can create noticeable fullness. Pairing backcombing techniques with the right products can also improve texture and grip.
Try sprinkling a small amount of volume powder onto your roots, then gently massage it in. This adds instant grip and enhances volume, especially for fine hair, without adding unnecessary weight. It also provides a secure base for your extension clips to latch onto.
Using volumising shampoos with ingredients like biotin or collagen can help plump up your natural strands, creating a strong foundation. Just remember to apply these shampoos to your natural hair only. Using them on extensions could strip away their oils and cause damage. Heather Collier from Cliphair explains:
It's best to not apply volumising shampoo directly on to your extensions, as this can strip them of their oils and weigh the hair down.
After washing, blow-dry your hair until it’s about 70% dry. Use a round brush to lift your roots as you dry. For extra hold, set your hair with rollers for 10–15 minutes before clipping in your extensions. Once the extensions are in place, a light mist of hairspray can help lock everything in.
When choosing products, go for lightweight formulas that are free from protein, keratin, sulfates, and high alcohol content. Combined with precise backcombing and layering, these tips will help you achieve a consistent, voluminous look.
10. Backcomb and Smooth for Subtle Volume
Let’s take your backcombing skills up a notch to create subtle volume while keeping your extensions securely in place and the clips hidden.
Backcombing works wonders by adding texture at the roots, ensuring your extensions stay put and giving your hair a natural lift. As Cliphair explains:
"Backcombing is one of the oldest tricks in the book when it comes to giving you hair a much-needed lift."
To start, detangle your hair with a specialised extension brush. Then, using a pintail comb, tease small sections of hair at the mid-ear level downward. This creates a solid base and ensures a smooth transition without redoing earlier steps.
Once your extensions are clipped in, gently smooth the top layer with a soft-bristle brush. This blending technique hides the clips while keeping the volume intact. For best results, brush upwards from the ends to avoid snagging and achieve a polished look.
Steer clear of applying oils or serums near the clips, as they can cause slippage. Instead, after styling, use one to two pumps of treatment oil on your mid-lengths and ends to replenish moisture lost during backcombing.
If you’re using heat tools to smooth the top layer, don’t skip the heat protectant. Professional-grade formulas can protect your extensions from damage, even at temperatures up to 232°C.
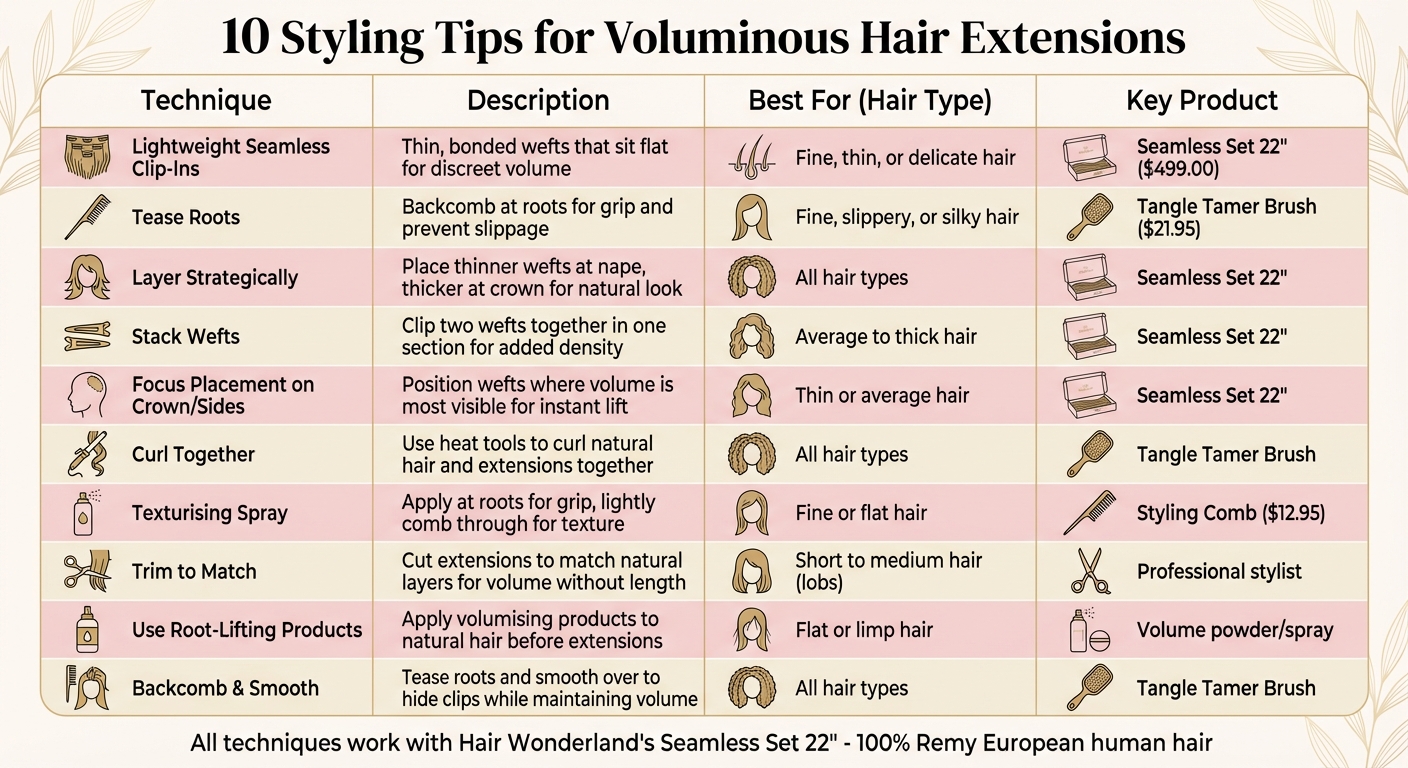
Quick Reference Table for Techniques
Here's a handy guide to help you achieve fuller, more voluminous hair using extensions. Each technique is paired with the ideal hair type and recommended tools or products.
| Technique | Description | Best Suited Hair Types | Recommended Product |
|---|---|---|---|
| Lightweight Seamless Clip-Ins | Thin, bonded wefts that sit flat for discreet volume. | Fine, thin, or delicate hair | Seamless Set 22" ($499.00) |
| Tease Roots | Backcomb at the roots for grip and to prevent slippage. | Fine, slippery, or silky hair | Tangle Tamer Brush ($21.95) |
| Layer Strategically | Place thinner wefts at the nape and thicker ones near the crown for a gradual, natural look. | All hair types | Seamless Set 22" |
| Stack Wefts | Clip two wefts together in one section for added density. | Average to thick hair | Seamless Set 22" |
| Focus Placement on Crown/Sides | Position wefts where volume is most visible for instant lift. | Thin or average hair | Seamless Set 22" |
| Curl Together | Use heat tools to curl your natural hair and extensions together for a seamless blend. | All hair types | Tangle Tamer Brush |
| Texturising Spray | Apply at the roots for grip and lightly comb through for texture. | Fine or flat hair | Styling Comb ($12.95) |
| Trim to Match | Cut extensions to match your natural layers for added volume without extra length. | Short to medium hair (lobs) | N/A |
| Use Root-Lifting Products | Apply volumising products to your natural hair before adding extensions for extra lift. | Flat or limp hair | N/A |
| Backcomb & Smooth | Tease the roots and smooth over to hide clips while maintaining volume. | All hair types | Tangle Tamer Brush |
Hair Wonderland’s double-drawn Russian vs Mongolian human hair extensions are perfect for these methods. The Seamless Set 22", made from 100% Remy European human hair, is versatile - it can be trimmed, coloured, and heat-styled just like your natural hair. For detangling and pre-styling, the Tangle Tamer Brush ensures smooth application and helps extend the life of your extensions.
Refer to this table as your go-to guide for achieving the perfect voluminous hairstyle with ease.
Conclusion
Getting voluminous hair with extensions is all about using the right techniques and quality products. The methods covered here - like teasing roots for extra grip, stacking wefts for added density, or curling your natural hair and extensions together - can help you achieve fuller, more natural-looking hair. When paired with proper care, these steps ensure your volume lasts.
Since extensions don’t get natural nutrients from the scalp, keeping them hydrated is key. Products like argan oil and treatment masks can help maintain their health and shine. For detangling without damaging the attachments, the Tangle Tamer Brush ($21.95) is a great option. Hair Wonderland’s Seamless Set 22" ($499.00) is another standout, offering the flexibility to trim, colour, and heat-style just like your natural hair.
Whether you're focusing on crown placement for an instant lift or backcombing for subtle volume, taking care of your extensions ensures these techniques deliver the best results. Plus, enjoy perks like free shipping on orders over $200.
FAQs
How do I choose the right extension weight for my hair type?
Choosing the right extension weight comes down to your natural hair's thickness and the volume you're aiming for. If your hair is on the thicker side, you'll likely need heavier extensions to achieve a balanced, full appearance. On the other hand, if your hair is finer, lighter extensions are a better choice - they’re easier to blend and less likely to strain your natural hair. Think about your styling goals too. While heavier extensions can deliver dramatic volume and length, it's essential to ensure your hair can handle the added weight without risking damage.
How can I stop clip-in extensions slipping during the day?
To keep clip-in extensions in place all day, focus on proper attachment and improving grip. Here are some handy tips:
- Boost security: Add extra clips or use grip-enhancing products for added hold.
- Prep with texturising sprays or dry shampoo: These products at the roots can create a better base for the clips to grip onto.
- Section strategically: Clip the extensions close to the scalp for a snug fit.
- Double-check attachment: Make sure all clips are fully closed and not holding more hair than they can handle.
These simple steps can help keep your extensions secure and prevent them from slipping as you go about your day.
What’s the best way to blend extensions with short or layered hair?
To make extensions blend well with short or layered hair, it's important to layer and trim the extensions to match your natural haircut. This helps create a smooth, flowing look and eliminates any harsh, blunt edges. Using the right styling tools and techniques also plays a big role in achieving a natural finish. Hair Wonderland offers premium extensions that are designed to blend effortlessly, giving you a polished and cohesive appearance when styled properly.