

Keratin bond extensions are a long-lasting way to add volume and length to your hair, offering a natural look that can last 3–6 months with proper care. This method involves attaching individual strands of human hair using a keratin-based adhesive melted with a heat tool. Here's a quick breakdown of the process:
- Preparation: Start with clean, dry, and tangle-free hair. Use a clarifying shampoo and avoid conditioner near the roots.
- Tools: Essential tools include a heat applicator, sectioning clips, bond cutters, and remover solutions.
- Application: Section the hair in a horizontal brick-lay pattern, apply bonds 0.6–1.25 cm from the scalp, and melt the keratin adhesive for a secure hold.
- Blending & Styling: Cut and shape the extensions to match your natural hair, ensuring a seamless finish.
Maintenance is key: brush gently, wash with sulphate-free products, and schedule professional check-ups every 5–6 weeks to keep your extensions looking their best. By following these steps, you can enjoy natural-looking extensions that blend beautifully with your hair.
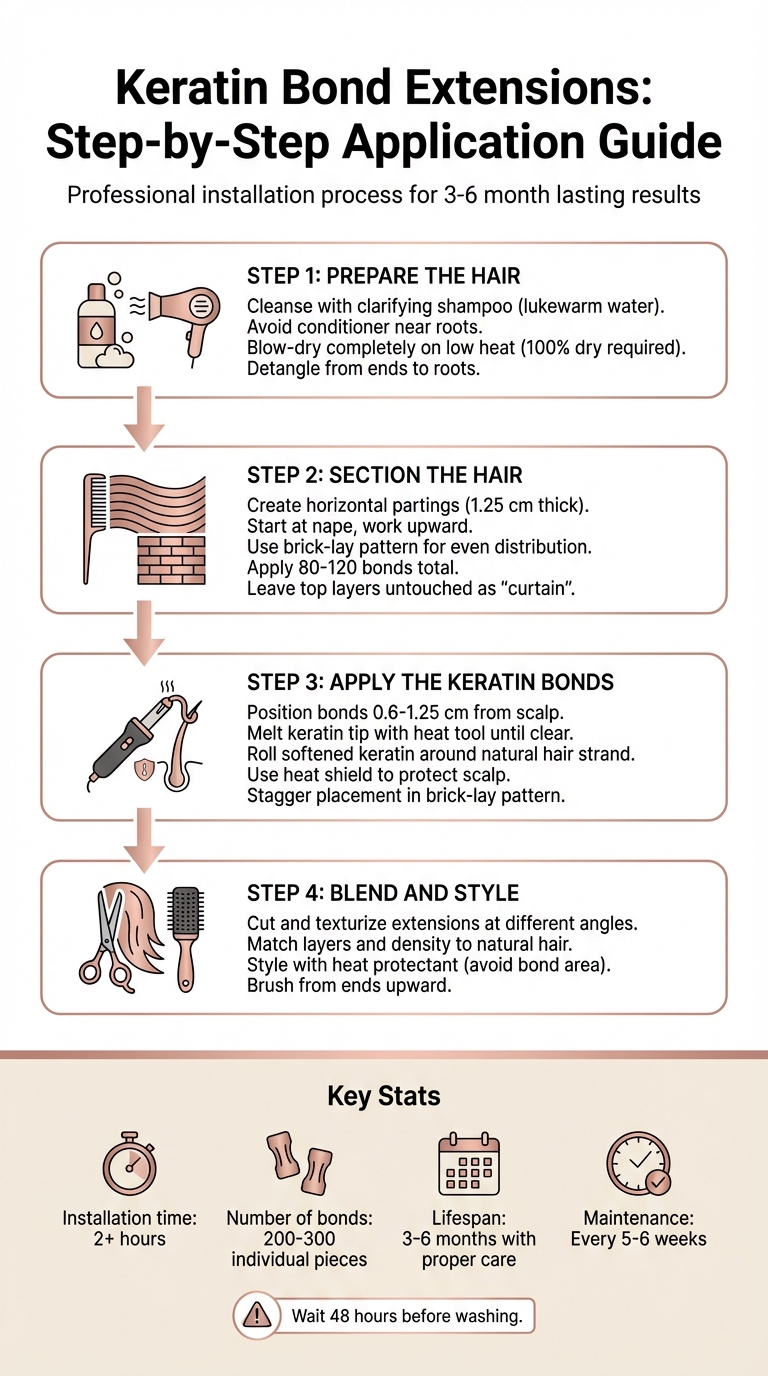
4-Step Keratin Bond Hair Extension Application Process
K-Tip Master Class - Don’t Install K-Tips Until You Watch This!
sbb-itb-dcde78e
Tools and Materials You'll Need
Getting the right tools and materials is your first step towards achieving a durable and natural finish with keratin bond extensions. Since a full installation typically involves 200 to 300 individual pieces, professional-grade tools are essential for safety and precision.
Professional Application Tools
Your main tool will be the digital heat applicator, which melts the keratin bond at the end of each extension strand. Precise temperature control is critical here to avoid damaging the hair or causing burns. To protect the scalp and safely mould the melted keratin, use heat shield guards and finger protectors.
Bond cutters are another must-have, allowing you to customise the size of keratin bonds. This is especially helpful when working with thinning areas or creating micro-bonds for a discreet look. Other essentials include sectioning clips, a tail comb, and Easigrips grippers (priced between $8.00 and $9.00 per pack) to create clean partings and ensure even distribution. An Easibond Hair Extension Holder ($33.00) is also a handy addition, keeping extension strands organised during the 2+ hour installation process.
When it’s time to remove the extensions, remover pliers and a keratin remover gel or solution are necessary to slide the bonds off without harming the natural hair. Hair Wonderland's Removal Solution ($54.00) is specifically designed for this purpose.
Once you've gathered your application tools, the next step is choosing high-quality hair extensions and accessories.
Hair Extensions and Accessories
The quality of your hair extensions plays a huge role in the final result. Opt for premium double-drawn human hair extensions for their durability and natural movement. This ensures you can blend extensions with natural hair for a professional look. Hair Wonderland offers Russian and Mongolian human hair extensions tailored for fusion techniques, providing the performance keratin bonds require.
For maintenance, Hair Wonderland's Tangle Tamer Brush ($21.95) is a great investment. It’s designed to prevent snagging at the bonds during daily brushing, helping to maintain the extensions' 3–6 month lifespan.
Step 1: Prepare the Hair
Getting your hair ready is the first step to a flawless keratin bond installation. Starting with hair that's clean, dry, and free of tangles is a must. Oils or moisture left in the hair can weaken the adhesive, leading to bond slippage. So, proper cleansing and drying are key to ensuring the bonds hold securely.
Cleanse and Dry
Begin by washing your hair with a clarifying shampoo and lukewarm water, paying special attention to the roots and scalp, where natural oils tend to build up. Avoid applying conditioner near the roots - keep it to the mid-lengths and ends only. This prevents creating a slippery layer that could interfere with the keratin bonds. After washing, gently pat your hair dry with a soft towel to reduce friction and tangles. Then blow-dry your hair completely on a low heat setting. It's critical that your hair is 100% dry before moving on, as even a little moisture can weaken the keratin bonds.
Detangle for Smooth Sections
Once your hair is dry, detangling is the next step. Start at the ends and work your way up, holding the hair near the scalp to reduce pulling. Tools like Hair Wonderland's Tangle Tamer Brush or The Detangle Brush are great for gliding through hair without snagging. A wide-tooth comb is another excellent option, especially for finer detailing. Taking the time to detangle thoroughly now will make sectioning easier later and ensure neat, precise partings for the brick-lay pattern.
Step 2: Section the Hair
Once your hair is clean, dry, and detangled, it's time to section it properly for precise application.
Sectioning is what separates a polished, professional look from a rushed job. The idea is to create horizontal partings so each bond is applied with care and the weight is evenly distributed. This step lays the groundwork for the brick-lay pattern, which ensures the extensions blend naturally and move freely.
Create Clean Partings
Start at the nape of your neck and work upward. Use a tail comb to divide your hair into horizontal sections about 1.25 cm thick. These clean partings help each bond sit evenly without straining your natural hair. Clip the rest of your hair out of the way using sectioning clips, releasing only one row at a time to keep your focus on the section you're working on. Before attaching any extensions, double-check that all stray hairs are securely clipped away from your working area. Then, arrange the bonds in a brick-lay pattern to promote a natural flow.
Use a Brick-Lay Pattern for Even Distribution
The brick-lay pattern is key to achieving a natural and seamless look. Picture a staggered brick wall - each bond is positioned slightly off-centre from the one below it. This arrangement avoids stiffness and allows for smooth, natural movement. Typically, 80–120 bonds are applied, depending on the thickness of your hair. Be sure to leave the topmost layers untouched; these layers act as a "curtain" to conceal the bonds, giving the extensions a polished and undetectable finish.
Step 3: Apply the Keratin Bonds
Now that you've carefully sectioned your hair, it's time to attach the keratin bond vs. tape adhesives. This step requires precision to ensure the extensions look seamless and natural.
Position the Keratin Bonds
Start by placing each keratin bond about 0.6 to 1.25 cm away from your scalp. This small gap allows your natural hair to move freely without putting stress on the roots. To create a balanced bond, match the size and weight of the extension to a similar strand of your natural hair. A heat shield is essential here - it not only protects your scalp from the heat tool but also helps guide the placement of each bond. Make sure the section you're working on is clean and free of stray hairs to avoid tangling or discomfort later on.
Melt and Roll the Bonds
Take the heat tool and melt the keratin tip until it becomes clear and soft. Be cautious not to overheat it, as too much heat can weaken the keratin and affect the bond's durability. Once melted, roll the softened keratin around the natural hair strand to form a smooth, cylindrical shape. This shape solidifies quickly as it cools, securing the extension firmly in place. Many stylists recommend using finger protectors during this step to avoid burns and achieve a polished finish. Repeat this process for each bond, ensuring consistency throughout.
Stagger the Application for a Natural Look
When applying the bonds, use a brick-lay pattern, staggering each one slightly off-centre from the row below. This technique distributes the weight evenly across your scalp and prevents any obvious gaps or bulky sections. For a full-head installation, you'll typically need 80 to 120 bonds, but this number can vary depending on the thickness of your hair and the volume you're aiming for. In delicate areas like the crown or hairline, opt for smaller bonds to keep the extensions discreet and natural-looking.
Step 4: Blend and Style
Blending and styling are the finishing touches that make your extensions look like a natural part of your hair, building on the careful work you’ve done so far.
Once all the bonds are securely in place, it’s time to cut and shape the extensions so they flow effortlessly with your natural hair. If blending is done poorly, the extension line becomes obvious, which is something you definitely want to avoid. Start by unclipping your natural hair, then grab a cutting comb and texturise the extensions at different angles. This helps soften any harsh lines and creates feathered ends that blend beautifully with your own hair.
Pay extra attention to the layers and edges around your face, as this area tends to draw the most attention. If your natural hair has layers or texture, use thinning scissors on small, vertical sections of the extensions to match their density. The aim here is simple: make it impossible to tell where your natural hair ends and the extensions begin. Keep your head in a neutral position while cutting for the most precise results. When done correctly, this step ensures the extensions look completely natural.
Once you’ve nailed the cut, it’s time to style. Whether you prefer sleek straight hair, soft waves, or bouncy curls, styling enhances the blend. Use straighteners or curling wands to achieve your desired look, but be mindful of the keratin bonds - direct heat can weaken the adhesive. Always apply a heat protectant to the mid-lengths and ends, steering clear of the bond area. If you’re drying your hair, stick to a blow dryer on a low heat setting.
For daily maintenance, brush your hair starting from the ends and work your way up, holding your hair above the bonds to avoid unnecessary tension. A soft-bristle or loop brush is ideal, as it prevents snagging. Thanks to the discreet nature of keratin bonds, you can style your hair in high ponytails or elegant updos without worrying about the attachment points showing. This gives you the freedom to experiment with a variety of looks while keeping your extensions secure and undetectable.
How to Maintain Keratin Bond Extensions
Post-Application Care
To ensure the bonds adhere properly, avoid exposing them to water for the first 48 hours after application. This means no washing your hair during this time to keep the bonds intact.
Daily Care Routine
Brush your hair twice a day, starting from the ends and working upwards while holding the hair above the bonds. This technique helps prevent matting and keeps the bonds secure. To maintain moisture, apply 1–3 pumps of treatment or argan oil to the mid-lengths and ends twice a day.
When it comes to washing, limit it to 2–3 times per week and always use sulphate-free shampoos and conditioners. Focus shampoo on the scalp and roots, gently massaging it in, and apply conditioner only to the mid-lengths and ends to avoid loosening the bonds. Stick to lukewarm water instead of hot, as high temperatures can weaken the keratin bonds. After washing, gently blot your hair dry and use a blow dryer on a medium or low heat setting for the bond area.
Hair Wonderland warns: "Leaving extensions in for too long can damage your natural hair."
Following these steps consistently will help maintain the strength and longevity of your bonds.
Professional Maintenance Appointments
Daily care is essential, but professional maintenance is just as important. Schedule appointments every 5–6 weeks to keep your extensions and natural hair in good condition. If your hair is on the finer side, your stylist might recommend check-ups every 4 weeks. Regular visits ensure your extensions remain secure and seamlessly blended with your natural hair.
Over time, natural hair shedding can weaken the sections supporting the bonds, making these appointments crucial.
Hair Wonderland advises: "If you want your natural hair to grow while wearing extensions, do not leave them in for longer than 6 weeks without maintenance."
During these sessions, your stylist will re-section your hair to make sure the extensions rest on strong, evenly distributed sections of natural hair. This process helps minimise the risk of breakage and other common problems and ensures your extensions remain comfortable and long-lasting.
Conclusion
Achieving flawless keratin extensions comes down to precise application and attention to detail. Start with a thorough cleanse to provide a clean base for bonding. Section your hair in a brick-lay pattern, ensuring even distribution, and apply the bonds at the right distance to allow for natural movement. Use a specialised heat fusion tool to melt the keratin tip, then roll the softened bond quickly to create a secure and uniform seal. Complete the process with professional cutting and styling to blend the extensions seamlessly.
The quality of tools and products plays a crucial role in both the longevity and the final appearance of the extensions. Premium Remy hair, like Hair Wonderland's double-drawn Russian and Mongolian extensions, offers smooth, tangle-free strands with intact, aligned cuticles that last for 3 to 6 months when cared for properly. Pairing this with professional-grade heat applicators and sulphate-free aftercare products helps preserve bond integrity while protecting natural hair from damage. These steps ensure the extensions maintain their natural look and durability over time.
"Keratin bond hair extensions are a luxury choice for professionals who want to give their clients a long-lasting, natural, and customisable hair transformation." - Line One Hair
With regular maintenance every 5 to 6 weeks and a dedicated aftercare routine, keratin bond extensions can deliver stunning, natural results. By following these guidelines and using high-quality products, you can enjoy extensions that blend beautifully and feel as natural as your own hair.
FAQs
Am I a good candidate for keratin bond extensions?
If your hair is in good condition and healthy, keratin bond extensions could be a great option for you. These extensions are versatile, suiting a variety of hair types - whether your hair is fine, thick, curly, or straight. Plus, they can be tailored to perfectly match your hair colour for a seamless look.
It's always a good idea to book a professional consultation first. This allows a stylist to evaluate whether your hair is suitable and discuss the upkeep involved. Proper care, like gentle brushing and following specific hair care routines, is key to maintaining these extensions.
How do I avoid bond slippage or breakage?
To keep keratin extensions in place and avoid bond slippage or breakage, focus on correct application techniques. Ensure bonds are thoroughly melted and securely sealed around each strand during installation. Stay away from products containing alcohol or sulphates, as these can weaken the bonds over time. When brushing, use a soft-bristled brush and start detangling from the ends, working your way up to avoid pulling. Limit direct heat exposure to the bonds while styling to help preserve their strength.
Can I swim, colour, or use heat styling with keratin bonds?
Swimming, colouring, or using heat styling tools with keratin bond extensions isn't usually advised. These activities can compromise the keratin adhesive or harm the extensions themselves. To keep your extensions looking their best, stick to professional care guidelines. If you need to use heat styling, proceed with caution to minimise potential damage.