

Clip-in extensions can instantly transform short hair into longer, fuller styles. The process is simple: start by sectioning your hair, backcombing for grip, and strategically placing the extensions from the nape upward. Choose extensions that match your hair’s colour and thickness for a natural look. For short hair, seamless clip-ins with thin wefts are ideal as they blend better and stay hidden. Tools like a pintail comb, fine-toothed comb, bobby pins, and sectioning clips will help ensure a smooth application. Finish by blending the extensions with your natural hair through styling, such as curling or straightening, for a polished result.
Here’s a quick summary of the steps:
- Prep your hair: Section horizontally, pin down short layers, and backcomb roots for grip.
- Choose the right extensions: Opt for lightweight, seamless designs like Hair Wonderland’s options.
- Attach wefts strategically: Start at the nape, working upwards, leaving top layers to cover clips.
- Blend and style: Curl or straighten for a unified texture.
With a consistent care routine, high-quality extensions can last 6–12 months, making them a great option for transforming short hair.
Easy Clip in Hair Extension Tutorial for Short Hair | Pixie Cut to Long Hair
sbb-itb-dcde78e
Tools and Products You'll Need
To style short hair with extensions, having the right tools is all about precision and ease.
Clip-In Extensions
For short hair, seamless clip-in extensions are a game-changer. Unlike traditional stitched wefts that can create noticeable bumps, seamless extensions feature a thin, bonded strip that lays flat against your scalp, making them easier to hide under shorter layers. A standout option is Hair Wonderland's Seamless Set 22" (AUD $499.00). Made from 100% Remy European human hair with Invisi® weft technology, these extensions weigh just 200 grams. This lightweight design ensures they stay in place and blend naturally. For the best results, your natural hair should be at least 13–15 cm long.
Styling and Preparation Tools
A few key tools will make the process smoother and the final look flawless:
- Pintail comb: Ideal for creating precise, horizontal sections starting from the nape.
- Fine-toothed comb: Perfect for backcombing the roots to create a textured base, or "shelf", to secure the clips.
- Bobby pins: Use these to pin the bottom-most section flat, keeping stray hairs out of sight.
- Sectioning clips: Essential for holding the upper layers of hair away while you work on the lower sections.
For added grip, especially on fine or freshly washed hair, apply texturising powder or dry shampoo. A detangling brush, like Hair Wonderland's Tangle Tamer Brush (AUD $21.95), is gentle on both your natural hair and the extensions, preventing tugging at attachment points. Lock in the teased sections with hairspray, and if you're using a curling wand or flat iron, don't skip a heat protectant and follow a guide to heat styling extensions to keep the hair looking healthy. Once your tools are ready, you're all set to prep your natural hair for a flawless application.
Preparing Your Natural Hair
Getting your short hair ready is the first step to achieving extensions that stay in place and blend seamlessly. The goal here is to create a sturdy base for the clips, ensuring the extensions look natural and feel secure.
Sectioning and Securing the Nape
Start by dividing your hair into horizontal sections, beginning at the nape and working your way upwards. Pay extra attention to the bottom layer at the nape - gather it neatly and pin it flat with bobby pins. This step helps hide blunt ends and creates a smooth base for your first weft. Use the pointed end of a rat-tail comb to ensure your parts are neat and even. As you move upwards, aim for sections spaced about 2.5 to 5 centimetres apart to keep the volume evenly distributed across your hair.
Backcombing for Better Grip
To give the clips something to hold onto, backcombing is key. Take a fine-toothed comb and gently tease the roots at the spots where the wefts will be placed. This creates a slightly rough texture that helps the clips stay secure. A quick spritz of hairspray over the teased areas will lock in the texture and make the grip even stronger.
Leaving Front and Side Layers Loose
Avoid attaching extensions too close to the hairline. Keep the top and temple layers free to naturally cover the clips and seams. For side wefts, position them at least 2.5 centimetres away from the hairline and below eyebrow level. This ensures the extensions remain hidden and blend naturally with your layers.
How to Clip In Extensions: Step-by-Step
Step-by-Step Guide to Applying Clip-In Extensions for Short Hair
Once your hair is prepped and divided into sections, it's time to start attaching the wefts. Working from the bottom layer upward helps ensure each section is secure and blends seamlessly with your short hair. Layer by layer, you'll create a natural, cohesive look by choosing between volume vs. length transformations.
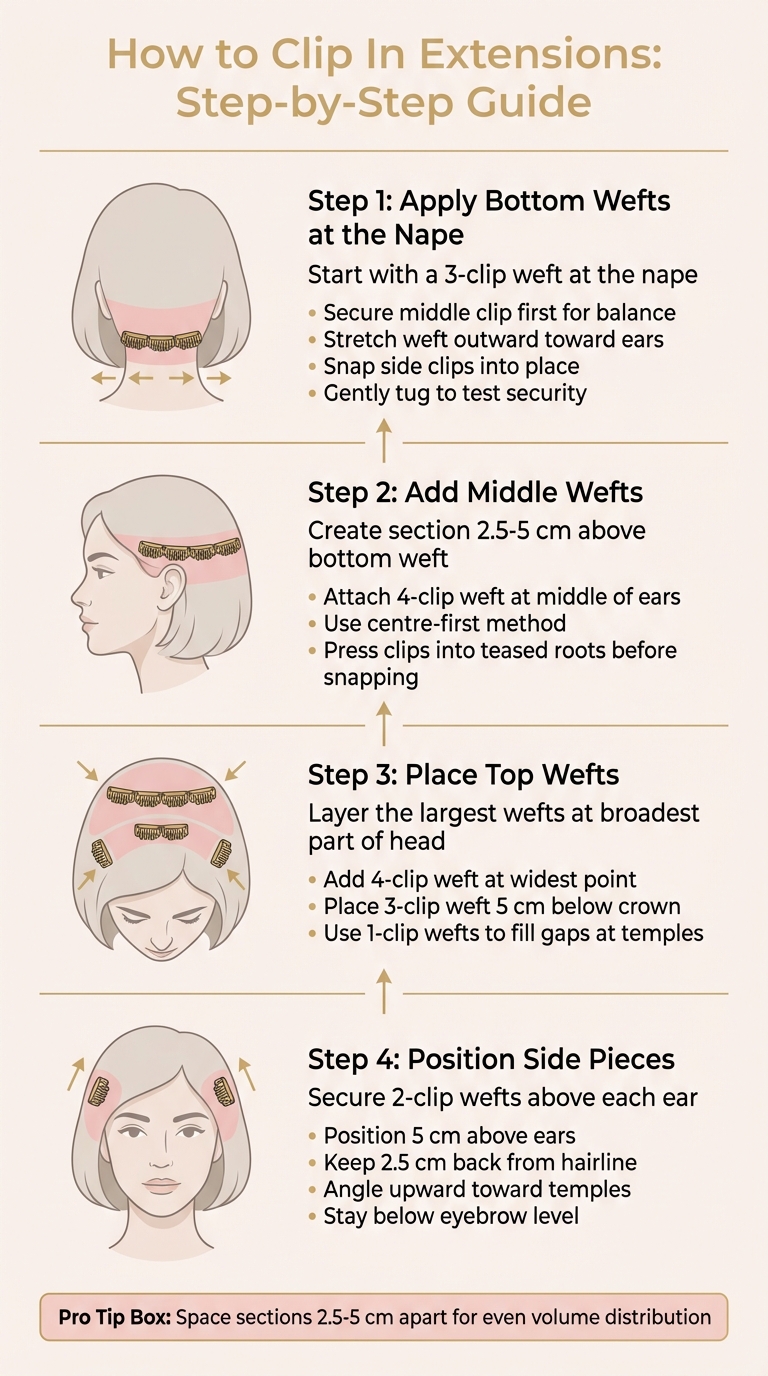
Applying the Bottom Wefts
Begin with a 3-clip weft at the nape of your neck. Position it centrally, then secure the middle clip first by snapping it firmly into your roots - this keeps the weft balanced. Before fastening the side clips, gently stretch the weft outward toward your ears to smooth out any bumps or creases. Once aligned, snap the side clips into place. Hair Wonderland's Invisi® weft technology is specifically crafted to sit flat against the scalp, offering a lightweight and comfortable hold that won't weigh down short hair. After clipping, give the weft a gentle tug to ensure it's securely anchored. Double-check that it feels snug before moving on.
Adding Middle and Top Wefts
Create a new section of hair about 2.5–5 centimetres above the bottom weft. At the middle of your ears, attach a 4-clip weft using the same centre-first method: secure the middle clips, stretch the weft outward, and then fasten the side clips. Continue layering by placing the largest 4-clip weft at the broadest part of your head. Then, add a 3-clip weft approximately 5 centimetres below your crown. For each weft, press the clips into the teased roots before snapping them shut - this creates a firm, interlocking grip that helps prevent slipping. To fill in any thin areas or gaps where shorter layers might peek through, use 1-clip wefts, especially around the temples.
Positioning Side Pieces
Once the central layers are in place, it's time to secure the side pieces. Attach 2-clip wefts about 5 centimetres above each ear, positioning them at least 2.5 centimetres back from your hairline. Angle the wefts upward toward your temples to achieve a natural, face-framing effect. Keep all side pieces below eyebrow level to ensure the top layers of your hair can fully cover the clips. If the hair near your temples is too short to blend, twist those small sections and pin them flat against your head before clipping the extensions over them. This trick helps create a seamless finish.
Blending and Styling Techniques
Teasing and Blending Attachment Points
After clipping in your extensions, gently backcomb the hair just above each weft to create a soft cushion that helps conceal the attachment points. Light teasing softens the transition between your natural hair and the extensions. Once teased, smooth the top layer of hair over the area to hide the weft seams. For finer or silkier hair types, applying a light-hold hairspray to the teased sections before smoothing can make the blending process even more effective. Pay extra attention to the areas where your natural hair meets the extensions - these are the spots that need the most care to ensure a flawless transition. This step lays the groundwork for styling that seamlessly integrates the extensions with your natural hair.
Styling for a Unified Look
Styling your natural hair and extensions together is a great way to achieve a cohesive appearance. Curling or waving both can help blend textures and minimise noticeable differences in length. Start by applying a heat protectant, then use a curling wand or flat iron set to a temperature below 180°C to style small sections of hair and extensions together. This method ensures a consistent texture, making shorter layers less visible. Once styled, use Hair Wonderland’s Tangle Tamer Brush to gently blend the textures, starting from the ends and moving upward to prevent breakage. Finish with a light shine spray to give your hair a uniform sheen. These steps ensure a polished, natural look that flows beautifully from your natural hair into the extensions.
Storing Your Extensions
Proper storage is essential for maintaining the quality of your extensions after styling. Before putting them away, brush through the extensions, starting at the ends and working upwards to remove any tangles. Hair Wonderland's Clip In Bag is a great option for keeping your extensions organised and safeguarding the clips from damage. Store your extensions in a cool, dry place, away from direct sunlight. With the right care, extensions typically only need washing every 10 to 15 wears, or approximately every 4 to 6 weeks. Following these steps will help keep your extensions looking their best for longer.
Conclusion
When you follow the right steps, clip-in extensions can transform short hair into a natural-looking, fuller style that's easy to manage. The key lies in creating a secure base, layering strategically, and blending seamlessly. Start at the nape and work upwards, using wider wefts at the back for volume and smaller ones around the sides to frame your face. Always leave enough natural hair on top to cover the clips and ensure they stay discreet.
Blending is what makes extensions look flawless. Teasing the hair just above each weft adds a cushion that hides the seams, while safely styling your natural hair and the extensions together with heat tools ensures the textures match. Opting for high-quality Remy human hair extensions is a smart choice - they can last 6 to 12 months with proper care, offering a long-term solution for enhancing short hair.
Hair Wonderland makes this process even simpler. Their extensions use ultra-flat, lightweight seams that sit flush against your scalp, making them much easier to conceal in short hair compared to bulkier options. Made from 100% Remy human hair, these extensions move naturally and resist tangling, which is especially important for blending with shorter layers. Premium double-drawn vs single-drawn hair options like Russian or Mongolian hair can also be heat-styled and tailored to suit your exact preferences.
To keep your extensions in top condition, proper care is essential. Washing is only needed every 10 to 15 wears, keeping maintenance low while ensuring your extensions continue to look amazing. With the right combination of quality extensions and careful technique, achieving longer, fuller hair that looks completely natural is entirely within reach.
FAQs
Will clip-ins damage short hair?
Clip-in extensions are a safe option for short hair when used correctly and with care. To reduce the chance of damage, make sure they’re placed properly, avoid attaching them to very thin or fragile sections of hair, and always remove them before sleeping. Gentle handling during application and removal, along with regular maintenance, helps keep your natural hair healthy. This makes clip-ins a great temporary way to add length or volume to short hair.
How do I stop clip-ins slipping out?
To keep clip-in extensions secure, start by sectioning your hair at the nape of your neck. For better grip, backcomb the roots where the clips will attach. Make sure to snap the clips fully closed close to the scalp, avoiding placing them too far down the hair strands. If they start to slip, you can carefully reclip them. These simple steps will ensure your extensions stay put throughout the day.
Can I swim or sleep in clip-ins?
It’s best to avoid swimming or sleeping while wearing clip-in extensions. These extensions are meant for short-term use and can be damaged or become uncomfortable if exposed to water or worn for long periods. To keep them in good condition and ensure they last, always take them out before heading to bed or diving into the pool.