
Layering wefts is a method for adding both length and volume to your hair using extensions. By combining wefts of varying lengths (e.g., 16", 18", and 20"), you can create a natural, blended look that mimics the way hair grows. This technique avoids harsh lines and ensures smooth transitions between layers, making it ideal for anyone looking to enhance their hairstyle without waiting for natural growth.
Key Takeaways:
- What are wefts? Bundles of hair stitched onto a thin strip of fabric, lace, or silicone.
- Why layer them? It improves blending extensions with natural hair, adds dimension, and prevents a choppy appearance.
- Who can use them? Great for fine or short hair, but not suitable for those with active hair loss or very short hair (less than jaw-length).
- Prep and tools: Use silicone-lined beads, a tail comb, sectioning clips, and a detangling brush for the best results.
- Installation tips: Start with longer wefts at the nape and shorter ones higher up. Secure them using beads or thread for durability.
- Maintenance: Tighten every 6–8 weeks and care for extensions with gentle brushing and proper styling techniques.
Layering wefts is a practical way to achieve fuller, longer hair while maintaining a natural look. With the right tools and care, this technique can transform your hairstyle and boost your confidence.
How to Stack 4 Wefts Without Tension or Damage!
sbb-itb-dcde78e
Preparing for Weft Layering
Getting your hair and tools ready is a must for a smooth and secure weft installation. Skipping these steps can lead to slippage, discomfort, or a less-than-natural finish. By taking time to prep your natural hair and organise your wefts, you'll not only streamline the process but also help your extensions last longer.
Tools and Products You'll Need
Before you begin, gather the right tools. A tail comb is essential for creating neat, horizontal partings and for root backcombing. Use sectioning clips to keep your hair tidy during the process, and have sharp hair-specific scissors on hand for trimming wefts to the correct width. Using dull scissors or ones not designed for hair can fray the weft’s cloth strip, leading to premature shedding.
For beaded installations, you'll need silicone-lined micro beads, a bead loader, and pliers or beading tools. Silicone-lined beads are gentler on your hair and provide a better grip than unlined alternatives. If you're sewing in your wefts, make sure you have a needle and thread that matches your hair colour. A detangling brush, such as those from Hair Wonderland, is also important for smoothing out both your natural hair and the extensions.
"A neat and straight parting is crucial for a seamless finish and comfortable wear." - Kiki Hair
Getting Your Hair Ready
A good foundation is key to secure and long-lasting weft placement. Start by washing your hair with a sulfate-free shampoo to remove any product build-up without drying out your hair. Apply conditioner or a deep treatment only to the mid-lengths and ends - avoid the roots entirely, as any residue near the scalp can cause beads or thread to slip. Rinse thoroughly with lukewarm water and dry your hair completely using a microfibre towel to keep frizz at bay.
Once your hair is dry, gently detangle it by brushing from the ends upward. Use a tail comb to part your hair, securing the upper sections with clips. Lightly backcomb the roots or apply a volumising powder to create a sturdy base that helps prevent the wefts from sliding.
Preparing the Wefts
Before installation, measure each weft against the width of the horizontal section where it will be applied. Hair Wonderland's premium double-drawn Russian and Mongolian human hair extensions work particularly well for this, as their consistent thickness ensures a natural, full look from root to tip. Trim each weft to be slightly shorter than the section width to create a seamless blend. This attention to detail is crucial for achieving layered results with natural volume and smooth length transitions.
"Measure the weft against the width of your head and trim it if necessary. Ensure that the weft is slightly shorter than your head's width to allow for a more natural blend." - PA Hair Extensions
If you're layering multiple lengths - such as 40 cm, 45 cm, and 50 cm - organise them by size. Attach notes to each piece with a paperclip to identify their placement. Typically, the longest wefts go at the back or nape, while shorter layers are positioned higher up or around the face.
How to Layer Wefts Step-by-Step
Hair Extension Weft Installation Guide by Hair Type
Once your hair and wefts are prepped, it's time to install them. Taking your time with each step ensures a secure and natural-looking result. Here's how to build a solid foundation and layer your wefts for a seamless finish.
Creating a Foundation Row
Start by brushing your hair thoroughly, then use a tail comb to create a clean, horizontal parting from ear to ear across the back of your head. Leave a thin layer of natural hair underneath - this will act as a "safety layer" to hide the beads, keeping your extensions discreet when your hair moves.
Choose silicone-lined micro beads that match your natural root colour for the best grip and protection. Using a loop wand, thread a pencil-width section of hair through each bead, spacing them about 2 cm apart. Clamp each bead securely with pliers, leaving a small 1–2 mm gap between the bead and your scalp to prevent tension or discomfort. This row will serve as the anchor for the rest of your wefts.
"Unlike some extensions that can stress the hair follicle, beaded wefts distribute weight evenly, lessening the chance of damage." - Kiki Hair
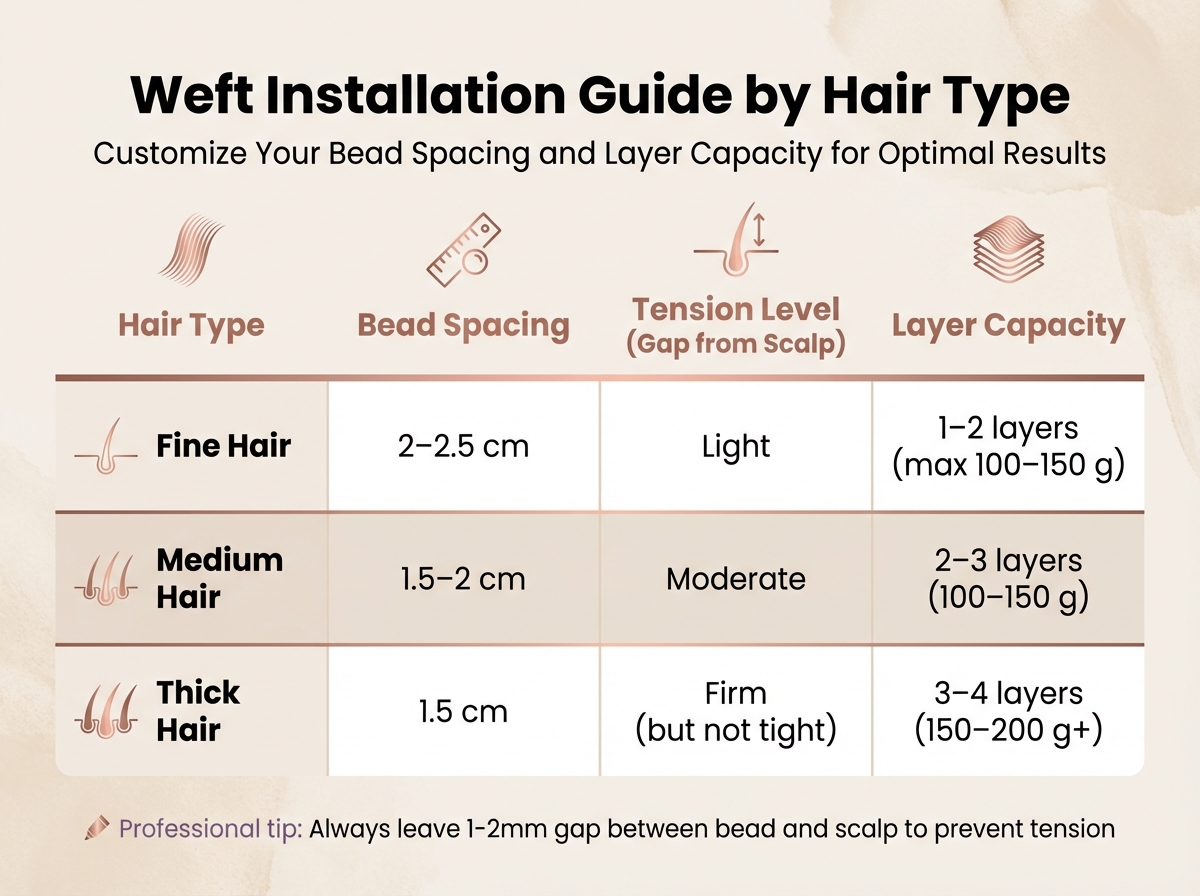
The spacing and tension of the beads should align with your hair type. For finer hair, space beads slightly farther apart and clamp them with lighter tension to reduce strain. For thicker hair, beads can be placed closer together with firmer clamping for added stability.
| Hair Type | Bead Spacing | Tension Level (Gap from Scalp) | Layer Capacity |
|---|---|---|---|
| Fine Hair | 2–2.5 cm | Light | 1–2 layers (max 100–150 g) |
| Medium Hair | 1.5–2 cm | Moderate | 2–3 layers (100–150 g) |
| Thick Hair | 1.5 cm | Firm (but not tight) | 3–4 layers (150–200 g+) |
Positioning and Stacking Layers
Begin layering at the nape and move upwards in horizontal sections. Secure the longest weft to the foundation row first. Use a curved needle and nylon thread to sew the weft onto the beads, starting with anchor stitches at both ends. Then, use blanket stitches to secure the weft along the row, ensuring it’s firmly attached.
Layering different weft lengths is key to achieving a natural look. Place mid-length wefts about 2.5 cm above the first row and shorter wefts higher up. This staggered "stairway" arrangement prevents a harsh, step-like appearance, creating soft, flowing layers instead. For finer hair, limit each row to one or two lightweight wefts, while thicker hair can handle three or more without looking bulky.
If you're working with ultra-thin wefts, like Miracle or Genius wefts, you can try the "sandwich" technique. This involves sewing one weft underneath and another on top of the beaded row. This method hides the beads while evenly distributing the weight across the foundation.
Securing Layers for Durability
Once your layers are positioned, secure them with professional nylon thread that matches your hair colour. Use a curved needle to stitch through the weft and around the beaded row, ensuring the weft lies flat against your scalp. Avoid pulling too tightly, as this can cause discomfort or damage to your natural hair follicles.
For clip-in wefts, backcomb your roots or use a volumising powder to provide extra grip before clipping in each layer. Start at the nape, working upward, and clip each weft securely before moving to the next row. If stacking multiple clip-in layers, ensure each row is firmly in place before proceeding.
After installation, check each row to confirm the beads feel snug but allow natural movement. Plan to have the wefts tightened every 6–8 weeks according to a hair extension maintenance planner to maintain their fit and appearance.
Blending and Styling Layered Wefts
Blending Techniques for a Natural Look
Nothing gives away poorly installed extensions faster than the "blunt shelf effect" – that sharp line where your natural hair ends, and the extensions begin. To avoid this, focus on creating a natural, seamless transition. A key tip? Match the extension colour to the ends of your natural hair, not the roots, for a flawless blend.
For soft, natural-looking edges, use thinning shears or a razor comb to point-cut the extensions. This involves making small, upward snips along the edges to avoid harsh, choppy lines. Regular scissors can leave an unnatural finish, so steer clear of those. If your natural hair has a blunt cut, consider softening the ends slightly before installing the wefts. For those with thick hair, thinning out the outer sections of the extensions can prevent the dreaded "mushroom top" effect.
"Soft curls, waves, and textured hair in general help hiding the difference between natural hair and hair extensions." - Brenda L., Cliphair
Adding a touch of volumiser powder or a texturising spray at the roots can work wonders. These products help disguise attachment points and add movement, ensuring the hair doesn’t sit flat. Also, position the wefts slightly away from the hairline to keep the blend discreet. These techniques not only make the extensions look more natural but also set the stage for styling.
Styling Layered Extensions
Once your extensions are blended, the next step is to style them as if they’re part of your natural hair. Whether you’re curling, straightening, or blow-drying, always style your natural hair and extensions together. This ensures the strands intermix seamlessly. Soft waves or loose curls are particularly effective at camouflaging any transitions, while a slight bend at the ends can soften overly straight styles.
Don’t skip the heat protectant! Following a guide to heat styling extensions will help you maintain their quality over time. Even though premium extensions like Hair Wonderland’s double-drawn Russian/Mongolian human hair are designed to handle heat styling, protecting them will help maintain their quality over time. Use a loop brush or a soft-bristle brush to detangle gently, avoiding damage to the attachment points. For updos, make sure the wefts are securely clipped or sewn in place, and use bobby pins to anchor loose sections without causing unnecessary tension. These steps ensure your extensions look flawless and stay secure, no matter the style.
Troubleshooting and Expert Tips
Common Mistakes to Avoid
One of the biggest missteps is installing extensions that are far longer than your natural hair. For instance, adding 26-inch extensions to shoulder-length hair often creates an uneven and unnatural appearance. Instead, aim for staggered lengths - like 12–14 inches for the top layer and 16–18 inches for the bottom. This approach creates a natural taper without the need to trim the wefts.
When it comes to trimming, only machine-sewn or hybrid "Miracle/Genius" wefts should be cut. Cutting hand-tied wefts can cause them to unravel completely. If you need to customise a machine-sewn weft, use sharp, professional scissors and seal the edges with a small amount of clear fabric glue to minimise shedding.
Placement is another area where mistakes happen. Placing wefts too close to the hairline or crown can make the tracks visible, and clamping beads too tightly can lead to discomfort or even traction alopecia. According to the American Academy of Dermatology, "improper extension application is the primary cause of extension-related hair damage". To avoid this, leave a thin layer of natural hair beneath your parting to conceal the beads, and ensure you can comfortably slide a finger under each weft. This ensures the attachment is secure but still allows natural scalp movement.
Another common mistake is sleeping with wet hair or applying heavy products near the attachment points. These habits can lead to matting and slippage. Always dry your hair completely before bed to keep your extensions secure and looking natural between maintenance appointments.
Expert Advice for Long-Lasting Results
In addition to avoiding common mistakes, these professional tips can help you maintain your extensions for the long haul. Scheduling maintenance appointments every 6–8 weeks is crucial. With proper care, high-quality Remy human hair wefts can last 9–12 months. However, regular tightening is necessary to keep them securely in place. The American Academy of Dermatology also warns that leaving extensions in for too long can increase tension on your follicles, potentially leading to traction-related hair loss.
For a better grip and to protect your natural hair, use silicone-lined beads for the foundation row. If your wefts are thin, the "sandwich" technique can help make them nearly invisible. When using heat styling tools, avoid temperatures above 180°C to preserve the integrity of your extensions.
Make brushing a daily habit - 2–3 times a day - with a loop brush or wide-tooth comb. Start at the ends and work your way up, holding the weft to reduce stress on the attachments. Tools like Hair Wonderland's detangling brushes are specifically designed to keep premium double-drawn Russian or Mongolian hair extensions tangle-free and secure. Combined with the layered installation technique mentioned earlier, these tips will help your extensions stay beautiful and durable over time.
Conclusion
Layering wefts offers a tailored, natural look with balanced weight and adaptable volume. Whether you're after a slight boost in thickness or a bold transformation, the secret lies in staggering the lengths, securing each row correctly, and caring for your extensions with the right tools. As Matilda Marshall, Director at Paul Edmonds, puts it: "You get longer, thicker hair quickly, and as the weight of the weft is distributed across more of your hair there's less tension on your head, so it's less damaging".
Mastering this technique opens up countless styling options - from soft, face-framing layers to full, voluminous ponytails - all while keeping your extensions comfortable and discreet. With regular brushing and proper upkeep, you can extend the life of your wefts and maintain their flawless appearance.
Our high-quality extensions are crafted for durability and seamless blending, making them perfect for layered applications. Pair them with our detangling brushes and care products to keep your extensions lightweight and natural-looking. Choosing premium wefts and using the right techniques ensures your hair moves and blends effortlessly, creating a look that's full of life.
Layering wefts isn't just about adding length - it's a way to achieve natural dimension, comfort, and fluid movement that mirrors real hair growth. With the right methods and materials, you can enjoy salon-level results that stand the test of time.
FAQs
How many weft layers do I need for my hair type?
The number of weft layers you’ll need varies depending on your hair type and the level of volume you’re aiming for. For a natural yet full look, 2-3 layers usually do the trick for most people. If you have thicker or more textured hair, you might require extra layers or thicker wefts to ensure proper coverage. Ultimately, it’s all about tailoring the layers to match your hair’s density and the style you want, as layering gives you plenty of flexibility to achieve your desired result.
What weft lengths should I combine for a natural blend?
For a natural look, try layering wefts of varying lengths to imitate the way real hair naturally falls. Place shorter wefts closer to the roots and longer ones towards the ends to create a smooth transition. For example, combining 20-inch wefts with 16- or 18-inch ones gives a gradual, flowing effect. Just make sure the length difference is subtle - only a few inches - so the blend appears seamless and avoids any harsh contrasts.
Can I layer wefts if my hair is shorter than jaw-length?
Layering wefts works best for longer hair, as it creates a more seamless and natural appearance. If your hair is shorter than jaw-length, layering can be tricky and might not look as natural unless handled by an experienced stylist. A professional can tailor the layers to match your hair length, ensuring a smooth and well-blended result.