

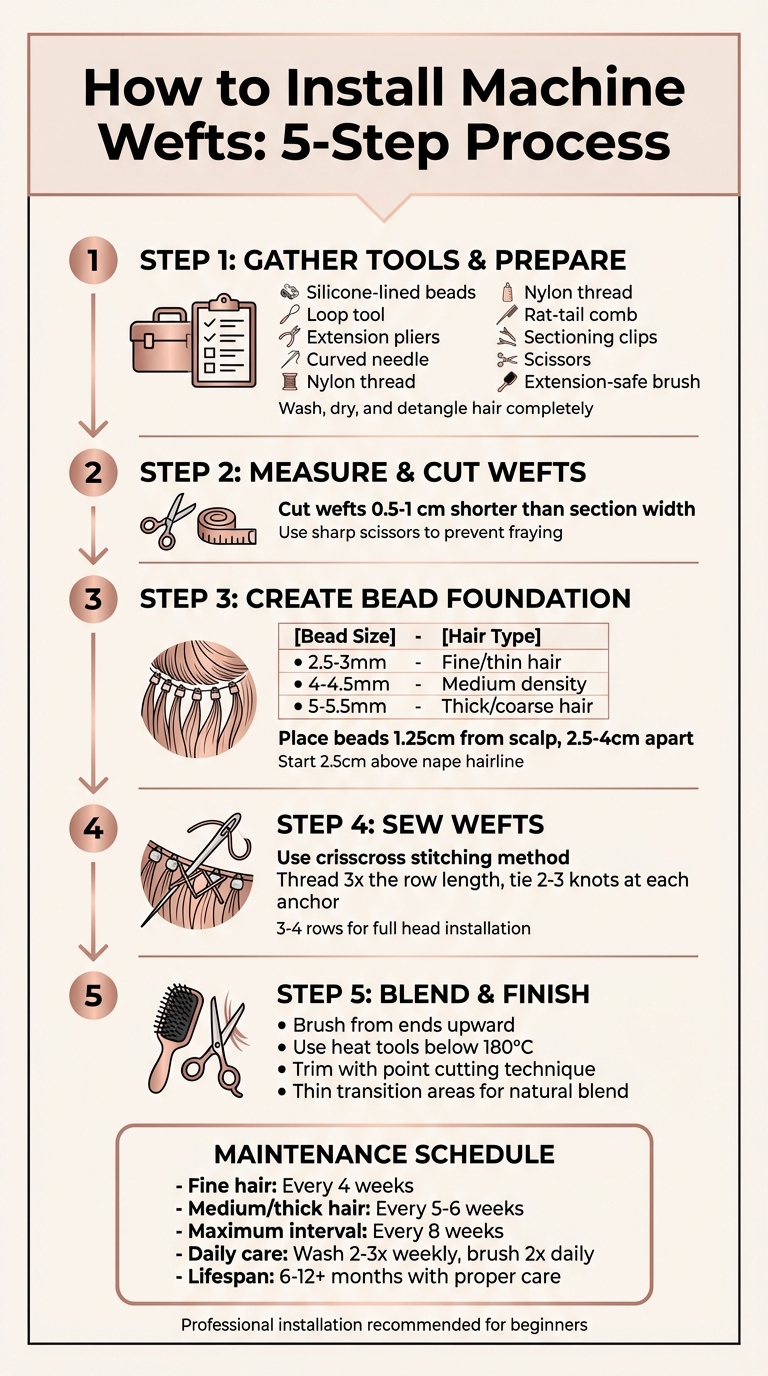
Machine weft extensions are strips of hair sewn into a base that can be attached to your natural hair for instant length and volume. They are strong, durable, and can be sewn onto cornrows or attached with micro-beads, avoiding the use of glue or heat. Proper installation ensures comfort and prevents damage. Follow these steps for a smooth process:
- Tools Needed: Silicone-lined beads, loop tool, extension pliers, curved needle, nylon thread, rat-tail comb, sectioning clips, sharp scissors, and an extension-safe brush.
- Preparation: Wash and dry your hair thoroughly, detangle, and create clean sections.
- Weft Customisation: Measure and cut the wefts slightly shorter than the section width for a natural fit.
- Foundation: Use silicone beads to create a secure base, spaced evenly along the section.
- Attachment: Sew the wefts to the beads using a crisscross stitching method for a firm hold.
Following a hair extension maintenance planner includes washing 2–3 times weekly with gentle products, brushing twice daily, and re-tightening every 6–8 weeks. With proper care, machine wefts can last over a year. For beginners, professional installation is recommended for best results.
Step-by-Step Guide to Installing Machine Weft Hair Extensions
Machine Weft Extensions Tutorial - Webinar by Educator Shania Butcher | Aqua Hair Extensions
sbb-itb-dcde78e
Tools and Materials Needed
Before diving into the installation process, take some time to gather all the necessary supplies and organise your workspace. A well-prepared setup ensures everything runs smoothly from start to finish.
Installation Tools
Here’s what you’ll need to get started:
- Silicone-lined micro beads: These are gentler on natural hair, offering a secure grip without causing damage or slippage, unlike standard metal beads.
- Loop tool (or bead loader): Essential for threading hair through the beads.
- Extension pliers: Used to clamp the beads shut during installation and reopen them for removal.
- Curved 'C' needle: Designed to follow the natural contour of the head, making it safer to use than straight needles.
- Colour-matched bonded nylon or polyester thread: Provides strong, discreet stitching for long-term wear. For sensitive scalps, cotton thread is a softer alternative.
- Rat-tail comb: Ideal for creating clean, horizontal sections.
- Sectioning clips: Metal or duckbill clips work best for holding hair layers in place.
- Sharp scissors: Necessary for trimming wefts and thread cleanly without fraying. Whether you are working with Russian or Mongolian hair,
- Extension-safe brush: Prevents pulling on the beads. Brands like Hair Wonderland offer brushes specifically designed for this purpose.
Setting Up Your Workspace
Create a clean, well-lit workspace where you can easily access all your tools. A salon trolley can help keep everything organised, arranged in the order you’ll need them - start with sectioning tools, then move to foundation-building supplies, followed by the attachment materials.
Before beginning, disinfect all metal tools and pre-thread your needles with the colour-matched thread. Ensure your client’s hair is washed, thoroughly dried, and completely detangled. This preparation not only streamlines the process but also helps achieve the best results.
Preparing Your Hair and Wefts
Washing and Drying Your Hair
Clean, dry hair is a must - any leftover oils can make beads or thread slip during installation. Start by using a clarifying or deep-cleansing shampoo to thoroughly cleanse your scalp and roots, where the extensions will be applied. Stick to lukewarm water instead of hot, as high temperatures can weaken your hair strands.
After shampooing, apply a moisturising conditioner to the lengths of your hair only. This keeps your hair soft and helps it blend better with the extensions. Rinse thoroughly and ensure your hair is completely dry before moving forward - using a hairdryer is recommended, as damp hair can lead to scalp irritation.
Once your hair is fully dried, detangle it with a wide-tooth comb. Then, use a precise styling tool like the Hair Wonderland Styling Comb ($12.95) to create clean, horizontal sections. Proper sectioning is key to achieving a flat and comfortable installation.
With your hair ready, it’s time to customise your wefts for the perfect fit.
Measuring and Cutting the Wefts
Getting the right measurements is crucial for a natural, seamless look. Position each machine weft against the back horizontal section of your hair to gauge its width. Trim the weft so it’s slightly shorter than the section - about 0.5 to 1 centimetre shorter. This ensures the extensions stay discreet, avoiding any visibility near your hairline or temples.
"Measure the weft against the width of your head and trim it if necessary. Ensure that the weft is slightly shorter than your head's width to allow for a more natural blend." - PA Hair Extensions
Use sharp, professional scissors to cut the wefts. The reinforced stitching on machine wefts allows you to trim them into smaller sections without worrying about shedding. Avoid using dull scissors, as they can damage the fabric base and cause fraying. After cutting, check the edges for any loose strands and remove them to minimise future shedding.
Creating the Bead Row Foundation
Getting the bead row foundation just right is key to ensuring your machine wefts lay flat and feel comfortable.
Sectioning Your Hair
Begin at the nape of your neck, about 2.5 cm above the hairline. Use a rat-tail comb to create a clean, straight horizontal parting. This parting sets the stage for the layers above it.
"A neat and straight parting is crucial for a seamless finish and comfortable wear." - Kiki Hair
To keep your workspace tidy, clip the upper sections of your hair with sectioning clips. Leave a thin layer of natural hair below the parting to camouflage the beads. For a full head installation, plan for 3 to 4 horizontal layers, working from the bottom upward. The number of layers will depend on the natural thickness of your hair.
With your sections neatly divided, you’re ready to start placing the beads.
Applying Silicone Beads
Select silicone-lined beads that match your root colour to ensure a strong yet gentle grip. The bead size should correspond to your hair’s thickness:
| Bead Outer Diameter | Recommended Hair Type |
|---|---|
| 2.5–3 mm | Fine or thin hair |
| 4–4.5 mm | Medium density hair |
| 5–5.5 mm | Thick or coarse hair |
Using a loop tool, thread a small section of natural hair through the bead. The hair section should be roughly the same thickness as the bead. Slide the bead up so it sits about 1.25 cm away from your scalp - this spacing allows for natural movement. Once in position, clamp the bead securely with extension pliers.
After securing each bead, test its hold by gently tugging on it. A properly clamped bead should stay in place while still allowing slight movement. Place each bead 2.5 to 4 cm apart along the horizontal row for an even foundation. This spacing ensures the weight is evenly distributed and creates a stable base for attaching your weft.
"We recommend silicone-lined ones; they grip hair better, feel more gentle, and are less likely to slip." - Layla Lee, Founder, Gistar Hair
Attaching Machine Wefts
Once the beads are in place, the next step is securing the wefts with precision.
Sewing the Wefts to Beads
Position the weft directly above the bead row, ensuring it lies flat against your scalp without any bumps or ripples. To begin, cut a thread that’s three times the length of the row, and thread it through a curved 'C' needle using nylon or polyester thread that matches your natural root colour. This keeps the stitches as discreet as possible.
"The crisscross method involves inserting the needle underneath the bead and through the weft, then crossing the thread over the top of the weft and back under the next bead." - Kiki Hair
Start sewing at the centre of the row. Insert the needle under the first bead, pass it through the reinforced seam of the weft, and then cross the thread over the top of the weft before moving to the next bead. This crisscross pattern ensures each bead acts as a secure anchor. Pull each stitch tight enough to hold the weft firmly in place, but not so tight that it causes discomfort. Secure the thread at each anchor point by tying 2–3 strong knots to prevent the stitches from loosening.
Once the first row is secured, you can move on to layering premium hair extensions for proper coverage.
Installing Multiple Rows
With the bead foundation in place, add rows methodically to ensure even weight distribution. For a full-head installation, it’s common to use 3–4 rows of wefts. Space each row about a finger-width apart, starting from the nape of the neck and working upward toward the crown. This spacing allows your natural hair to move freely and prevents any stiffness.
To create extra volume, you can stack 1–3 wefts on a single bead row. To achieve this, place one weft underneath the bead track and 1–2 wefts on top. This 'sandwich' technique not only adds volume but also helps conceal the beads. When stacking, sew all the wefts together to keep the layers seamless without adding unnecessary bulk to the scalp.
Blending and Finishing
Once the wefts are securely attached, the final step is to blend them seamlessly with your natural hair.
Brushing and Styling
Begin by gently brushing your hair using a detangling brush or a wide-tooth comb. Work from the ends upward to avoid pulling on the attachment points, which helps reduce tension on the beads and thread. Regular brushing - ideally twice a day - can also prevent matting.
When it’s time to style, follow a guide to heat styling extensions and always use a heat protectant spray. Aim to keep your tools below 180°C, as extensions are more prone to heat damage since they don’t benefit from your scalp’s natural oils. For styling products like oils or serums, apply them sparingly and only from the mid-shaft down to the ends. Avoid heavy products near the roots or attachment points, as they can cause the beads or thread to slip out of place.
These steps ensure your extensions are ready for trimming and final blending.
Trimming and Shaping
To achieve a natural look, trim the extensions with sharp scissors, tailoring them to match the length and layers of your natural hair. Using point cutting techniques helps create a soft, gradual edge, avoiding any harsh lines that could make the extensions noticeable.
Pay special attention to the transition area where the wefts meet your natural hair. Thinning this section with professional thinning scissors can remove excess bulk, creating a smooth and realistic blend. Layla Lee, Founder of Gistar Hair, highlights the importance of this step:
"Use scissors to thin the wefts and natural hair blend, removing harsh lines and avoiding a 'wig look'."
If you’re unsure about trimming techniques, it’s a good idea to visit a professional stylist for the initial shaping. They can customise the cut to suit your hair type and face shape, ensuring a flawless finish.
Maintenance and Aftercare Tips
Taking care of your machine wefts properly can extend their lifespan to anywhere between 6 and 12 months.
Maintenance Schedule
Regular professional appointments are a must to keep your extensions secure and to protect your natural hair. How often you’ll need these appointments depends on your hair type and how quickly your hair grows.
| Hair Type/Condition | Maintenance Timeline | Primary Requirement |
|---|---|---|
| Fine Hair | Every 4 weeks | Frequent adjustments to avoid tension on delicate strands. |
| Medium to Thick Hair | Every 5–6 weeks | Standard re-beading and tightening of the weft. |
| Maximum Interval | Every 8 weeks | The longest you should go to prevent matting and breakage. |
During these appointments, your stylist will re-section your hair to ensure the weft attaches securely to a healthy, balanced section. Interestingly, over 90% of extension wearers say that sticking to a professional maintenance schedule adds an extra 2 to 3 months to the life of their extensions compared to skipping care.
In addition to professional upkeep, following a daily care routine is essential to keep your extensions looking and feeling their best.
Daily Care Tips
- Washing: Stick to washing your hair 2–3 times a week using sulfate- and paraben-free products. Focus the shampoo on your scalp, condition the mid-lengths and ends, and always blow-dry your hair completely on medium heat.
- Brushing: Use an extension brush or a wide-tooth comb twice daily. Start brushing from the ends, holding the top of the weft to minimise tension.
- Moisture: Since extensions don’t benefit from natural scalp oils, apply 1–2 pumps of a treatment oil (like argan oil) to the ends every day to keep them hydrated.
- Sleeping and Swimming: Before bed, secure your hair in a low, loose braid or ponytail and sleep on a silk or satin pillowcase to reduce friction and matting. If you’re swimming, apply a leave-in conditioner beforehand, and make sure to rinse and shampoo your hair twice afterwards.
Conclusion
Installing machine wefts successfully relies on careful preparation and precise application techniques. Starting with clean, dry hair - preferably washed with a clarifying shampoo - sets the stage for secure attachment. Key steps like proper sectioning, accurately measuring your wefts, and sewing them with the right tension help ensure the wefts lie flat without discomfort or visible lines.
But installation is just the first step. How you care for your extensions daily and schedule professional maintenance will determine their longevity and appearance. As Layla Lee, Founder of Gistar Hair, aptly says:
The beauty of hair extensions isn't just in the moment of installation, it's in every gentle step of care afterward.
This highlights how essential proper aftercare is to maintaining the look and health of your extensions.
If you're new to machine wefts, professional installation is highly recommended. A skilled stylist can ensure the correct bead placement and thread tension, reducing the risk of scalp irritation or traction alopecia. They’ll also use expert trimming and layering techniques to make your extensions blend seamlessly with your natural hair.
Whether you opt for a professional or DIY approach, achieving lasting, natural-looking volume depends on preparation, precision, and consistent care. These are the cornerstones of flawless machine weft installation.
FAQs
Can I safely install machine wefts at home?
Yes, you can apply machine wefts at home, but it requires patience, the right tools, and proper technique to ensure your hair stays healthy. The process typically involves sectioning your hair, attaching the wefts with methods like micro beads or sewing, and being gentle throughout. That said, if you're new to this, professional help is often a better option to avoid potential damage or uneven results. If you do decide to try it yourself, take time to practise and follow detailed instructions for a natural finish.
How do I choose the right bead size for my hair?
When choosing the right bead size for weft extensions, it's important to take your hair's natural texture and the application technique into account. Smaller beads work best for fine hair since they’re lighter and help avoid unnecessary bulk. On the other hand, larger beads provide a stronger grip, making them ideal for thicker hair types. The aim is to keep the weft securely in place while avoiding tension or damage, ensuring the choice aligns with both your hair's thickness and the extension method being used.
What should I do if my wefts feel tight or itchy?
If your wefts feel uncomfortably tight, it’s likely they’ve been installed with too much tension. Try gently adjusting them to ease the pressure. For itching, resist the urge to scratch - this can make things worse. Instead, use a gentle, moisturising hair product to calm your scalp. Discomfort might also signal irritation or product buildup. If the problem continues, it’s best to see a professional hairstylist. They can check the installation and offer guidance to protect your natural hair from potential damage.