
Micro-bead extensions are a heat-free, glue-free way to add length and volume to your hair. Using small silicone-lined beads, individual strands are securely attached to your natural hair. They’re reusable and can last 6–12 months with proper care, making them a low-maintenance option for many hair types.
Here’s what you need to know:
- Tools Required: Micro-beads, pliers, threading tool, rattail comb, sectioning clips.
- Hair Prep: Wash with a clarifying shampoo, dry thoroughly, and section neatly.
- Installation: Thread natural hair through the bead, insert the extension, and clamp securely.
- Aftercare: Follow a daily hair extension care routine, wash 2–3 times weekly, and avoid applying conditioner near the roots.
- Maintenance: Schedule adjustments every 4–6 weeks to keep them secure and prevent damage.
How to make & install your own hair extensions! (Microbead/Micro-ring/Itip)
sbb-itb-dcde78e
Tools and Materials You'll Need
Before you start installing micro-bead extensions, it’s essential to have all the necessary tools and materials ready. This ensures the process goes smoothly and efficiently.
Required Tools
First on the list are micro-beads with silicone lining. These tiny metal rings are designed to protect your natural hair while keeping the extensions securely in place. The silicone lining adds extra grip, preventing the beads from slipping down your hair strands.
Next, you’ll need pliers - specifically, closer pliers for clamping the beads shut and remover pliers for opening them when it’s time to take the extensions out. Opt for professional-grade stainless steel pliers for better precision and durability.
A threading or loop tool is another must-have. This tool, whether it’s a wire loop or crochet hook, is used to pull your natural hair through the micro-beads. Some versions can even thread multiple beads at once, making the process quicker.
For neat and clean sectioning, a rattail comb is indispensable. Pair this with sectioning clips to keep your hair organised and prevent tangling during the installation process. Proper sectioning also ensures even weight distribution, which is crucial for comfort and maintaining healthy hair.
| Tool | Function | Price Range (AUD) |
|---|---|---|
| Micro-Beads (Silicone-Lined) | Secure extensions to natural hair | A$14.99 per pack |
| Closer Pliers | Clamp beads shut | A$14.99 |
| Remover Pliers | Open beads for removal | Included in kits |
| Loop/Threading Tool | Pull hair through beads | A$4.99 |
| Rattail Comb & Clips | Section and organise hair | Part of kits |
| Professional Tool Kit | Complete set with case | A$129.00–A$145.00 |
Once you’ve gathered your tools, it’s time to focus on selecting the right extensions.
Choosing Quality Extensions
The type of extensions you choose plays a huge role in how natural they look and how long they last. For the best results, go for double-drawn Remy human hair extensions from trusted brands like Hair Wonderland. These extensions are known for their consistent thickness from root to tip, which creates a fuller and more natural look.
Hair Wonderland offers premium double-drawn Russian and Mongolian human hair extensions, which are carefully processed to keep the cuticles intact and aligned. This alignment prevents tangling and ensures the hair remains soft and silky throughout its lifespan. With proper care, these high-quality extensions can last anywhere from 6 to 12 months. In contrast, synthetic extensions typically wear out within three months.
When selecting your extensions, don’t forget to match the bead colour to your roots rather than your ends. This simple step keeps the attachment points hidden, giving your extensions a more seamless and natural appearance.
Preparing Your Natural Hair
Getting your natural hair ready is a crucial step to ensure your extensions stay secure and last longer. Skipping or rushing this process can lead to bead slippage, discomfort, or even damage to your extensions.
Washing and Drying
Start by washing your hair with a clarifying shampoo to remove any build-up that could cause the beads to slip. Focus on cleaning your scalp and roots thoroughly. As Hair Wonderland advises, "hair must be freshly washed with a cleansing shampoo before application".
Steer clear of products with heavy proteins, silicones, or high alcohol content. These ingredients can act like lubricants, weakening the attachment and causing extensions to fall out earlier than expected. If you need to condition your ends, be cautious to keep the conditioner away from the roots.
Once washed, make sure your hair is completely dry. Blow-dry it on medium heat to avoid any moisture issues. Detangle gently, working from the ends up to the roots, using an extension brush or a wide-tooth comb.
Sectioning the Hair
Use a rattail comb to section your hair horizontally, starting at the nape and working upwards. This method ensures a natural and even look. Layering the extensions between sections of your natural hair also helps keep the bead connections hidden.
Divide your hair into small sections and secure the rest with clips. For those with smooth or fine hair, lightly backcombing the root area at each section can create extra texture, helping the micro-beads grip more securely. Proper sectioning not only prevents tangling but also ensures the beads are placed firmly and evenly.
Colour Matching
After prepping and sectioning your hair, proper colour matching and blending is the final touch to create a seamless look. Choose extensions with balayage, highlights, or mixed tones to replicate the natural variation in your hair. Hair Wonderland offers premium Russian and Mongolian hair extensions in a wide range of shades, making it easier to achieve an ideal match.
Installation Instructions
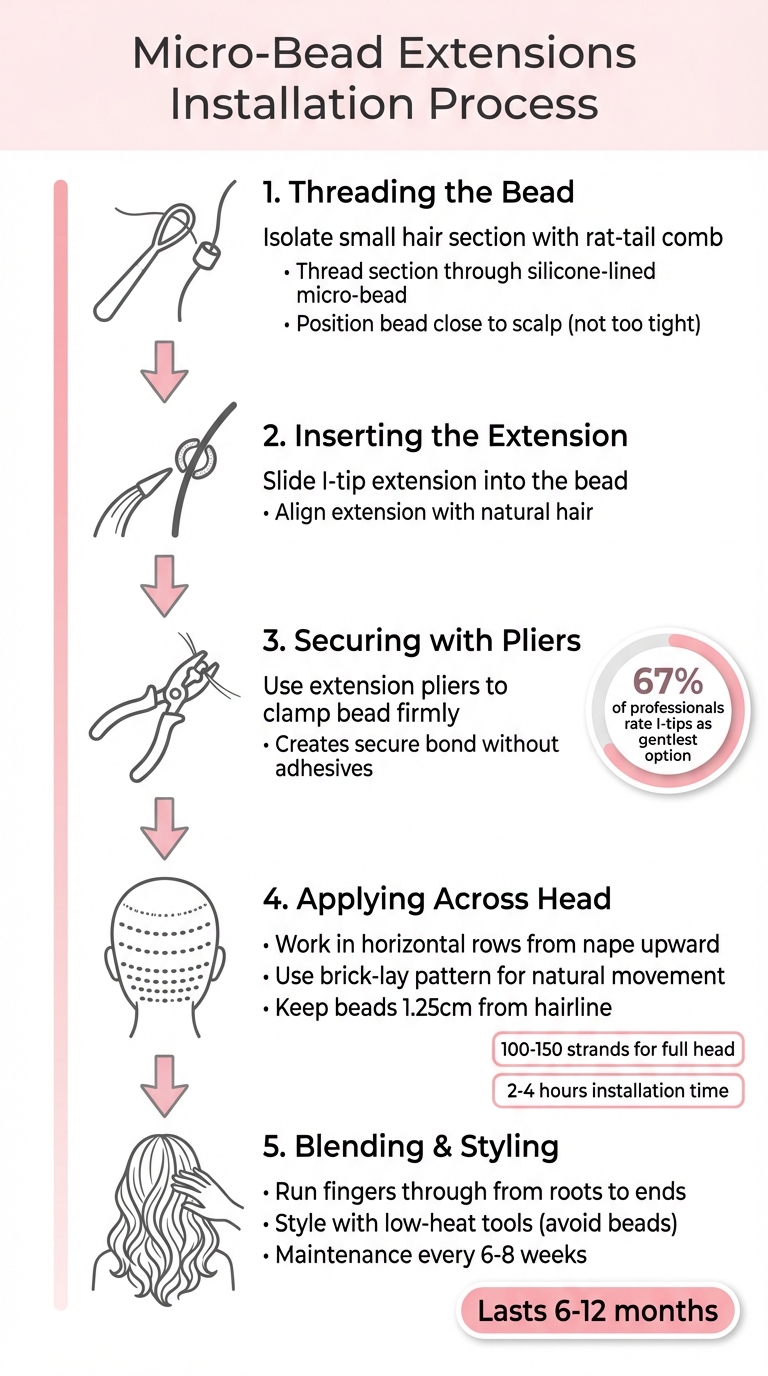
Micro-Bead Hair Extensions Installation Process: 5 Essential Steps
Once your hair is prepped and sectioned, follow these steps to attach your micro-bead extensions securely and comfortably.
Threading the Bead
Start by using a rat-tail comb to isolate a small, sturdy section of hair. With a threading tool, guide this section through a silicone-lined micro-bead. Position the bead close to your scalp, but avoid clamping it too tightly. As Showpony Hair Extensions advises:
The idea here is to make it snug but not too tight, ensuring it holds the extension securely without causing any discomfort.
For those with finer or thinner hair, silicone-lined beads are a great choice. They offer extra grip, reducing the chances of slippage. Once the bead is in place, you're ready to insert the extension.
Inserting and Securing the Extension
Slide the I-tip extension into the bead, aligning it with your natural hair. Then, use professional hair extension pliers to clamp the bead firmly, creating a secure bond without the need for adhesives or chemicals. According to surveys, over 67% of hair professionals regard I-tip extensions as one of the gentlest options for long-term use. While some mild scalp sensitivity is normal at first, it should subside quickly.
Applying Extensions Across the Head
Work methodically, attaching extensions in horizontal rows starting from the nape and moving upward. To create a natural look, stagger the beads in a brick-lay pattern, which allows for better movement. Keep beads about 1.25 cm away from the hairline to ensure they remain hidden. For a full head, you’ll typically need 100–150 strands, and the process takes around 2–4 hours.
Blending and Styling
To blend the extensions seamlessly with your natural hair, run your fingers through from roots to ends. Style as desired using low-heat tools, but avoid applying direct heat to the beads. With regular maintenance appointments every six to eight weeks, your micro-bead extensions can last anywhere from six to twelve months.
Aftercare and Maintenance
Keeping micro-bead extensions in great condition requires a regular care routine. Just as proper installation creates a flawless look, consistent aftercare helps maintain it over time.
Daily Care Routine
Brush your extensions twice a day using a Tangle Tamer Brush ($21.95) or Detangle Brush ($29.95). Start at the ends and work your way up to prevent matting or tangling [9, 42]. Limit washing to 2–3 times a week, applying shampoo only to your scalp and working it in gently.
When it comes to conditioner or hair masks, avoid applying them near the beads. Focus on the mid-lengths and ends instead. Also, steer clear of products containing protein, keratin, sulfates, or high alcohol levels, as these can weaken the extensions.
Before going to bed, ensure your hair is completely dry to prevent tangling. Secure it in a loose, low braid or ponytail, and apply 2–3 pumps of treatment oil to the ends for added moisture overnight.
Regular Maintenance Schedule
Daily care is essential, but professional maintenance is equally important to keep your extensions secure and looking natural. Book "move-up" appointments every 4–6 weeks to adjust the extensions as your natural hair grows. This is particularly important because your hair sheds about 50–100 strands daily.
Hair Wonderland highlights the risks of delaying maintenance:
Leaving extensions in for too long can damage your natural hair. Understanding common hair extension problems can help you identify issues early. As your extensions grow, the section of natural hair they're attached to becomes smaller due to daily shedding.
For those with finer hair, adjustments might be needed every 4 weeks, while others can typically wait 5–6 weeks. Avoid exceeding 8 weeks between appointments, as this can lead to damage and may void service warranties at some salons. By sticking to a regular schedule and following proper aftercare, you’ll preserve the secure and natural look achieved during installation.
Conclusion
Micro-bead extensions are a fantastic way to add length and volume to your hair when applied and maintained correctly. From carefully matching the colour and sectioning the hair to securing the beads and scheduling regular upkeep, these steps help achieve a natural look that moves effortlessly with your own hair.
The quality of the materials used plays a big role in the outcome. Opting for premium double-drawn vs single-drawn Remy human hair, like the extensions available at Hair Wonderland, ensures your extensions stay thick from root to tip and blend beautifully with your natural hair. With proper care, these high-quality extensions can last between 6 and 12 months. Plus, many stylists appreciate micro-bead extensions for their minimal impact on natural hair over time.
Using the right tools is just as important. Professional extension pliers and high-quality aluminium beads provide a secure hold without causing discomfort or damage to your scalp. To keep your extensions smooth and tangle-free, tools like the Tangle Tamer Brush ($21.95) or the Detangle Brush ($29.95) are excellent options for maintenance between salon visits.
FAQs
How can I pick the perfect colour for my micro-bead extensions?
Choosing the right colour for your micro-bead extensions is crucial for a natural, flawless look. Try to select extensions that are within 1–2 shades of your natural hair colour for the best blend. If your hair features highlights or lowlights, go for extensions with multi-tonal shades to add depth and achieve a seamless finish.
To ensure the most accurate match, examine your hair colour in natural light, focusing on the mid-lengths to ends. These areas are where the extensions will blend most prominently, helping them look cohesive and natural once applied.
What should I do if my micro-bead extensions start slipping?
If your micro-bead extensions start to slip, it’s usually because of improper installation or the natural movement of your hair over time. This can occur if the beads weren’t secured tightly enough or if there’s too much strain on the hair.
The best solution? Head to a professional stylist. They can inspect your extensions and either reattach or adjust the beads as needed. Trying to fix them yourself might seem tempting, but it risks damaging both your hair and the extensions. To avoid slipping in the future, stick to regular maintenance and treat your extensions gently - avoid pulling on them or putting unnecessary tension on your hair.
How often should I book maintenance appointments for my micro-bead extensions?
To keep your micro-bead extensions in top condition and maintain the health of your natural hair, it's best to schedule maintenance appointments every 5 to 6 weeks. If you have finer hair, your stylist might recommend visiting more often - around every 4 weeks - to prevent any unnecessary strain.
Leaving your extensions unattended for longer than 6 weeks can lead to tangling or potential damage. Regular upkeep helps ensure your extensions stay comfortable, blend seamlessly, and last as long as possible.