
Bleaching hair extensions can be tricky, but it’s possible to achieve great results at home with the right approach. Extensions, unlike natural hair, are more prone to damage since they don’t receive nourishment from the scalp. To avoid dryness, breakage, or uneven colour, follow these key steps:
- Use 100% human hair extensions (preferably Remy or virgin hair) for even colouring and durability. Synthetic extensions don’t bleach well.
- Prepare properly: Wash extensions a few days before bleaching and do a strand test to check how they react to bleach.
- Use professional-quality bleach: Pair a powder bleach (blue or purple to reduce brassiness) with a 20-volume developer for controlled lightening.
- Apply bleach carefully: Work section by section, starting from the ends, and avoid the adhesive areas (clips, bonds, or tapes).
- Monitor processing time: Check every 5–10 minutes to avoid over-processing. Rinse once the desired colour is achieved or if the hair feels weak.
- Focus on aftercare: Use sulfate-free shampoos, deep conditioners, and hydrating masks to restore moisture and strength. Store extensions properly to prevent tangling and damage.
Bleaching requires patience and precision, but with these steps, you can safely lighten your extensions while maintaining their quality.
How to bleach hair extensions with no damage
sbb-itb-dcde78e
Choosing the Right Hair Extensions for Bleaching
If you're planning to bleach hair extensions, make sure they are 100% human hair. Cosmetologist Mila M. advises, "Bleaching synthetic hair extensions is not recommended due to the limitations and potential damage it can cause". Synthetic materials are non-porous, meaning they absorb bleach unevenly, often resulting in brittle and patchy outcomes.
For the best results, opt for premium Remy hair extensions. These retain their natural cuticles, making them more durable against chemical treatments. As HairingCaring.com puts it, "High-quality human hair extensions, such as Remy hair, retain their cuticles and are less processed. This quality makes them more resilient to chemical treatments like bleaching". Their natural structure provides a solid foundation for safer bleaching methods.
To take it a step further, consider the differences between double-drawn vs single-drawn extensions, which maintain consistent thickness from root to tip. For example, Hair Wonderland's Seamless Set features double-drawn Russian and Mongolian hair, designed specifically to handle chemical treatments. This set, priced at AU$499.00 for 22″ length, is a standout option for those seeking durability and quality.
Before diving in, always start with a strand test. This involves bleaching a small, hidden section of the extensions to gauge how they react. Apply the bleach mixture and check the strand every 5–10 minutes. If the hair shows signs of brittleness, uneven colouring, or degradation within 15 minutes, it's a clear sign to stop.
Finally, virgin or lightly processed human hair is your best bet for predictable and even bleaching results. Extensions that haven't undergone excessive treatments lift colour more consistently. On the other hand, hair with damaged or stripped cuticles may absorb bleach unevenly, leading to patchy tones and a higher risk of breakage.
Tools and Products You'll Need
Getting the right tools and products is key to safe and effective bleaching. The proper setup ensures better results and minimises the risk of damage, while poor choices can lead to uneven colour or even harm your extensions.
Required Tools
Start with a plastic mixing bowl - never use metal, as it can react with bleach and reduce its effectiveness. You'll also need tinting or applicator brushes to apply the bleach evenly, focusing on the ends and mid-shaft. Sectioning clips are essential to keep hair neat and ensure every strand gets treated.
For detangling and sectioning, consider the Hair Wonderland Tangle Tamer Brush (AU$21.95) and Styling Comb (AU$12.95). These tools are specifically designed for chemically treated hair, which is crucial because bleached extensions are more prone to breakage.
Don’t forget protective gloves to shield your hands and aluminium foil or cling wrap to maintain heat during processing. Keep towels handy to protect your workspace from spills or stains.
When it comes to the bleach itself, professional-quality powder bleach is non-negotiable. Lauren McCowan, Creative Director for Cloud Nine and Evo, emphasises:
Invest in a good quality [bleach powder], as compromising on this could yield disastrous results! I would recommend one that is blue or purple in colour as it will reduce brassiness.
Pair this with a 20 volume developer for controlled lightening. It’s strong enough to lift colour effectively without being overly harsh. Sydney hairstylist Brad Ngata cautions:
Bleach can damage the hair if the process is not done correctly and the right steps aren't taken to protect the hair.
Once the bleaching process is complete, the focus shifts to aftercare to restore moisture and keep your extensions in great condition.
Aftercare Products
Bleaching strips extensions of moisture, so restoring hydration is a must. Use sulfate-free shampoos and deep conditioners to gently cleanse and replenish moisture. Follow up with hydrating hair masks to repair dryness caused by bleach, and include a protein treatment to strengthen the hair's internal structure.
To neutralise any unwanted yellow or orange tones, apply a toner. Purple or violet toners are great for yellow tones, while blue toners work on orange hues. This step helps refine the colour, leaving a polished and professional finish.
Finally, proper storage is essential for maintaining bleached extensions. The Hair Wonderland Clip In Bag (AU$54.00) is perfect for keeping extensions detangled and protected. Bleached extensions are more prone to tangling and matting since they lack natural oils from the scalp, so storing them correctly helps extend their lifespan and keeps them looking their best.
How to Bleach Hair Extensions: Step-by-Step
Step-by-Step Guide to Bleaching Hair Extensions Safely
Preparing and Detangling Your Extensions
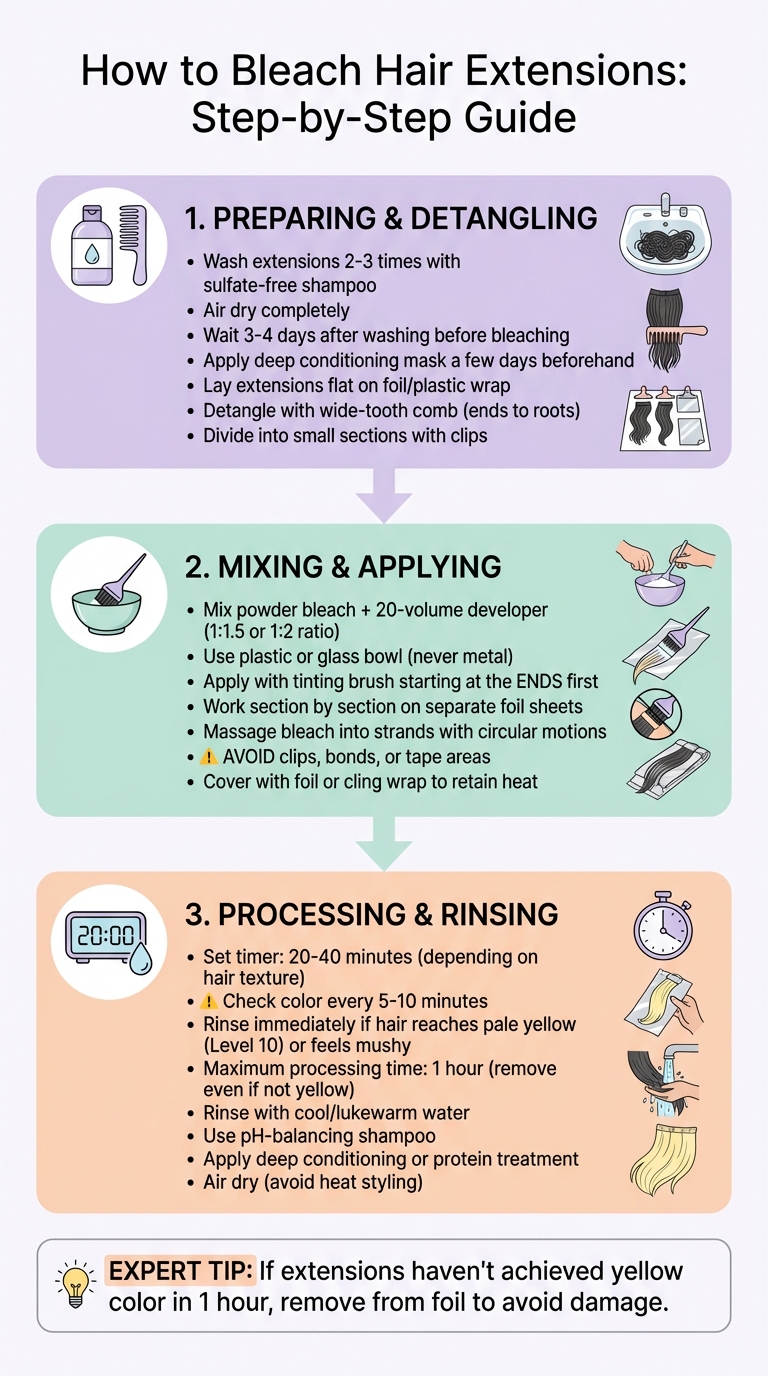
Start by washing your extensions 2–3 times with a sulfate-free shampoo to remove any buildup, oils, or sprays. Allow them to air dry completely - bleaching damp extensions can lead to uneven results. Ideally, wait 3 to 4 days after washing before bleaching, and use a deep conditioning mask a few days beforehand to help fortify the hair against chemical stress. Keep in mind that extensions lack natural oils, making them more prone to damage from over-processing.
Lay the extensions flat on a surface covered with aluminium foil or plastic wrap to protect your workspace. Use a wide-tooth comb, like the Hair Wonderland Styling Comb, to gently detangle from the ends to the roots. Divide the hair into small, manageable sections with clips to ensure even bleach application. Once sectioned, you’re ready to mix the bleach.
Mixing and Applying the Bleach
Combine powder bleach with a 20-volume developer in a plastic or glass bowl, using a ratio of 1:1.5 or 1:2. The mixture should be smooth and fluid for easy application but thick enough to stick to the hair. Using a tinting brush, start applying the bleach at the ends of the hair and work your way up towards the roots. Since the ends are older and more porous, they need the most processing time. Work section by section on separate foil sheets, massaging the bleach into the strands with circular motions to ensure full coverage. Be cautious to avoid applying bleach to clips, bonds, or tape areas, as this can damage the adhesive. Once applied, cover the extensions with foil or cling wrap to retain heat, and move on to the processing stage.
Processing Time and Rinsing
Keep a close eye on the processing to protect the hair's condition. Set a timer for 20 to 40 minutes, depending on the texture of the hair. Check the colour every 5 to 10 minutes by lifting the foil. If the extensions reach a pale yellow shade (Level 10) or start to feel mushy, rinse them immediately. Master Stylist Jasmin Todd advises:
If they haven't achieved a yellow colour in 1 hour, remove them from the foil anyway to avoid significant damage from over-processing.
Rinse the extensions thoroughly with cool or lukewarm water to help close the cuticles and remove all traces of bleach. Follow up with a pH-balancing shampoo to stop the bleaching reaction, then apply a deep conditioning or protein treatment to restore moisture and strength. Allow the extensions to air dry and avoid heat styling to minimise further damage. This step is crucial for preparing the extensions for post-bleach care.
Caring for Bleached Hair Extensions
Daily Care Routine
Bleached hair extensions require extra attention to keep them looking their best. Since these extensions lack natural scalp oils, they tend to dry out more quickly. To maintain their health, only wash them when they appear dirty - usually once a week or after 10 to 12 wears. Use lukewarm water and a sulfate-free shampoo, as hot water can make the hair brittle. Follow up with conditioner and deep treatments, focusing on the mid-lengths and ends to protect bonds or tapes. To keep the colour vibrant, especially for cool tones, add a purple shampoo to your routine to counteract yellowing.
For daily hydration, apply a few drops of argan or jojoba oil to the ends. If you use heat styling tools, always apply a heat protectant first, though air drying is the gentlest option. Brush your extensions several times a day with a wide-tooth comb or the Hair Wonderland Styling Comb, starting from the ends and working your way up to avoid breakage. Before bed, make sure the extensions are completely dry, then braid them loosely to prevent tangling while you sleep.
Proper Storage Methods
Good storage habits are just as important as daily care. Begin by detangling the extensions without damage and ensuring all clips are securely closed. Always make sure they are completely dry before storing to prevent mould or mildew. Keep them in a cool, dry place away from direct sunlight to avoid fading or UV damage. The Hair Wonderland Clip In Bag (AU$54.00) is an excellent choice to protect against dust and tangling. Opt for breathable materials like silk or satin for storage, and steer clear of plastic bags, which can trap moisture and cause static.
For long-term storage, especially if it’s longer than three months, wrap the extensions in acid-free tissue paper and store them in an airtight container. In humid environments, include silica desiccant packets in the container to absorb any excess moisture. These steps will help ensure your extensions stay in top condition, ready to use whenever you need them.
Conclusion
Safe bleaching starts with using high-quality 100% human hair, the right tools, and following a precise method. It's important to note that bleaching should only be done on Remy or virgin hair. The aligned cuticles in premium extensions, like those from Hair Wonderland, ensure even colour absorption and minimise the chances of brassy or uneven results.
Before diving in, always do a quick strand test to see how the extensions will respond:
"A strand test is crucial to determine how the hair extensions will react to the bleach." – Lisa, SISHAIR
Bleaching requires careful attention to detail. Stick to the recommended ratios and tools to avoid unexpected chemical reactions, and check the progress every 5 to 10 minutes to prevent over-processing.
Aftercare plays a big role in maintaining bleached extensions. Deep conditioning immediately after bleaching helps replenish lost moisture. Using sulphate-free shampoos and weekly hydrating treatments keeps the hair soft and manageable. Storing your extensions properly - like in a breathable bag such as the Hair Wonderland Clip In Bag (AU$54.00) - protects them from dust, tangling, and damage when they’re not in use. This is especially important when managing humidity and dry air storage to prevent environmental damage. With the right care, you can maintain the quality and longevity of your bleached extensions.
FAQs
Can I bleach already-coloured extensions?
It’s usually not a good idea to bleach extensions that have already been dyed. Bleaching can make the hair weaker and reduce its overall quality, especially if the extensions have gone through a colouring process before. If bleaching is absolutely required, it’s best to leave it to a professional who knows how to handle dyed extensions carefully to reduce the risk of damage.
Why did my extensions go brassy or patchy?
Brassiness or uneven tones in hair extensions can happen for several reasons, including chemical reactions or environmental exposure. Chlorine, minerals in water, UV rays, and even certain sunscreen ingredients can affect the pigments in extensions, particularly lighter shades. Additionally, overprocessing or improper bleaching can strip pigments, leading to patchy or inconsistent colouring.
To help prevent these issues, steer clear of harsh chemicals, limit sun exposure, and consider using toners or colour-correcting products to maintain a balanced tone.
How do I fix extensions that feel dry after bleaching?
To bring back moisture to extensions after bleaching, focus on deep conditioning treatments and natural oils. Treat your extensions with a deep conditioner, just like you would with natural hair, to boost softness and hydration. Natural oils, like argan or coconut oil, can also work wonders in restoring moisture and improving texture.
Be mindful of heat styling - too much can worsen dryness. Instead, stick to gentle detangling products to avoid causing additional damage. Consistent care with conditioning treatments and oils will keep your extensions feeling soft and looking their best.