

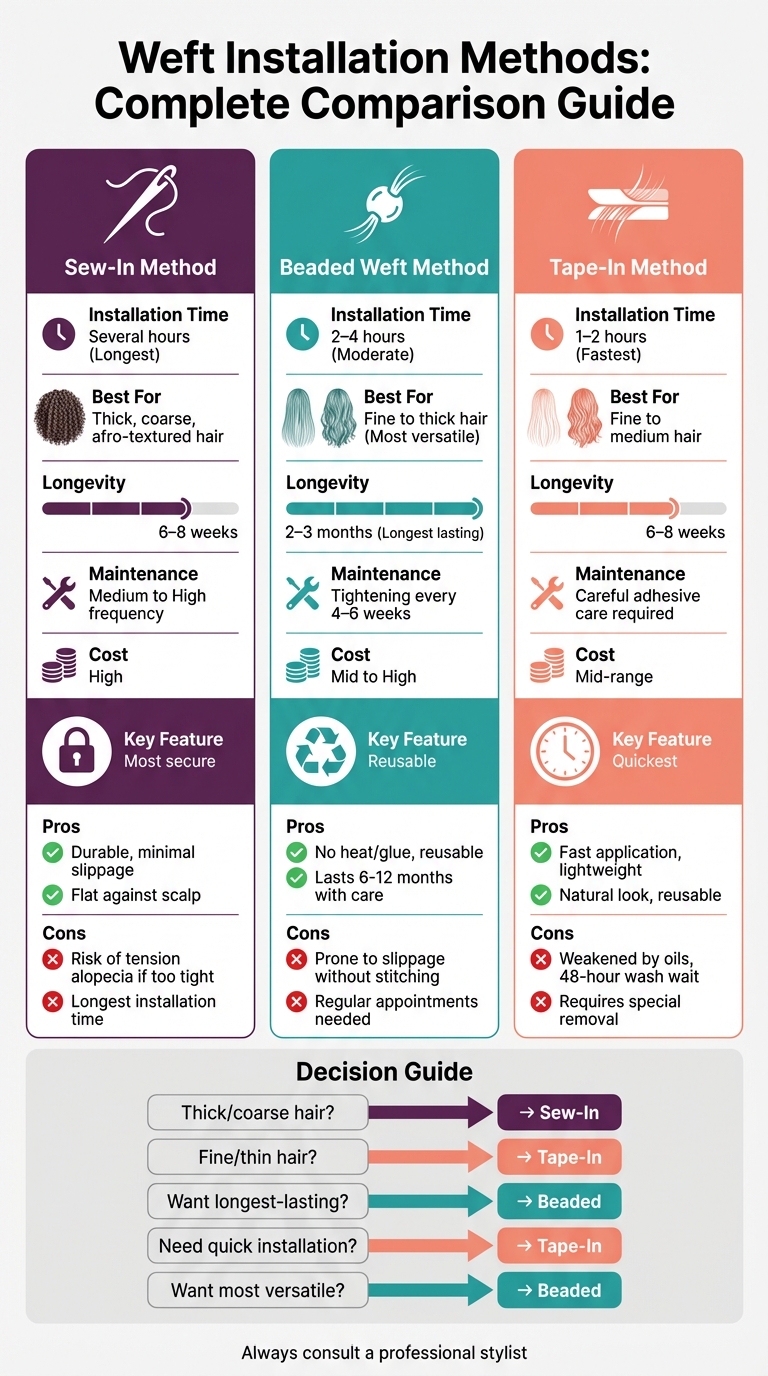
Weft hair extensions are a popular choice for adding length, volume, and thickness to your hair. There are three main methods to install them:
- Sew-In: Extensions are stitched into your hair using a needle and thread. Ideal for thicker hair, this method is durable but requires careful tension management to avoid damage.
- Beaded: Silicone-lined beads secure the wefts without glue or heat. Works best for medium to thick hair, but regular maintenance is needed to prevent slippage.
- Tape-In: Extensions are attached with adhesive strips, "sandwiching" your natural hair. Best for fine to medium hair, these are lightweight and quick to apply but need careful upkeep to maintain the adhesive.
Quick Comparison:
| Method | Best For | Installation Time | Longevity | Maintenance Frequency |
|---|---|---|---|---|
| Sew-In | Thick, coarse hair | Several hours | 6–8 weeks | Medium to High |
| Beaded | Medium to thick | 2–4 hours | 2–3 months | Every 4–6 weeks |
| Tape-In | Fine to medium | 1–2 hours | 6–8 weeks | Adhesive care |
Choosing the right method depends on your hair type, lifestyle, and how much time you can dedicate to maintenance. Always consult a professional stylist to ensure a safe installation and blend extensions with natural hair seamlessly.
Weft Hair Extension Installation Methods Comparison Chart
1. Sew-In Weft Installation
Installation Process
Sew-in weft installation involves attaching hair extensions to your natural hair using a needle and thread. The process starts with your stylist preparing your hair - cleaning, drying, and detangling it - before parting it horizontally about 2.5 centimetres above the nape of your neck.
To create a secure base, a thin section of hair is released, and the roots are backcombed with a tail comb. From there, the stylist threads a needle and stitches through both the weft and the backcombed section using a basic sewing technique. Once all the wefts are in place, they are blended with your natural hair using heat styling tools for a seamless finish.
Many modern salons now use a hybrid method that combines beads and sewing. Small beads are first applied as anchors, followed by stitching the weft in place. This approach results in a flatter, more comfortable installation compared to the older French braid method.
"Our method combines the security of beads with the durability of sewing, creating a balanced approach that doesn't tug or pull on your natural hair." - LDL International
This hybrid technique not only secures the wefts effectively but also adapts well to different hair types.
Best Suited Hair Types
The hybrid beaded-sewn method is particularly suitable for fine or fragile hair, as it evenly distributes tension across the scalp. It’s also a great choice for individuals with thinning hair.
"My hair is thinning and fine and their extensions remain flat and discreet, even without a lot of my own hair." - Rachel Lewis
While the standard sew-in technique works for most hair types, it’s essential to backcomb the roots correctly to ensure a sturdy base. Traditional French braid sew-ins, once a go-to for thick or coarse hair, are now less popular due to their bulkiness and the potential risk of tension alopecia if installed too tightly.
Advantages
Sew-in wefts are known for their durability and secure attachment. The stitching helps minimise slippage compared to bead-only methods, making them a long-lasting option. With proper care - like using sulphate-free shampoos, applying heat protectants, and avoiding sleeping with wet extensions - these wefts can last for several months. They also sit flat and discreet against the scalp, even if you have minimal natural hair.
Disadvantages
One major concern with sew-in wefts is the risk of tension alopecia if the base is installed too tightly. LDL International warns:
"When installed too tightly, it [French Braid method] may pull on the hair at the braid's edges, leading to tension alopecia over time."
This underscores the importance of seeking a professional stylist for installation and scheduling regular check-ups to ensure both the wefts and your natural hair remain in good condition.
sbb-itb-dcde78e
2. Beaded Weft Installation
Installation Process
Beaded weft installation involves attaching extensions to your natural hair using silicone-lined beads - no heat or glue required. The process begins with clean, dry hair. Your stylist parts the hair horizontally near the nape and threads small sections of your natural hair through the beads. These beads are then clamped securely, allowing for natural hair movement. Once the beads are in place, the hair weft is measured to fit your head, trimmed slightly shorter than your head's width, and positioned just above the beads. A hybrid technique combining beads and minimal stitching is often used to enhance stability. This careful approach ensures the extensions stay secure and comfortable, making it a versatile option for different hair types.
Best Suited Hair Types
Beaded wefts work best for medium to thick hair, as these hair types provide the strength needed to hold the beads securely. For those with fine or fragile hair, the standard beaded method may create too much tension or be prone to slipping. However, a custom hybrid method that balances weight distribution with gentle stitching can be a better fit, reducing strain on delicate hair. This technique is especially popular for clients looking to add significant volume and length. Its flexible design also allows for a variety of hairstyles, including ponytails and braids.
Advantages
One of the standout benefits of beaded wefts is their reusable nature. Since the wefts aren't damaged during removal, they can be reinstalled multiple times, making this method a budget-friendly long-term option. With proper care, the extensions can last anywhere between six and twelve months. The installation process is relatively quick, taking about 1–2 hours, and it avoids the use of chemicals, adhesives, or heat, which appeals to those wanting to reduce potential hair damage. However, regular maintenance is key to keeping both the extensions and your scalp in good condition.
Disadvantages
One potential downside is the risk of slippage, especially if the weft is attached using beads alone without stitching. As LDL International explains:
"While quick and convenient, [the bead-only] method often skips sewing the weft into place, making it prone to slippage."
Maintenance appointments are required every four to eight weeks to adjust the extensions as your natural hair grows. Over-tightened beads or excessive weight can lead to tension alopecia if not addressed properly. Additionally, using heavy oils or conditioners near the beads can cause the extensions to slide down the hair shaft. To prevent tangling and maintain the extensions, daily brushing with an extension-safe loop brush and loosely braiding your hair before bed are recommended.
3. Tape-In Weft Installation
Installation Process
Tape-in extensions provide a lightweight and speedy option compared to sew-in and beaded methods. These extensions work by "sandwiching" a thin section of your natural hair between two adhesive strips. To start, your hair must be freshly washed and dried, with no conditioners or oils, to ensure the adhesive sticks properly. The stylist will part your hair horizontally about 2.5 cm above the nape, peel off the tape backing, and place the weft underneath a small section of hair, roughly 0.6 cm from the root. A second tape weft is then pressed on top, securing the hair between the strips. A brief press with low heat may be used to strengthen the bond. The entire process typically takes less than an hour to complete. For the adhesive to fully set, avoid washing your hair for at least 48 hours after installation.
Best Suited Hair Types
Tape-in extensions are versatile and suit most hair types but are especially ideal for fine or thin hair. The slim wefts lie flat against the scalp, creating a discreet and natural look while reducing strain on the hair. For those with very fine or slippery hair, stylists may tease the roots slightly at the application points to provide a better grip and reduce the chance of slippage. The wider adhesive strips help distribute weight evenly, making tape-ins a popular choice for Australians who want a natural finish without added tension on their scalp.
Advantages
Tape-in extensions offer several benefits, starting with their quick installation process. They’re reusable, meaning they can be removed, re-taped, and reapplied with proper care. The slim, flat wefts create a seamless and natural appearance, while their lightweight design makes them comfortable - even for those with sensitive scalps. Since this method doesn’t typically rely on high heat and distributes weight evenly, it’s less likely to cause tension-related damage. Additionally, arranging the wefts in a staggered pattern enhances the natural flow and look of the hair.
Disadvantages
The adhesive used in tape-ins can be weakened by oils, so maintaining them requires careful attention. Use sulphate- and silicone-free shampoos and avoid applying conditioner near the tape bonds. Post-installation, avoid washing your hair for 48 hours to ensure the adhesive sets properly. Removal requires a specialised adhesive remover - usually oil or alcohol-based - to break down the bond without damaging your natural hair. To protect the bonds during exercise, wearing a headband can help keep sweat away, and rinsing your scalp afterwards can prevent build-up. Regular maintenance every six to eight weeks is necessary as your natural hair grows. While tape-ins are convenient and subtle, they do require consistent upkeep to maintain their appearance and effectiveness.
The Easiest Way to DIY Install Weft Hair Extensions. Beginner Friendly
Method Comparison
Here's a closer look at how different weft installation methods stack up in practice.
The best installation method for you depends on two key factors: your natural hair type and how much time you can spend at the salon. Tape-in wefts are the quickest to apply, requiring just one to two hours. Sew-in installations, on the other hand, take much longer due to the intricate braiding and stitching involved, often lasting several hours. Beaded wefts sit in the middle, taking about two to four hours depending on how much coverage you want.
Hair type also plays a big role in selecting the right method. Sew-ins are perfect for thick, coarse, or afro-textured hair that can handle the tension from tight braids. In contrast, tape-ins are ideal for fine to medium hair, as they lie flat against the scalp, creating a smooth, natural look without bumps. Beaded wefts are a flexible option - classic versions work well for medium to thick hair, while ultra-thin variants suit finer hair types.
| Method | Installation Time | Best Hair Type | Longevity | Maintenance Frequency | Cost Range |
|---|---|---|---|---|---|
| Sew-In | Several hours (Longest) | Thick, coarse, afro-textured | 6–8 weeks | Medium to High | High |
| Beaded Weft | 2–4 hours (Moderate) | Fine to thick (versatile) | 2–3 months | Tightening every 4–6 weeks | Mid to High |
| Tape-In | 1–2 hours (Fastest) | Fine to medium | 6–8 weeks | Adhesive care | Mid-range |
When it comes to longevity, beaded wefts tend to last the longest, staying in place for two to three months before needing a full reinstallation. However, they do require maintenance every four to six weeks to tighten the beads. Both sew-ins and tape-ins need repositioning every six to eight weeks. With proper professional care, high-quality Remy human hair wefts can be reused for nine to twelve months.
Costs vary widely across methods. Sew-ins tend to be the most expensive upfront due to the labour-intensive process and longer salon time. Meanwhile, tape-ins and beaded wefts fall into the mid-range price bracket, though costs for beaded installations can climb depending on the complexity of the application.
Conclusion
Choosing the right method depends on your hair type, lifestyle, and maintenance preferences. Sew-in wefts work well for thick hair but require a longer installation process and careful tension management. Beaded wefts are adaptable to various hair types but need regular tightening appointments. Tape-in wefts are the quickest to install and are ideal for fine to medium hair, though they require careful adhesive upkeep.
It's important to strike a balance between secure installation and maintaining your hair's health. Mistakes in application can lead to issues like slippage, tension discomfort, or even long-term damage. For the best results, consult an experienced stylist who can evaluate your scalp condition, natural hair texture, and daily habits to recommend the most suitable method for you.
Investing in high-quality human hair wefts can make a big difference. Premium wefts with tight, neat stitching minimise shedding and can last up to a year with proper care and a consistent daily care routine. Hair Wonderland offers double-drawn Russian and Mongolian human hair extensions, valued for their natural look and durability. These extensions are a go-to choice for salons across Australia due to their transformative results.
FAQs
What is the least damaging weft method for fine hair?
The sew-in method is a gentler option for fine hair as it spreads tension evenly across the scalp. By minimising stress on individual strands, this approach helps protect and maintain overall hair health.
How do I stop beaded wefts from slipping?
To keep beaded wefts from slipping, it's important to focus on both installation and upkeep. Start by ensuring the hair is thoroughly cleaned and clarified before applying the extensions - this helps create a solid base. Use high-quality extensions and avoid applying oils or conditioners near the beads, as these can loosen their hold. Regular maintenance every 6–8 weeks is essential, and securing the beads properly during application will go a long way in reducing slippage.
What hair products can weaken tape-in adhesive?
Products such as oils, silicones, and leftover conditioners can weaken the adhesive bonds of tape-in extensions. To keep the bonds secure, avoid using these products near the tapes. It's also important to thoroughly cleanse the hair before installation to ensure the tapes adhere properly.