

Removing hair extensions incorrectly can lead to breakage, hair loss, or scalp irritation. The key is to use the right tools and techniques specific to the type of extensions you’re removing. Here’s a quick guide:
- Clip-Ins: Unclip gently without pulling at the scalp. Support your roots while sliding them out.
- Tape-Ins: Use adhesive removers or oils to soften the bond. Avoid tugging; let the remover work.
- Beaded Wefts: Use pliers to open rings, or scissors for threads, ensuring no tension on your natural hair.
- Keratin Bonds: Apply bond remover or oil, then crimp bonds with pliers to loosen them.
Tools You’ll Need:
- Bead removal pliers for rings.
- Adhesive removers or natural oils for tapes.
- Precision scissors for sewn-in wefts.
- Wide-tooth comb or extension-safe brush for detangling.
Post-Removal Care:
- Cleanse with clarifying shampoo to remove residue.
- Rehydrate with deep conditioning or hair masks.
- Allow your scalp to rest for at least two weeks before reapplying extensions.
Patience and proper technique are essential. If you encounter resistance, stop and seek professional help to avoid damage. Follow these steps to protect your hair and maintain the quality of your extensions.
how to remove tape-in hair extensions
Tools and Products You Need for Safe Removal
Hair Extension Removal Tools Comparison Guide
The right tools can mean the difference between a smooth extension removal process and one that risks damaging your natural hair. While the specific items you’ll need depend on the type of extensions you’re removing, there are a few essentials that apply across the board.
Required Tools and Products
Start with mechanical tools. Bead removal pliers are a must if you’re dealing with micro rings, nano rings, or keratin bonds. These pliers are designed to open beads without pulling on your natural hair. For sewn-in or weft extensions, precision or needle-nose scissors are necessary to cut threads cleanly - just be cautious to avoid snipping your natural hair.
Chemical removers are key for dissolving bonds. Adhesive removers are perfect for tape-ins, while bond removers work well for keratin extensions. If you prefer a gentler option, natural oils like coconut, olive, almond, or baby oil can break down adhesives. Keep in mind, though, that oils need at least 15 minutes to work effectively.
Organisation and detangling tools make the process easier. Sectioning clips, like alligator clips, help keep your hair tidy and prevent tangling during removal. A pintail comb is great for precision work and for scraping away adhesive residue, while a wide-tooth comb or an extension-safe brush gently detangles hair without causing breakage. For example, Hair Wonderland’s Tangle Tamer Brush (AUD $21.95) is designed to ease post-removal tangles, and their Removal Solution (AUD $54.00) dissolves adhesives effectively.
Post-removal care products are essential for restoring your hair’s health after the removal process. Clarifying shampoos can help remove any leftover residue, while deep conditioners and hair masks replenish moisture and nutrients - an important step to keep your hair healthy after wearing extensions.
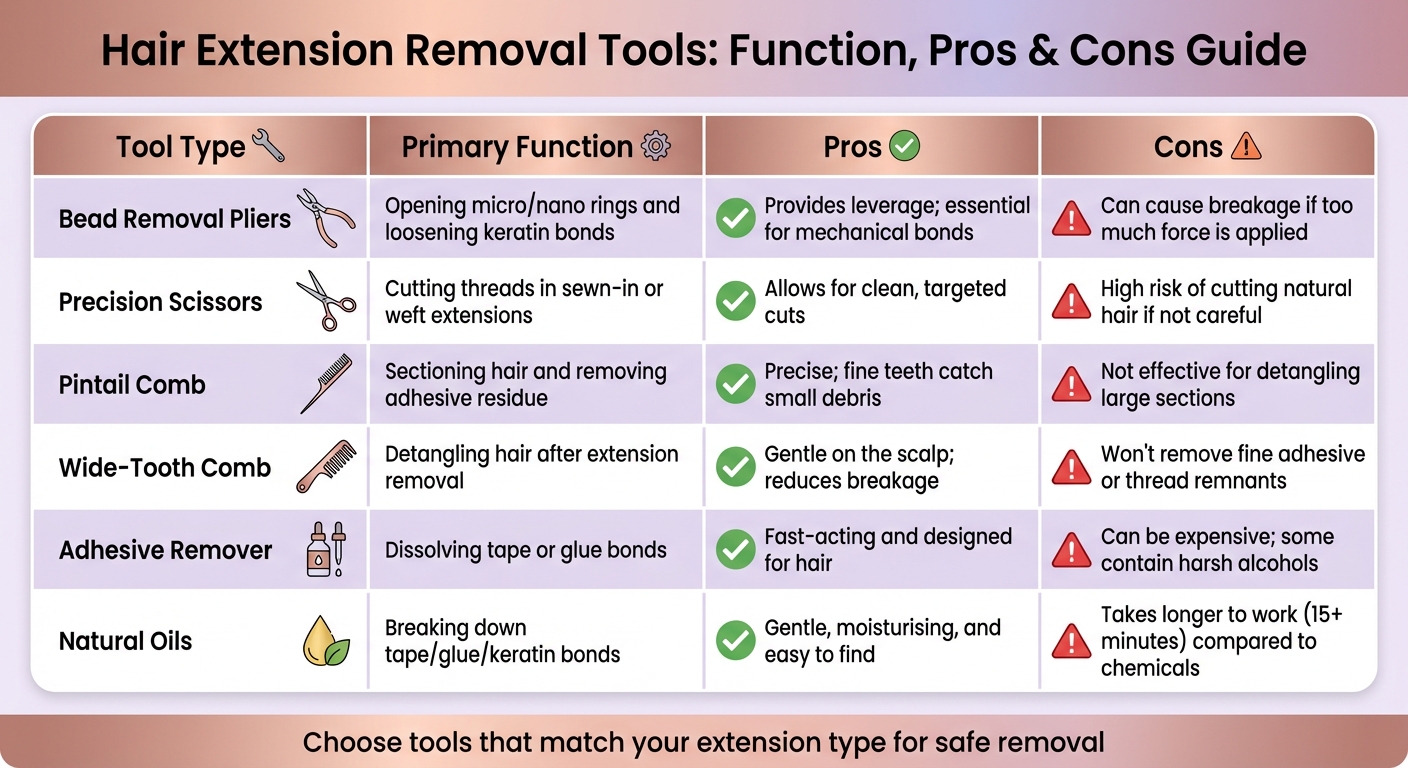
Below is a quick reference guide comparing the functions, benefits, and drawbacks of each tool.
Tool Comparison by Function
| Tool Type | Primary Function | Pros | Cons |
|---|---|---|---|
| Bead Removal Pliers | Opening micro/nano rings and loosening keratin bonds | Provides leverage; essential for mechanical bonds | Can cause breakage if too much force is applied |
| Precision Scissors | Cutting threads in sewn-in or weft extensions | Allows for clean, targeted cuts | High risk of cutting natural hair if not careful |
| Pintail Comb | Sectioning hair and removing adhesive residue | Precise; fine teeth catch small debris | Not effective for detangling large sections |
| Wide-Tooth Comb | Detangling hair after extension removal | Gentle on the scalp; reduces breakage | Won’t remove fine adhesive or thread remnants |
| Adhesive Remover | Dissolving tape or glue bonds | Fast-acting and designed for hair | Can be expensive; some contain harsh alcohols |
| Natural Oils | Breaking down tape/glue/keratin bonds | Gentle, moisturising, and easy to find | Takes longer to work (15+ minutes) compared to chemicals |
The key to a successful removal is using tools that match your extension type. As Invisible Bead Extensions advises:
"Improper hair extension removal can lead to damage, breakage, and unnecessary hair loss, a major concern for both stylists and clients".
How to Remove Hair Extensions Step-by-Step
Different types of hair extensions require specific removal techniques to ensure both the extensions and your natural hair stay in good condition.
Removing Clip-In Extensions
Start at the bottom by sectioning your hair at the crown and above the ears. Locate each clip and carefully release it without pulling or tugging. To open the clips, firmly press the sides rather than yanking them out.
As you remove each extension, support your roots by holding your natural hair close to the scalp with one hand while sliding the extension out with the other. This prevents unnecessary tension and reduces the risk of breakage. Once all the extensions are removed, use a wide-tooth comb to gently detangle your hair.
Brenda L. from Cliphair emphasises:
"Incorrectly removing human hair extensions can damage them and your own hair."
If a clip becomes tangled, dampen the area slightly with water or apply a leave-in conditioner to help it slide out more easily.
Removing Tape-In Extensions
Saturate the adhesive bonds with the appropriate remover. Start by sectioning your hair horizontally, beginning at the nape and working upwards, while clipping away the top layers. Apply adhesive remover or 91% isopropyl alcohol to each tape tab and let it sit for 15–20 seconds. If you’re using an oil-based remover, allow a few extra minutes for it to work.
Once the adhesive softens, gently wiggle the extension to loosen it and slide it down the hair shaft. Avoid pulling outward or upward, as this can damage your hair. If the tape is stubborn, use the end of a pintail comb to carefully separate it. For any remaining residue, apply a small amount of coconut, almond, or olive oil, and comb through the section gradually.
Stylist Anh Co Tran, Global Creative Director at Milbon, suggests:
"Well, they [can] use hand sanitizer [to remove the tape-ins]. It's like gold these days. Or rubbing alcohol".
After removing the extensions, rinse your hair with cold water to avoid melting any leftover adhesive, as hot water can make it harder to remove.
Removing Beaded Weft or Bonded Extensions
Removing beaded or bonded extensions requires extra care to avoid damaging your natural hair.
For beaded wefts, start by snipping the thread at each attachment point to release the extension. Then, use pliers to open the beads and slide them out. Once the extensions are removed, comb through your hair to clear any shed strands.
For keratin bonds, apply a keratin bond remover or natural oil to each bond and use pliers to crimp the bond until it weakens. As you remove each bond, support your roots by holding your hair close to the scalp while sliding the bond down. Removing a full head of bonded extensions can take over an hour, so patience is key.
Louise Jenkins, Education & Creative Manager at Great Lengths, cautions:
"If you pick or pull at old bonds, the hair that is still growing and attached can be put under unnecessary strain and, in the worst-case scenario, will come out".
To make the process smoother, brush your hair thoroughly - up to three times daily - before removal to ensure the bonds are well separated and easier to handle.
sbb-itb-dcde78e
Hair Care and Extension Storage After Removal
Caring for Your Natural Hair After Removal
After safely removing your extensions, taking care of your natural hair is a must for recovery and maintaining overall hair health. Start by gently running your fingers through your hair to remove any tangles and minimise breakage. Follow this with a double wash using a clarifying shampoo to get rid of adhesive residue, oils, or keratin remnants left by the extensions. After cleansing, treat your hair to a deep conditioner or nourishing mask, leaving it on for about 5–20 minutes to replenish moisture.
It's also important to give your scalp some breathing room before reapplying extensions. Allow at least two weeks for your roots to recover and regain strength. During this downtime, you might want to indulge in a soothing scalp massage or use a gentle exfoliant to stimulate your follicles and clear away any buildup.
Once your natural hair feels refreshed and healthy, you can turn your attention to storing your extensions properly.
How to Store Extensions Properly
Before storing your extensions, make sure they’re clean, dry, and free of tangles. For clip-in extensions, close all the clips to prevent them from snagging or tangling with other strands. Ensure they are completely air-dried to avoid issues like mould or unpleasant odours.
Choose a cool, dry place away from direct sunlight for storage. Opt for breathable materials rather than plastic to keep your extensions in good condition. A great option is the Hair Wonderland Clip In Bag ($54.00), which is specifically designed to keep extensions organised and dust-free. For extra care, loosely secure the base of the extensions with a silk scrunchie before placing them in the bag to prevent matting. When stored correctly, human hair extensions can last up to a year, staying in great shape for future use.
Tips to Prevent Damage During Removal
Best Practices for Safe Removal
To protect your natural hair during removal, patience and the right technique are essential. Always work in small sections, starting at the nape of your neck and gradually moving upward. Clip the top layers of your hair out of the way to expose each bond, making the process more manageable.
When removing extensions, support your roots by holding your hair firmly at the scalp with one hand while carefully sliding the extension out with the other. If you run into resistance, stop immediately to avoid causing damage.
Take your time - rushing the process can lead to unnecessary harm. If an extension feels stuck, apply more remover and give it time to work rather than forcing it. For tape-in extensions, ensure the adhesive tabs are fully saturated with remover. This allows you to gently wiggle them loose before peeling. Celebrity Hairdresser Patrick Wilson highlights the importance of this approach:
"To properly remove tape in extensions you will not need to pull them, this will cause damage. Simply continue to drench the tabs and add more remover and allow the remover to seep between the bonds."
This careful method reduces strain on your hair and helps prevent breakage.
After removing each extension, finger-detangle your hair to clear out shed strands and prevent tangles from forming. Always finger-detangle first before using a comb to avoid pulling and unnecessary damage.
If you experience pain, severe discomfort, or come across stubborn bonds or matting, stop immediately and seek help from a professional stylist. Forcing the removal can cause permanent damage to your hair follicles, which may require expensive treatments to repair.
Conclusion
Safe removal of hair extensions is all about using the right tools, applying proper techniques, and giving your hair the care it needs afterward to avoid damage, irritation, or hair loss.
Select tools specifically designed to break down bonds and open rings without straining your natural hair. Essentials include specialised adhesive removers, needle-nose pliers, and high-quality oils. As Madeleine Johnson, Hair Stylist & Hair Extensions Specialist, advises:
"Improper removal can result in significant hair loss or damage."
Technique matters just as much. Work in small sections, support your roots with one hand, and gently slide the extensions out with the other. Never force the process - if you feel resistance, apply more remover and give it time to work. A little shedding is normal during removal, but pulling can lead to unnecessary damage. Patience and precision are key to ensuring your hair stays healthy.
Once the extensions are out, your hair needs some TLC. Start with a clarifying shampoo to clear away any residue, then follow up with a deep conditioning treatment. It's also a good idea to let your scalp rest for at least two weeks before applying new extensions. This recovery period allows your roots and follicles to regain strength after the tension from the extensions.
Safe removal not only keeps your hair healthy but also helps maintain the quality of your extensions. Premium options, like those from Hair Wonderland (https://hairwonderland.com.au), can often be reused if removed carefully. Take your time, use the right products, and don’t hesitate to seek professional help if any bonds prove difficult to remove. By following these steps, you’ll protect your hair and get the most out of your extensions.
FAQs
What natural oils can I use to safely remove tape-in extensions?
To safely take out tape-in extensions without damaging your natural hair, you can rely on coconut oil, olive oil, or almond oil. These oils help break down the adhesive on the tape, making it much easier to remove the extensions. Coconut oil works particularly well thanks to its rich fatty acid content. Olive oil is another strong option, known for its moisturising effect, while almond oil’s lightweight texture makes it a gentle and effective choice.
If you're after something a bit different, argan oil is a fantastic alternative. It not only helps with removal but also leaves a lovely scent and adds shine to your hair. To use, apply a generous amount of your chosen oil directly onto the tape, let it sit for 10–15 minutes, and then gently massage the area while sliding the tape off.
Once the extensions are out, Hair Wonderland suggests washing your hair with a clarifying shampoo to remove any residue. Follow this with a nourishing conditioner to keep your natural hair healthy and hydrated, preparing it for your next set of extensions.
How long should I wait before reapplying hair extensions after taking them out?
It’s always wise to let your natural hair rest after taking out extensions to keep it healthy and strong. While there’s no hard-and-fast rule, giving it at least 1–2 weeks to recover can make a big difference. This break allows your scalp and hair to bounce back from the tension caused by wearing extensions.
During this downtime, prioritise giving your hair some TLC with hydrating treatments and gentle handling to restore moisture and strength.
If you’re unsure or notice any discomfort, it’s worth consulting a professional stylist. They can assess your hair’s condition and recommend the ideal time for reapplying extensions.
What should I do if my hair extensions feel stuck during removal?
If your extensions feel stuck, resist the urge to yank them out - this can harm your natural hair. Instead, follow these simple steps to remove them safely and gently.
Begin by applying a small amount of an oil-based remover or a specialised extension remover to the area. Let it sit for a few seconds to weaken the adhesive or loosen the bond. For micro-ring extensions, carefully open the ring with pliers and slide the extension out. Always work slowly and keep your movements parallel to your scalp to reduce tension on your hair.
After removing the extension, use a wide-tooth comb to gently detangle any knots. Finish with a nourishing hair mask or treatment to restore moisture and keep your hair in great condition. Taking your time and using the right tools can make all the difference in protecting your natural hair from damage.